Information Barriers in Microsoft 365 can be used to block (or allow) communication between groups of users and will apply to Teams, SharePoint and OneDrive. An example for a use case is a R&D department which may not communicate with the marketing department. The example used in this article is a multi-national company where users in the Netherlands are not allowed to communicate with users in Belgium because of high regulatory laws and requirements.
In this article, I will introduce you to Information Barriers in Microsoft Purview by walking you through setting up the backend and show you the impact it has on your users. Let’s go!
Setting the scene
For this demonstration, we are going to use the following employees in our fictional company:
- Allan Deyoung and Adele Vance, working in the Netherlands Office.
- Christie Cline and Megan Bowen, working in the Belgium Office.
When you want to implement Information Barriers in your environment, make sure to take your time planning the solution. First become familiair with all the possibilities, next make a design and finish by implementing it. Configuring Information Barriers may seem simple, but a lot of actions take time to take effect in your environment and behavior can be a bit flaky when you don’t wait for 24 hours after implementing your solution.
Information Barriers versioning
Information Barriers are available for quite some time now. However, it is only recently that Microsoft introduced some new features into Information Barriers and named this version “Information Barriers v2”. v2 was launched on March 6th 2023. So, If your tenant is created after this date, you have the option to use the v2 features. If your tenant is created before this date, you will have to wait for the option to migrate to v2, which is currently scheduled for July 2024. All information in this article is based on v1 and I will create an additional article about v2 which I’ll link here when it’s ready.
Pre-Information Barriers behavior

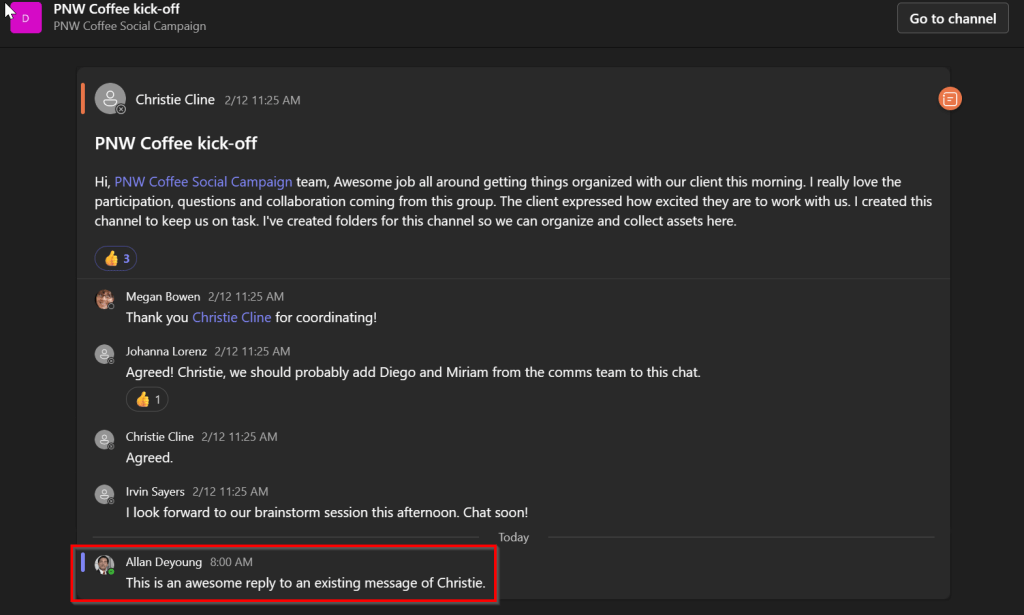
When there are no information barriers in place, users may communicate freely with other users in your Microsoft 365 tenant. In the example above, you can see that user Allan Deyoung can communicate with Christie Cline using Teams chat and reply to a post made by Christie in the “PNW Coffee kick-off” Team.
Setting up Information Barrier Basics – Segments
First, we are going to create segments. Segments are used to create a group of users based on a common property. In this example, I will use the property “Usage Location”. Other properties that can be used are for example Department, Street etc.
In the Microsoft Purview portal, navigate to Information Barriers, Segments and click “New Segment”.

First provide a segment name, for which I’ll use “Employees in the Netherlands”
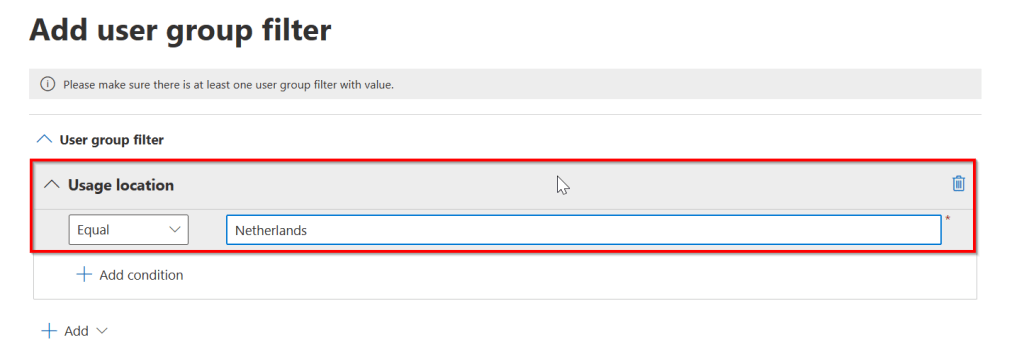
Next, create the group filter. Here I’ll use “Usage location” Equals “Netherlands”. This will form a group of all users in my tenant which have property usage location set to Netherlands.
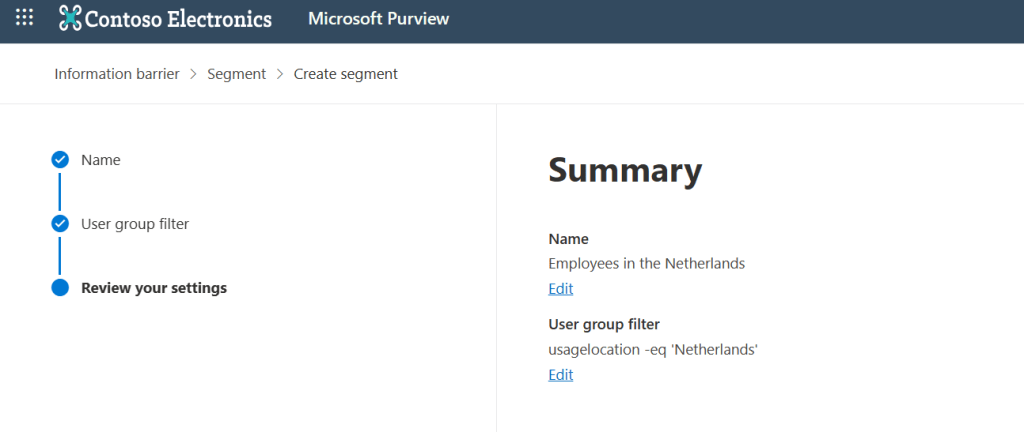
Review the summary and finish the wizard.
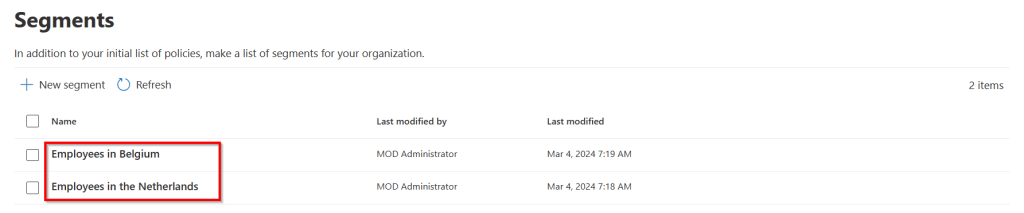
Create another segment using the same steps as before, however here I’ve changed the usage location to “Belgium”. Now I have 2 segments configured.
Note that information barrier segments have to be designed and configured in a way that all users are a member of only 1 segment. This limitation is removed in Information Barriers v2, but if you’re still using v1 and you’re adding users to multiple segments, applying your policies will fail.
Setting up Information Barrier Basics – Policies
Next, let’s configure policies. Policies are the glue between segments as you can choose to block or allow communication between segments with them. Under the information barriers section, click “Policies” and select “Create Policy”.
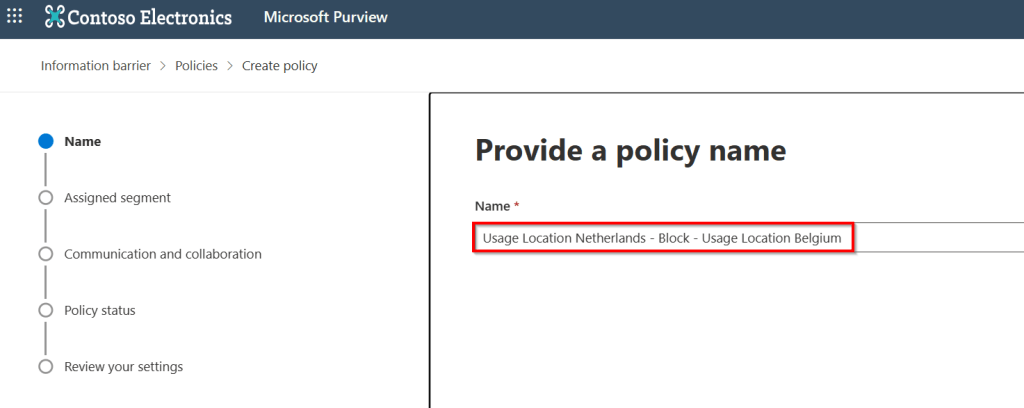
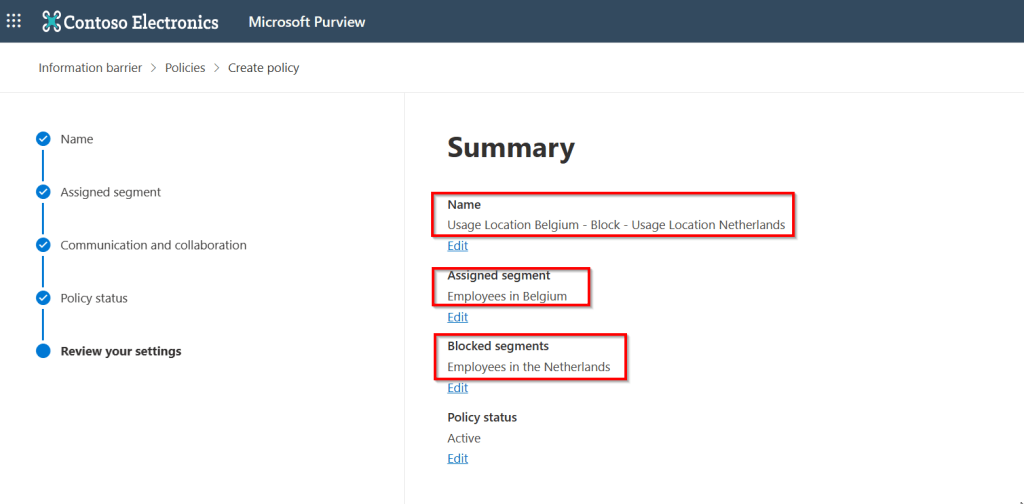
First, create a name for the policy. I chose to show the names of the segments that I’m going to use and the action (block).
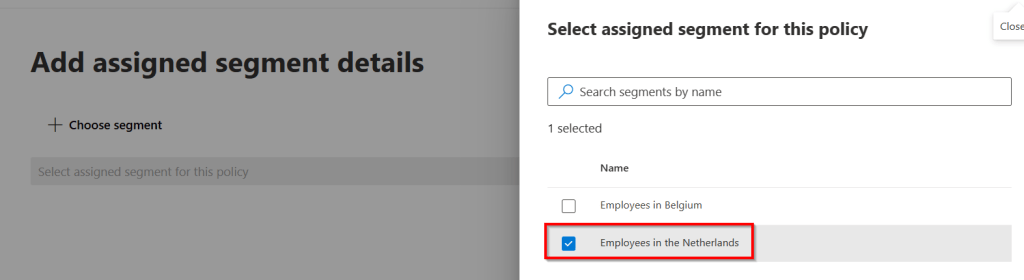
Next, assign the first segment, which is “Employees in the Netherlands” in this case.
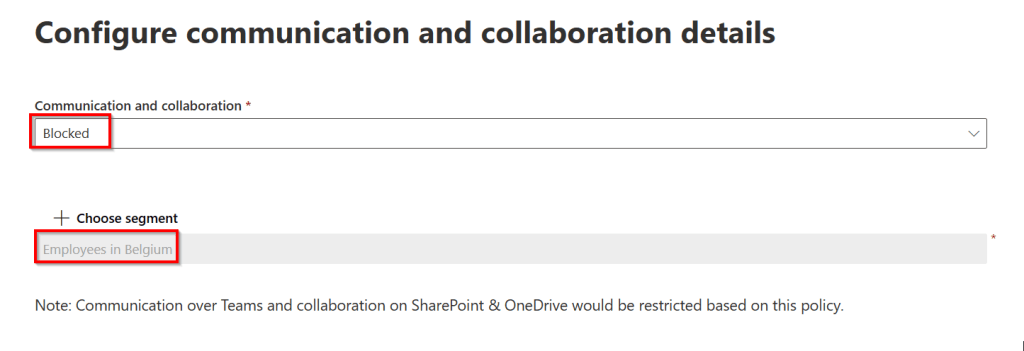
On the next page, select the action “Blocked” and choose the second segment which is “Employees in Belgium” in my case. Set the policy status to Active in the next step.
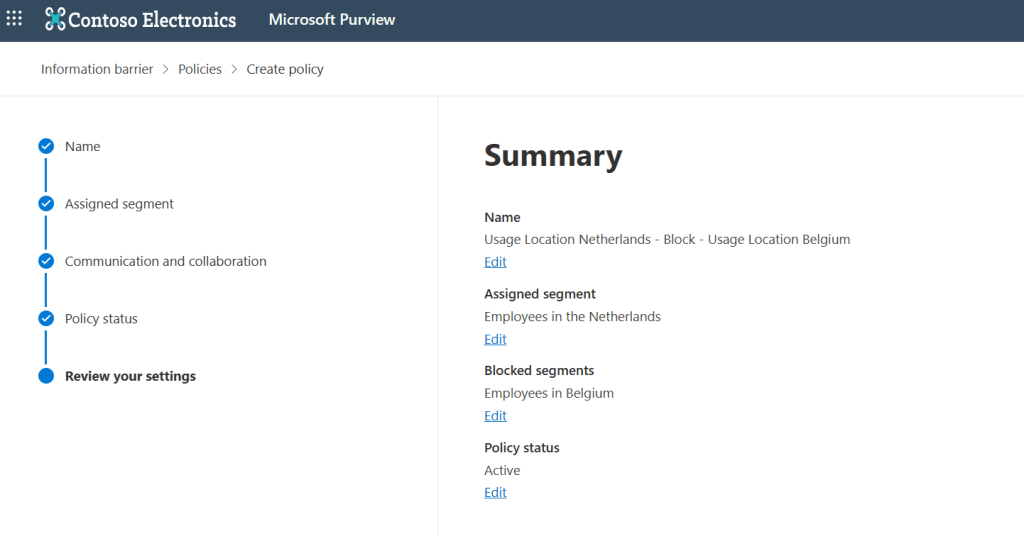
Review the summary and finish the wizard. Now the first policy is created. Now here comes the first catch. To be able to apply this policy, you should make the same policy in reverse. What I mean by this is that you also have to create a policy where users with usage location Belgium should block users with usage location Netherlands. This has to be done because 1-way communication blocks are not supported.
Here you see the second policy I’ve created.

And there we are, policy creation finished! ✔️
Setting Up Information Barrier Basics – Applying Policies
Now for the last step, we have to apply the policies we made.
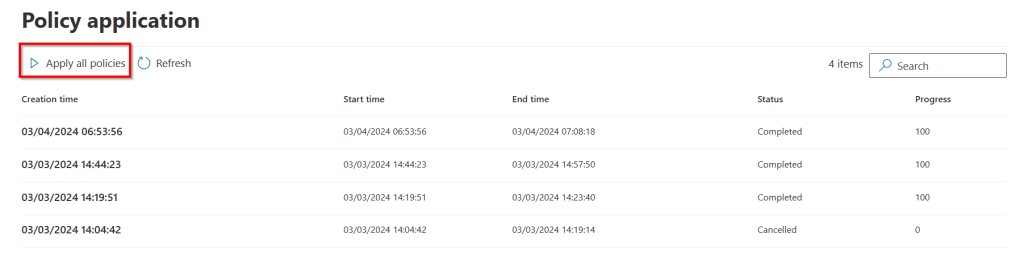
Navigate to “Policy application” under the Information Barriers section and press “Apply all policies”. The status will cycle through the phases NotStarted, ApplyInProgress, PendingCompletion and Completed. I would advise you to take your time and wait at least 24 hours after applying your policies to make sure they are distributed through your entire environment as otherwise your experience will not be consistent through the entire environment.
A quick note on editing and changing segments and policies. To put it simple, this cannot be done. When you want to remove a policy, keep in mind that you have to edit it first and set “Active” to off. If you want to remove a segment, first edit it’s filter so that it doesn’t include any users. If this doesn’t work, apply the policies again or wait a while longer. Still no juice? Check out the “Troubleshooting” section in the next article.
The user Experience – Teams
When taking a look at the user experience for teams I’ve created some examples. Let’s see what happens when Allen from the previous example wants to continue his 1 on 1 chat with Christie.
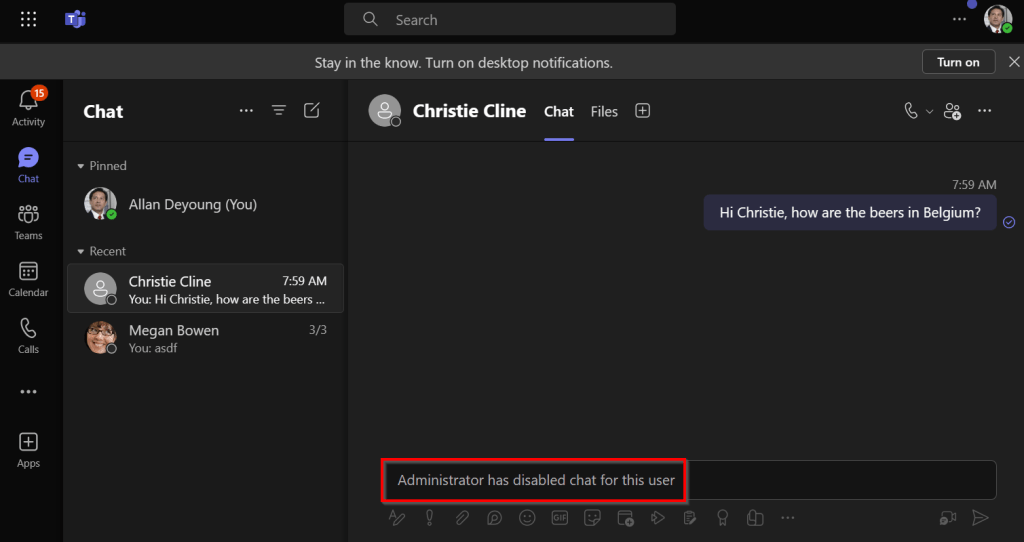
We receive a message that an “Administrator has disabled chat for this user”. This is ofcourse because both users are on different segments and we’ve blocked communication between these segments. Of course this works both ways, Christie is also not able to communicate with Allan anymore and Teams is displaying the same message in her Teams client.
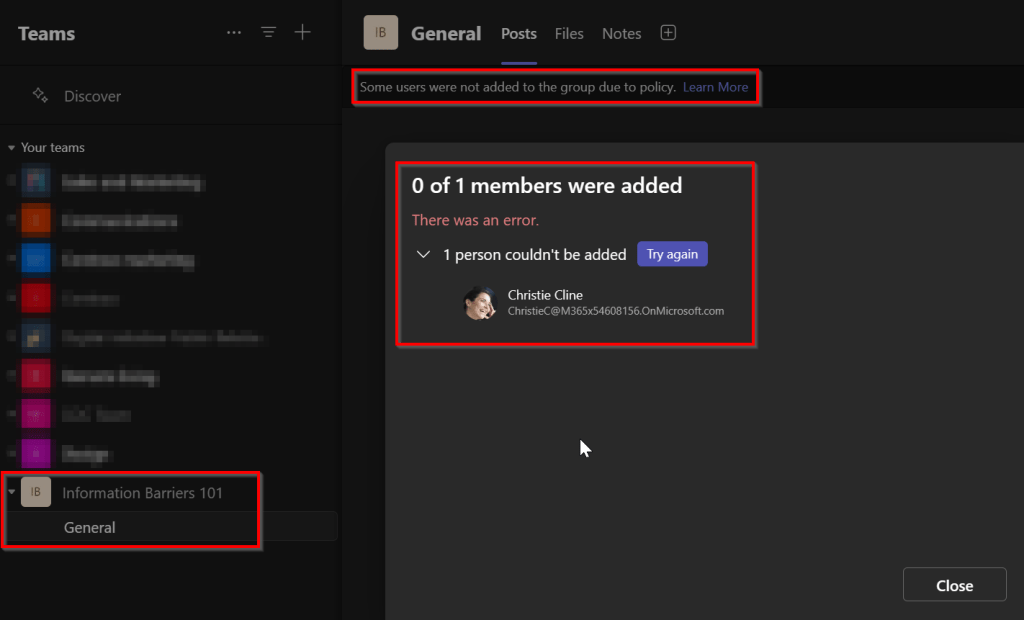
Let’s take a look at group chats. In this example Allan Deyoung creates a group chat with Adele Vance and Christie Cline.
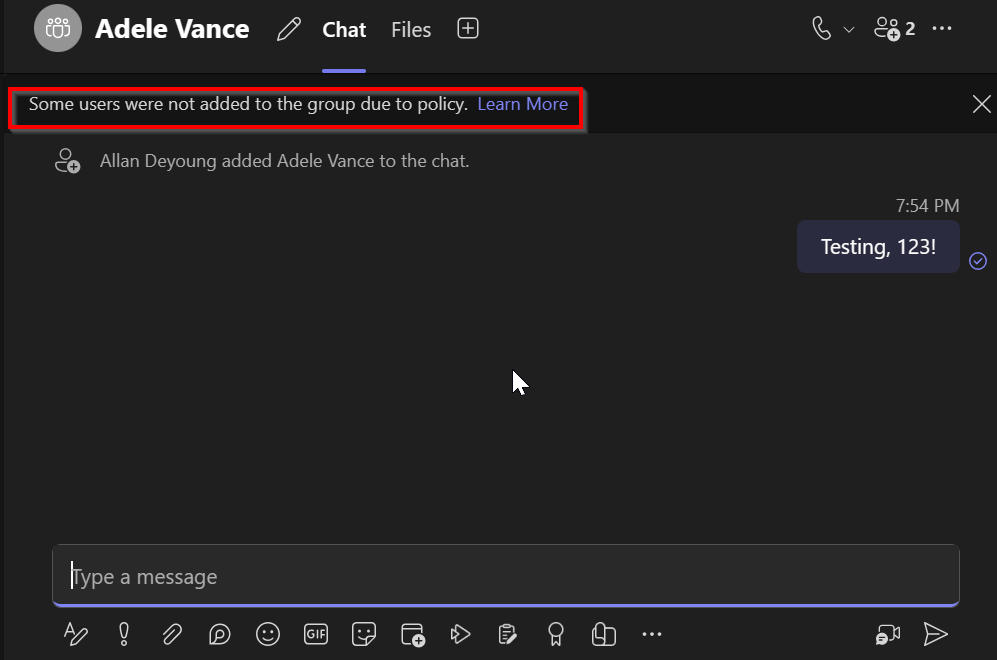
Allan is immediately notified that some users were not added to the group due to policy. In this case this would be Christie, since she’s in another segment to where communication is blocked.
Now onto Teams. Specifically the creation of a team. In this example Allen Deyoung create a public team and adds Christie to team.
Can you guess the outcome? Correct, Christie could not be added!
However, the behavior is different when the team is already created.
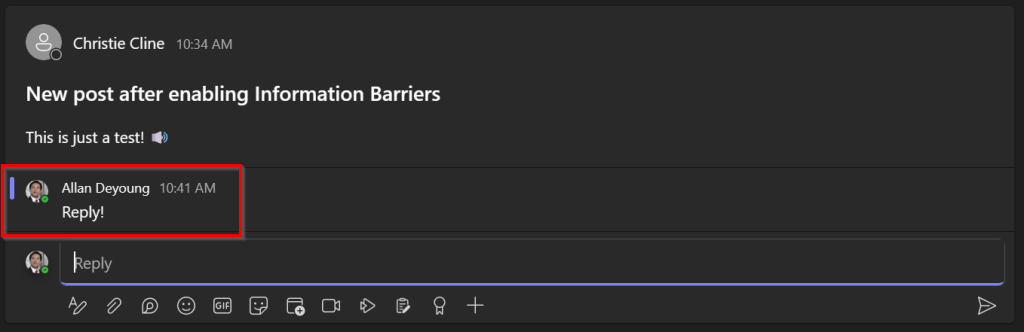
Even when Christie creates a new post in an existing team, Allan can still post a comment!
These are just some examples of what Information Barriers can do for you in Teams. Take a look at this Microsoft Learn article for more!
Setting up Information Barriers – Sharepoint Configuration
Microsoft Teams setup was reasonably quick and easy. SharePoint however needs some more work to get Information Barriers working.
For SharePoint (and also OneDrive) first install the SharePoint Online Management Shell by starting PowerShell 5 (included with Windows 11, unfortunately PowerShell 7 is not supported by the module at time of writing) and enter the following command:
Install-Module -Name Microsoft.Online.SharePoint.PowerShellWhen this is done load the module and connect to your SharePoint environment using the following cmdlets:
Import-Module Microsoft.Online.SharePoint.PowerShell
Connect-SPOService -Url https://YourSharePointURL-admin.sharepoint.com
Next, run the following cmdlet to lift the suspension from Information Barriers in SharePoint which enables it:
Set-SPOTenant -InformationBarriersSuspension $false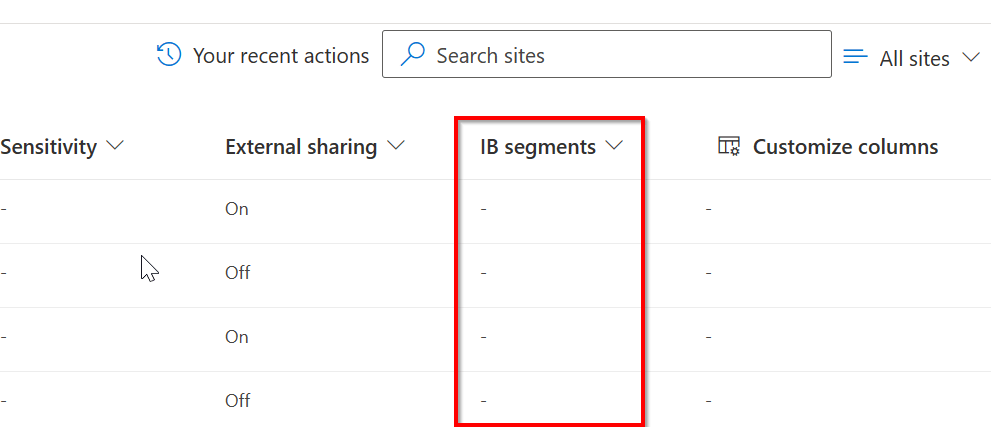
Now, Navigate to the SharePoint Online Admin Portal and click Active Sites. You should see a column named “IB Segments” as in the screenshot above. Information Barrier Segments are now enabled for your SharePoint sites.
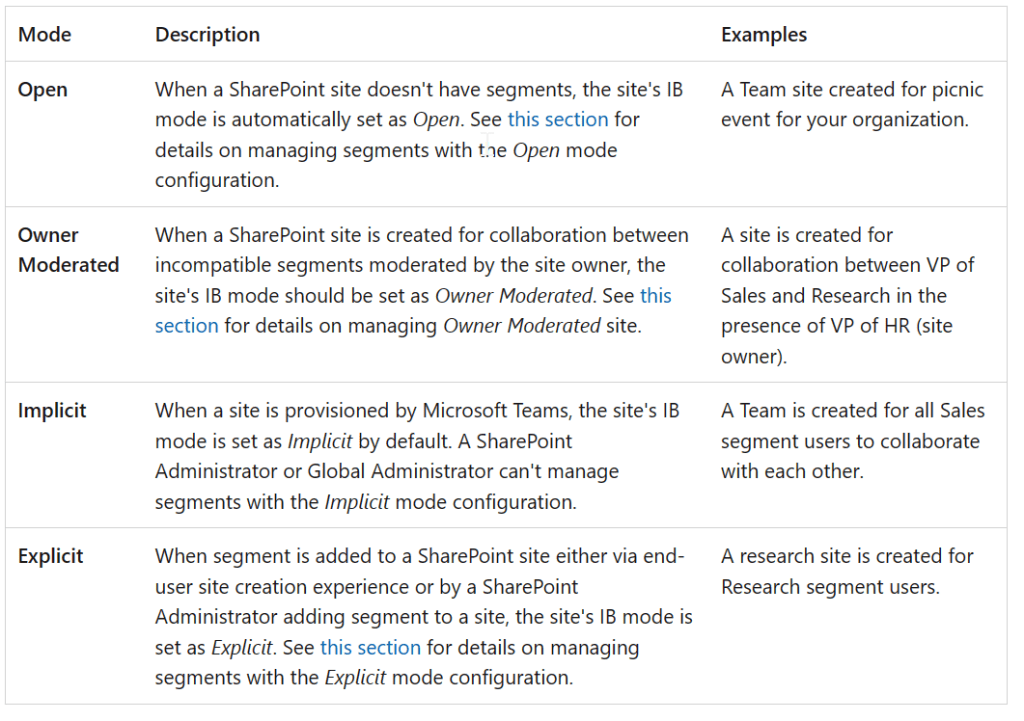
Before configuring the site, you should know that a SharePoint site can be configured in 1 of 4 Information Barrier Modes:
In this example, our site is configured with the IB Mode “Explicit”. You can always check the current mode of your site using the following cmdlet:
Get-SPOSite -Identity YourSiteURL | Select InformationBarriersModeNow on to the configuration of our SharePoint site:
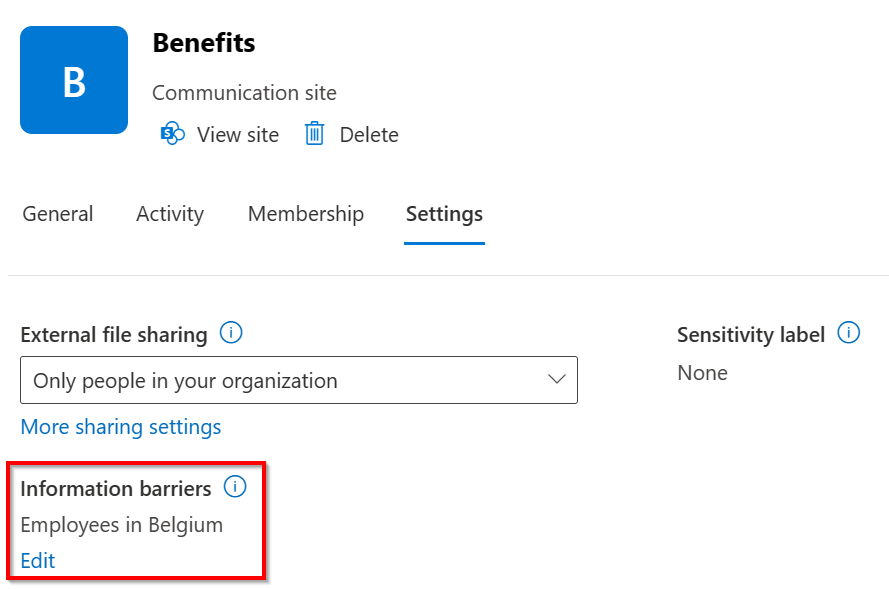
Navigate to one of your sites and click on the “Settings” tab. Add one of your created segments to your SharePoint site in the section shown above. By adding the site to a Information Barriers segment it can now be used by your Information Barrier policies. Let’s take a look at an example what this means for a user.
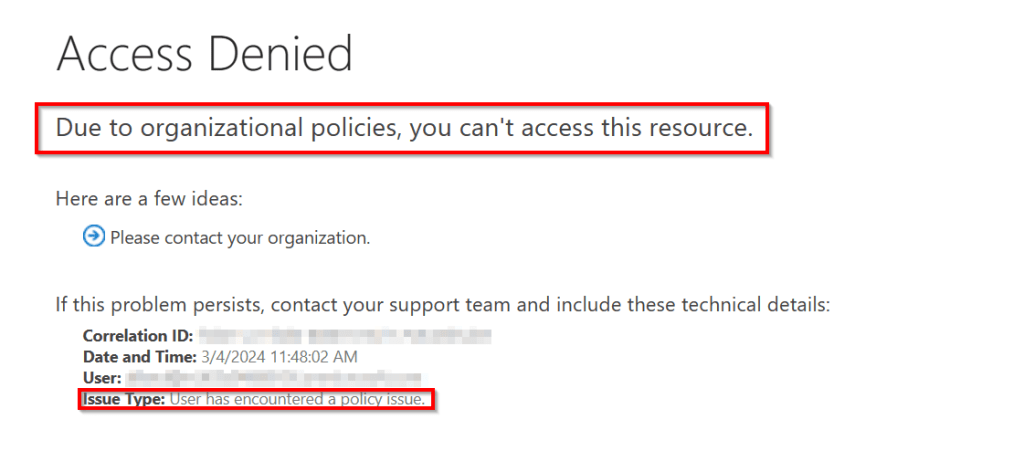
In the configuration above, I’ve added the SharePoint site “Benefits” to the “Employees in Belgium” segment. Now I can still add Allan to the site members, but since he hits the information barrier, he can’t access the site as can be seen in the screenshot above, since he’s not in the Belgium usage location.
Again, this is just 1 example. Take a look at this Microsoft Learn article to show all usecases.
Setting up Information Barriers – OneDrive Configuration
When we enabled Information Barriers for our SharePoint environment, we also enabled it for our OneDrive environment. So that’s a nice advantage. As with SharePoint, OneDrive can also be configured with different Information Barrier Modes:
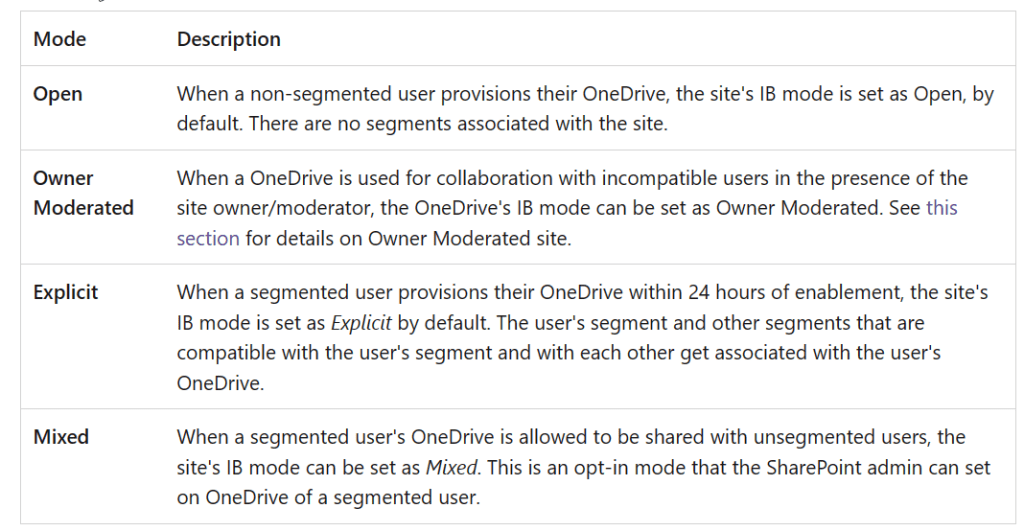
The difference with OneDrive is however, that when a user is added to an Information Barrier segment, this segment is stamped on it’s OneDrive and the Information Barrier mode of the users OneDrive is set to “Explicit”, both within 24 hours of setting the segment.
The mode can be seen using the “Microsoft.Online.SharePoint.PowerShell” module that’s used for the SharePoint configuration above. You can return to the same PowerShell window to execute the cmdlets. However, first you have to find the URL of the users OneDrive.
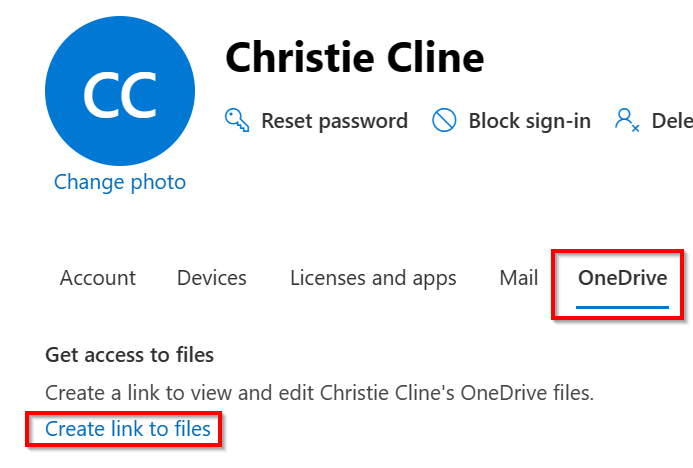
This can be found by navigating to the Microsoft 365 Admin Portal, Users, Active Users. Then select your user and click on the Onedrive tab. Then click “create link to files” and copy the link that is shown.
To see the mode, run the following cmdlet in the PowerShell window:
Get-SPOSite -Identity https://TenantName-my.sharepoint.com/personal/christiec_TenantName_onmicrosoft_com | Select InformationBarriersMode
As can be seen in the screenshot above, the mode is indeed set to “Explicit”. Explicit means the following according to Microsoft Learn:
To change the mode, use:
Set-SPOSite -Identity https://TenantName-my.sharepoint.com/personal/christiec_TenantName_onmicrosoft_com -InformationBarriersMode OwnerModeratedor to show which segment was assigned, use:
Get-SPOSite -Identity https://TenantName-my.sharepoint.com/personal/christiec_ TenantName _onmicrosoft_com | Select InformationSegment
As shown in the screenshot above, the result returned is not the name of a segment, but a GUID. This GUID should be matched with the GUID that’s a result of the “Get-OrganizationSegment” cmdlet.
But this is in another module. And to be precise the “Exchange Online PowerShell module”. Weird name? Yes. But it get’s the job done. And this module is supported by Powershell 7.0.3 and later. Install with command
Install-Module -Name ExchangeOnlineManagementTake a look at it’s Microsoft Learn page for all the prerequisites.
Run the following commands to match the GUID above with a meaningful name:
Import-Module ExchangeOnlineManagement
Connect-IPPSSession -UserPrincipalName admin@TenantName.onmicrosoft.com
Get-OrganizationSegment | ft Name, EXOSegmentID
The result is as follows:

And this checks out, since it’s Christie’s OneDrive and Christie is an employee from Belgium! To wrap this up, let’s take a look at the user experience.
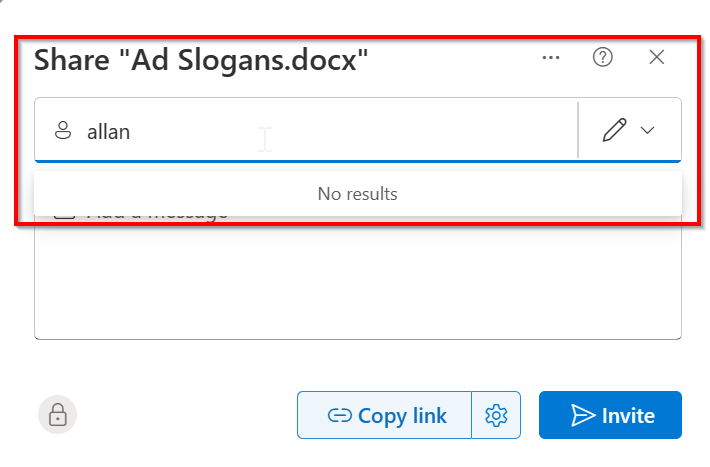
When Christie wants to share a file in her OneDrive with Allan (which is in another segment) this isn’t possible. Allen doesn’t even show up in the list of available users!
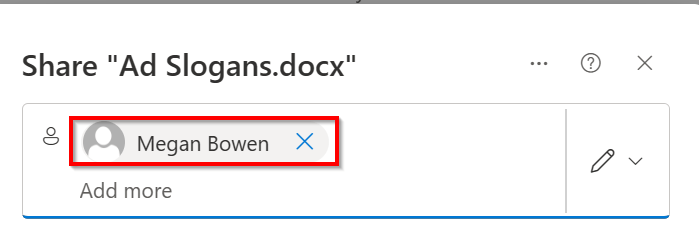
However, when sharing the same document with Megan Bowen, who is also a user from Belgium, this is possible and Megan can be found in the recipients list.
As with the Teams and SharePoint examples, this OneDrive scenario was just 1 example. Take a look at Microsoft Learn to see other possibilities!
In the next article I’ll describe new Information Barrier features in v2 along with some troubleshooting tips. See you there!

One thought on “Microsoft Purview 101: Down the rabbit hole with Information Barriers Configuration”