An often heard question is whether it is possible to use 1 retention policy for an entire Team. The short answer: it depends. As you may have read in my article on where Teams files are stored, your team exists of 1 or multiple SharePoint sites. When you use only general channels, there is only 1 SharePoint Site. For each private or shared channel added to your team, a separate SharePoint site is added. If you would like to know about the how and why about this, I would advise you to read the article mentioned above.

In this article I will take you on a journey to what the above means for the configuration of retention policies. I will use a demo team that I’ve created that can be seen in the screenshot above. The Team is called “Every Channel Type in 1 Team-Team” (How does that stack up for an Originality Award?). The team consists of 2 standard channels (“General” and “Standard Channel”), 1 Private Channel and 1 Shared Channel that are both called the same as the type of channel they resemble. Let’s dive right into the Purview portal!
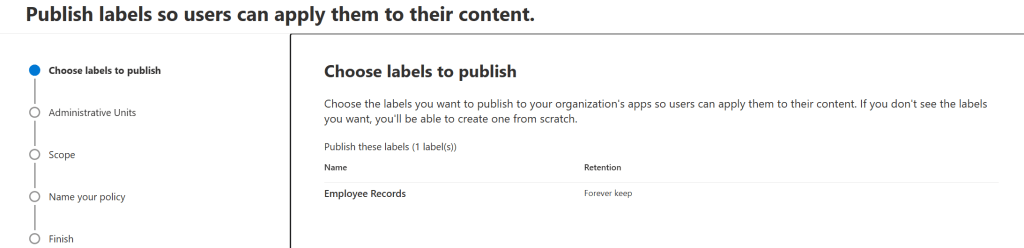
We are going to publish the previously created label called “Employee Records”. If you need more context on where in the configuration process of retention labels we are, take a look at my articles on Data Lifecycle Management or Records Management.

We skip the admin units screen and in the above screen, we choose “Static” as the type of retention policy so we can select the SharePoint sites ourselves using this wizard.

Now onto the main part of this article. Let’s start with publishing the label to the Team and it’s standard channels. To target the Team and it’s standard channels, we’ll need to use the location “Microsoft 365 Group Mailboxes & Sites”. Next, we can filter this by searching for the teamsite’s name and selecting it. We need this option for the Team and it’s standard channels because a Team and corresponding standard channels are based on a Microsoft 365 group.
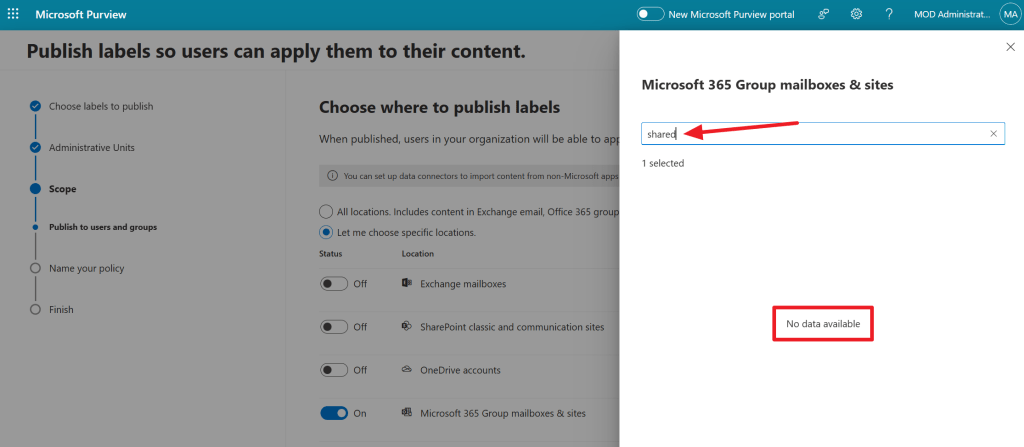
Now, when we search for the “shared” channel by name, it cannot be found. Likewise for the private channel. Why? Because the SharePoint sites that power shared and private channels are not based on a Microsoft 365 group. So we need another option to configure these into the policy.
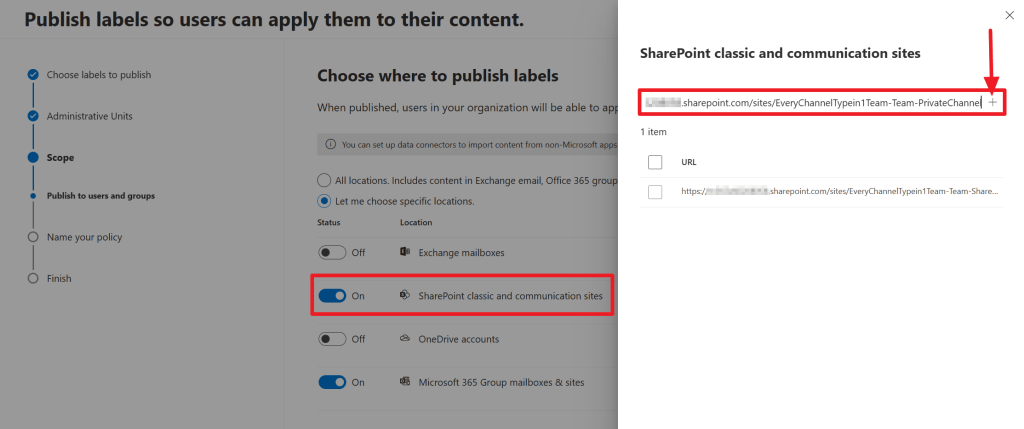
Because these sites are not build upon a Microsoft 365 group, we need the option “SharePoint classic and communication sites”. What’s different here however, is that the filtering screen does not work the same as the filtering screen for SharePoint sites that are based on Microsoft 365 groups. In this case, we have to enter the entire URL for the site, which you can find by navigating to the files tab of the channel in Teams, selecting the 3 dotted menu and choosing “Open in SharePoint”.
Paste it into the window displayed above and press the “+”-sign. Now select the added site by ticking the box before adding another site. It looks as though the previous added site disappears, but all sites show up when pressing “Done” and selecting “Edit” again. Also, if somehow the URL you enter is not correct and you press the “+”-sign, the entry is not added to the list.
Now finish the wizard and you’re all set. Now, let’s circle back to M365 Groups in relation to teams.

When navigating to the Entra ID admin page, all groups and searching for “every” to find the M365 Group where our Team is based on, we can find it because as mentioned previously, the Team is based on a M365 Group.
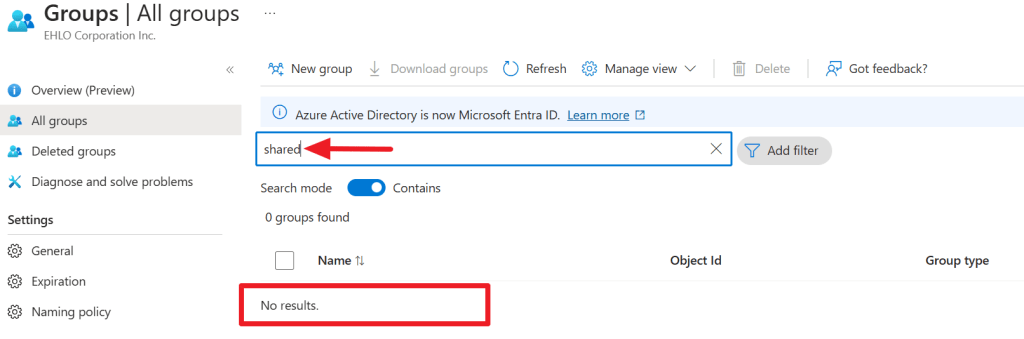
However, when searching for “shared” or “private” to find the channels that have their own SharePoint site, no groups are found, simply because they’re not based on a M365 Group!
Have fun with your retention policies!
