Data Loss Prevention (DLP) in Microsoft Purview can be used to prevent your users from oversharing information. Oversharing information is the process of accidently or purposely sharing information with recipients that are not allowed to have or view this information.
While there are various ways to implement DLP with Microsoft Purview, one of the main ones is by leveraging DLP Policies. When taking a look at the DLP Policies pages in Purview, Microsoft gives us the following introductory text:
Use data loss prevention (DLP) policies to help identify and protect your organization’s sensitive info. For example you can set up policies to help make sure information in email and docs isn’t shared with the wrong people.
DLP makes use of so-called Sensitive info types, often referred to as SIT’s. Microsoft includes an enormous list of SIT’s you can use out-of-the-box. You can look at SIT’s as the engine in DLP, as each SIT holds a pattern and/or logic for recognizing content. A few examples of these classifiers are:
- Credit Card Number
- U.K. Physical Addresses
- User Login Credentials
If you want to take a look at the entire list I would recommend to navigate to the Purview portal, Data classification, Classifiers, Sensitive info types. At the time of writing this article the list consists of 324 items. If the pattern/logic for classifying a piece of information in your environment isn’t present, you also have the option to create a SIT yourself.
Plan first, implement second
A few questions that you should ask yourself before heading out and start configuring DLP enthusiastically:
- Which stakeholders do I have to interview or include in my team to select the right types of sensitive information for my company?
- How do I validate my setup before enforcing policies on users?
- What is my scope? What is included in my scope and what is not?
- What is my business planning and what is my planning on technology?
- How do I introduce DLP to my end-users. Should I include training or adoption?
Generally, the following step-by-step action plan would give you the opportunity to get some insights and let your users get acquainted with the introduction of DLP in their day to day jobs.
- Design the DLP policies you would like to configure.
- Make a deployment plan.
- Configure your policies to first run in simulation mode.
- Use statistics and information from simulation mode to finetune your policies.
- Place policies in production according to your deployment plan.
Configure Data Loss Prevention (DLP)

After you’ve done your homework we can start configuring the DLP policies. To start, we move to the Purview portal and select ‘Data Loss Prevention’, ‘Policies’. Here, let’s click ‘Create policy’.
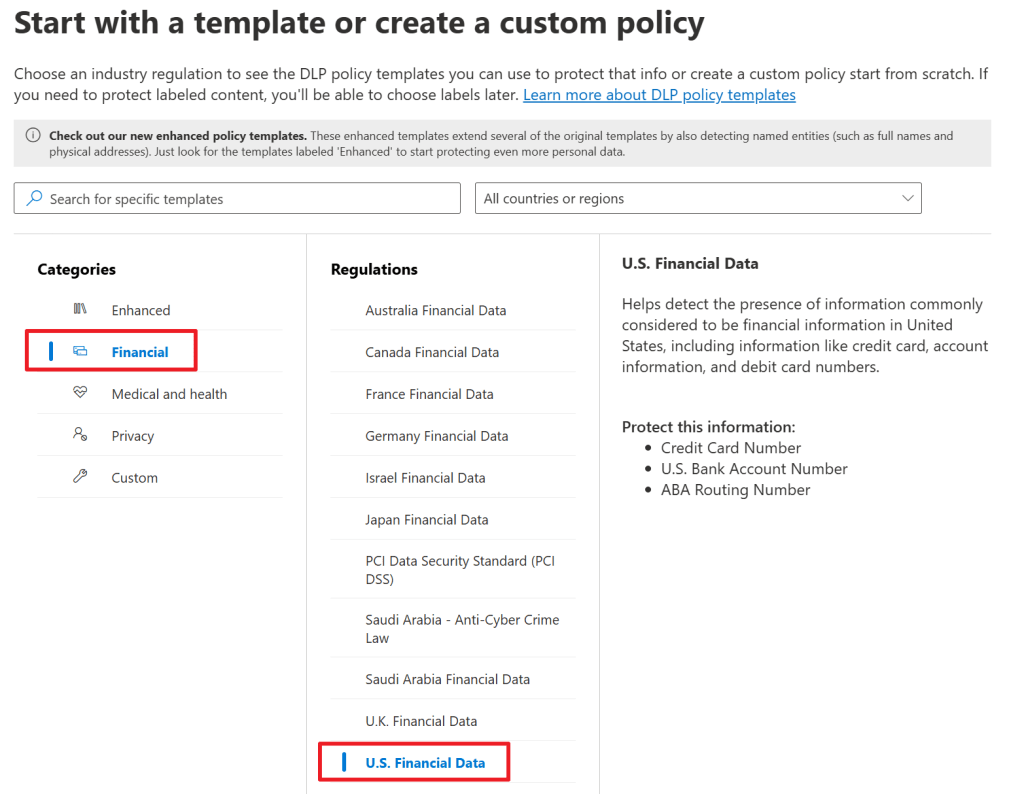
In the first screen of the wizard, we are able to select one of the regulations that are provided by Microsoft and are divided into various categories. In this example, we want to protect U.S. Financial info that is found in data. As said, if there’s no category or regulation that fits your needs, you can also create your own custom rules to match data in your environment.
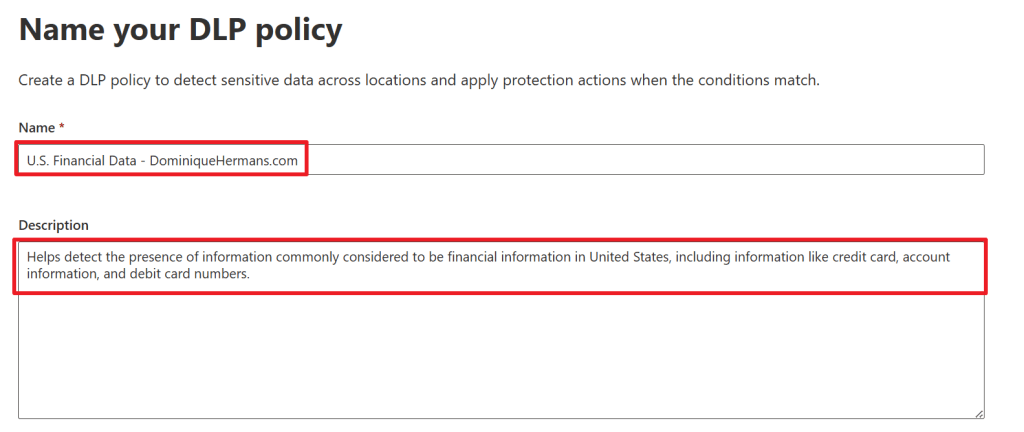
In the next step, name your policy and create a matching description and select Admin Units if you use them.

Select where you want your policy to apply. In this demo, I choose to go with all SharePoint sites and Teams chat and channel messages for all users and groups. If you need, you can filter down this list.

Now for the fun part. The template you choose in the first step of the wizard came with a predefined set of rules and conditions to match data in your environment. You can go with the defaults here, but it’s also possible to edit them. Let’s go with ‘create or customize advanced DLP rules’ to see what’s in store for us in these policies.
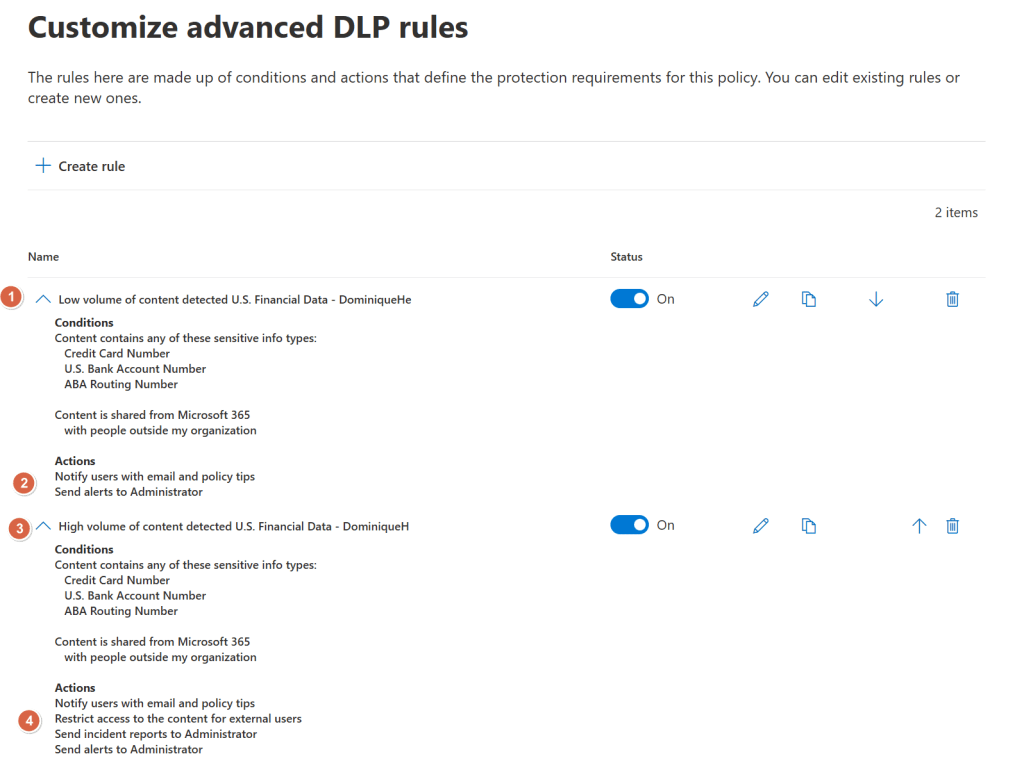
The rules that are included in the ‘U.S. Financial data’ policy match data on the following sensitive info types, or SIT’s, that can be seen in the screenshot above tagged with label ‘1’ and ‘3’:
- Credit Card Number OR
- U.S. Bank Account Number OR
- ABA Routing Number
AND
- Content is shared from Microsoft 365 with people outside my organization.
As you can see, the policy is configured twice, with the difference being that the first one is for ‘low volume of content detected U.S. Financial data’ and the second being ‘High volume of content detected U.S. Financial Data’.
When we press the edit button on the policies, we can see the exact difference between ‘high volume’ and ‘low volume’.
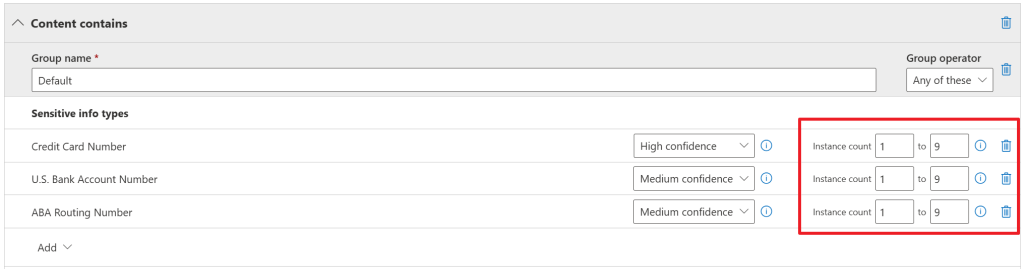
When looking at the ‘low volume’ policy properties first, you’ll see that a sensitive info type has to be found in a certain document between 1 and 9 times for it to fall into this category and for the policy to be applied. When looking back at the screenshot before this one, actions applied with the ‘low volume’ policy are:
- Notify users with email and policy tips
- Send alerts to administrator
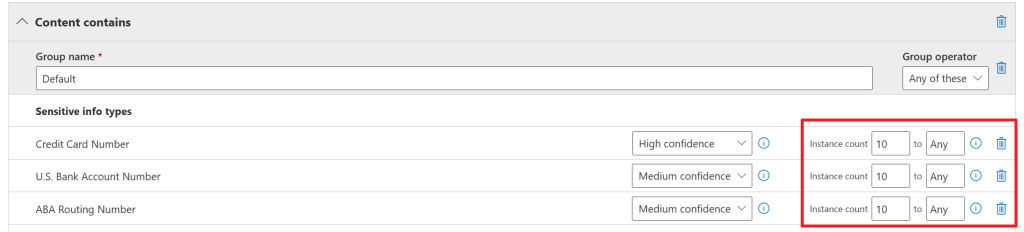
Now let’s take a look at the properties for the ‘high volume’ policy. We can see that a SIT has to be found between 10 and ‘any’ times for this policy to apply. Actions applied for this policy are of course much stricter:
- Notify users with email and policy tips
- Restrict access to the content for external users
- Send incident reports to administrator
- Send alerts to administrator
A detour into Sensitive Information Types (SIT’s)
For additional knowledge, let’s take a look at one of the SIT’s used in the policies, ‘Credit Card Number’.
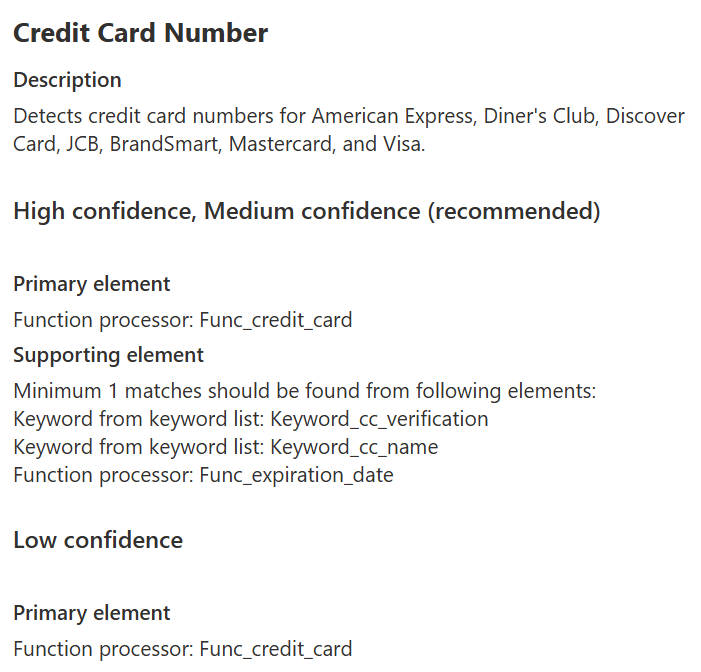
The ‘Credit Card Number’ SIT consists of the following elements:
- Name
- Description
- Primary and supporting elements that define the logic to find that a number found is actually a Credit Card Number. The more elements that are matched, the more certain Purview is that a match is actually a Credit Card Number in this case. If all of the above elements match, it’s considered to be a High confidence or Medium confidence match. If only the ‘Function processor: Func_credit_card’ matches, it’s considered to be a Low confidence match. You can see that this confidence level is also used in the policy properties where we looked at ‘high volume’ and ‘low volume’ properties.
Back to configuration of our DLP policy
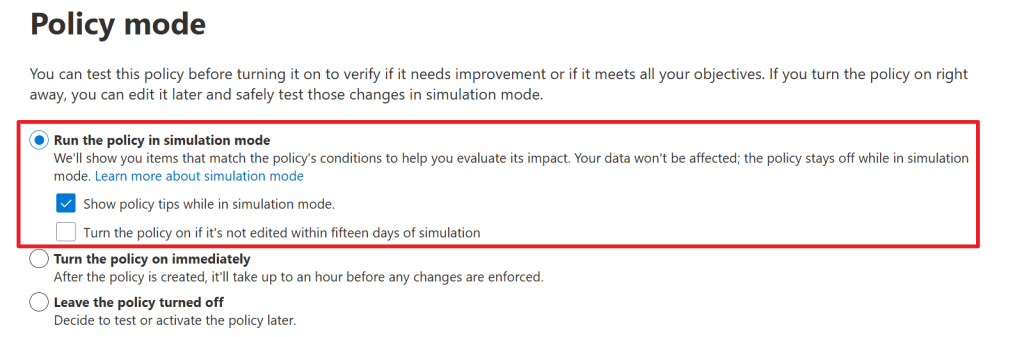
In the ‘policy mode’ screen we can configure the policy to:
- Run in simulation mode. This doesn’t enable the policy but will run a scan that you can evaluate before enabling the policy. This gives you the opportunity to fine-tune your policy before placing it into production. We’ll take a look at this later. While in simulation, you can show policy tips to users, which I’ll enable. It’s also possible to turn the policy on automatically if it’s not edited within 15 days. I’ll skip this for now.
- Turn the policy on right away (not recommended).
- Leave the policy turned off.
Let’s go with the first option, and do show policy tips in simulation mode.
All set! Review the summary and finish the wizard.

Back in the policies screen, I configure the new policy to have top priority for it to be applied before any other matching policy is applied.
Reviewing simulation results
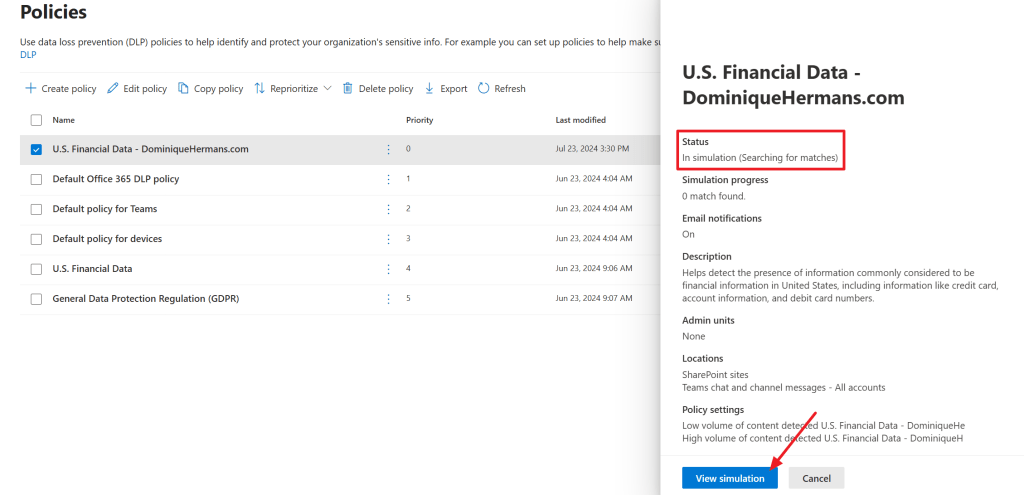
When clicking the newly created policy, we can see the status is ‘In simulation (searching for matches)’. Now it’s time to take a well-deserved break and enjoy your weekend en come back a few days later. The exact time it takes to run the simulation depends on the size of your environment and data it contains.
Now before continuing, make sure to grant yourself the ‘Data Classification Content Viewer’ role by adding yourself to the ‘Content Explorer Content Viewer’ role group. If you don’t, you won’t be able to look into sensitive info details.
When returning and matches are actually found, click the ‘view simulation’ button.
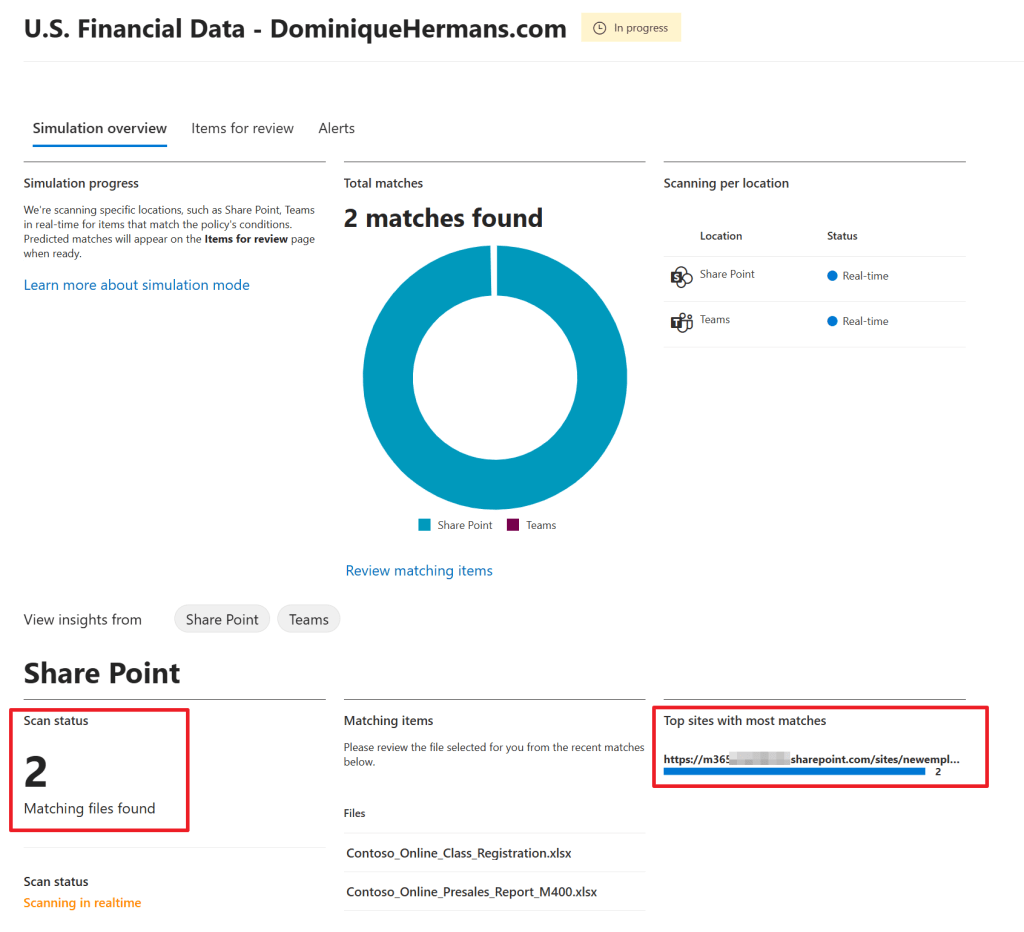
Here you’ll find an overview of the matches found in your organization. In my case, 2 matching files are found which both are found in 1 SharePoint site.
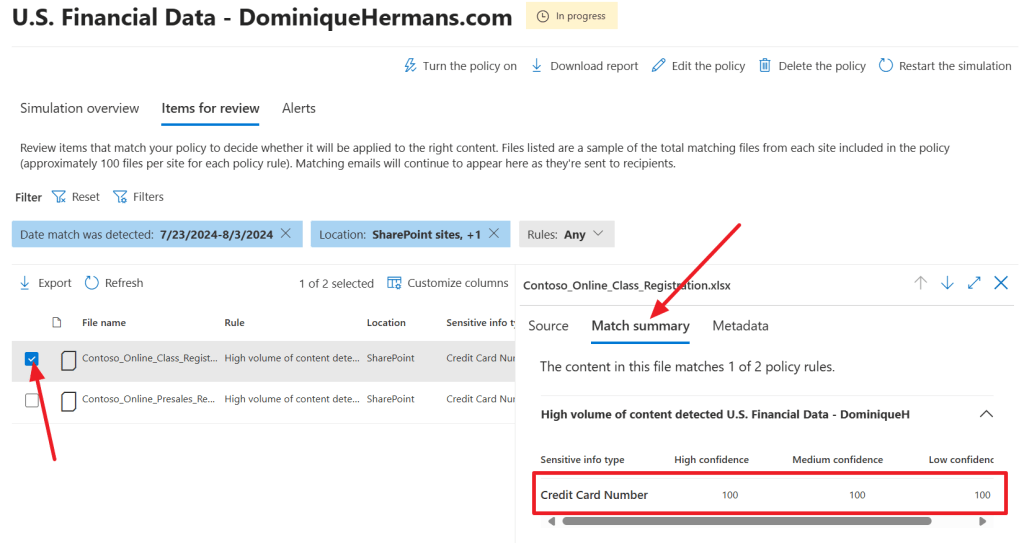
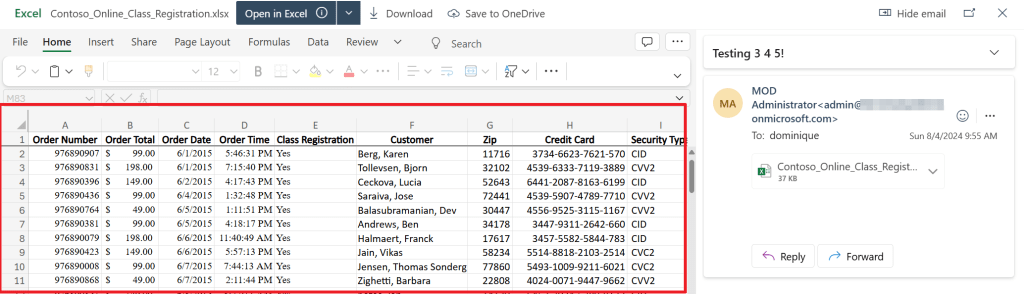
When you click on the ‘items for review’ tab followed by the ‘match summary’ tab, you can select an item. At the right hand side, the portal shows which sensitive information type was found in your document by confidence level. So it could be true that a SIT was identified using the ‘low confidence’ logic, but not by the medium or high confidence logic that was configured in the SIT. In this document however, the configured SIT (Credit Card Number) was found 100 times by low, medium and high logic defined in the SIT.
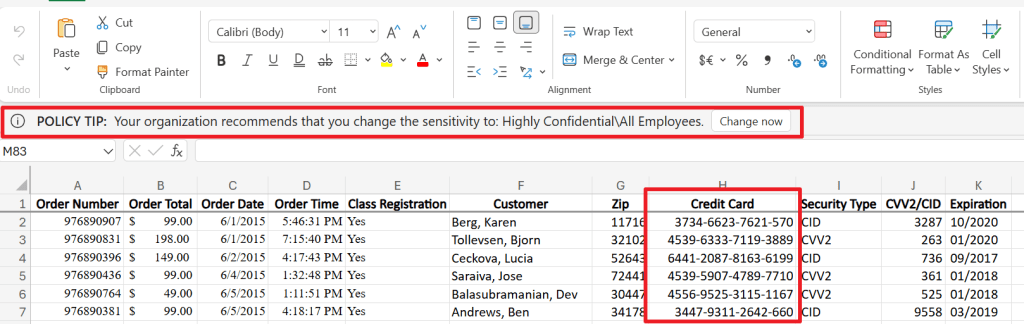
Let’s take a look at the ‘Contoso_Online_Class_Registration.xlsx’ sheet. Here, credit card info is found. Actually a list of 100 entries (which I shortened for readability) can be found in the sheet which matches the score above. As configured, the policy tip is also shown to the user. It’s also possible to customize the policy tip if necessary.
At this point you would review some items and if all seems ok, you can enable the policy so it becomes active in your environment.
Enabling the policy

We can enable the policy by going back to the ‘view simulations’ screen and selecting ‘Turn the policy on’. Confirm the dialog box and refresh the page. According to the documentation, it can take about 1 hour for changes to apply across your environment.
Verifying results from the users perspective
Now, let’s see how the protective actions of our policy look like when viewed from a users point of view. Let’s do this by trying to share a document that’s considered to be a sensitive information type (Credit Card Number) via SharePoint.
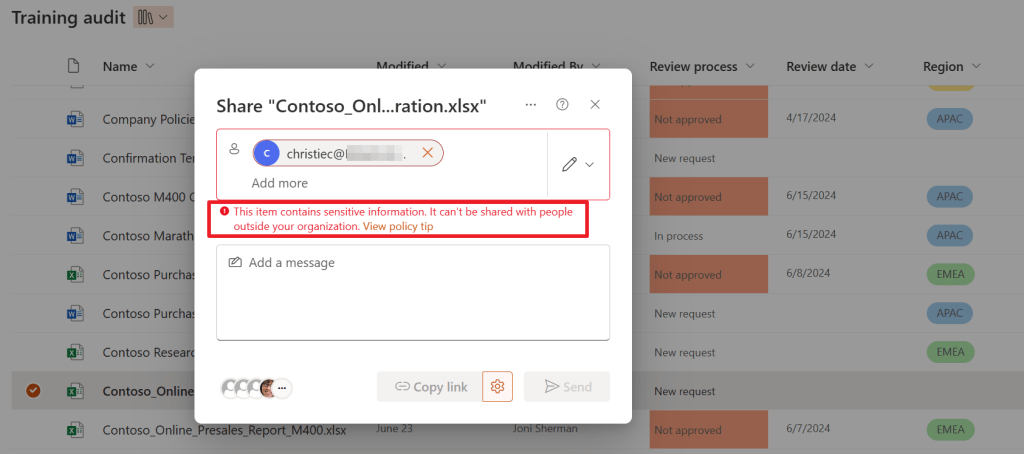
As you can see, the file can’t be shared because it contains sensitive information, which was found using the SIT we configured in our DLP policy!
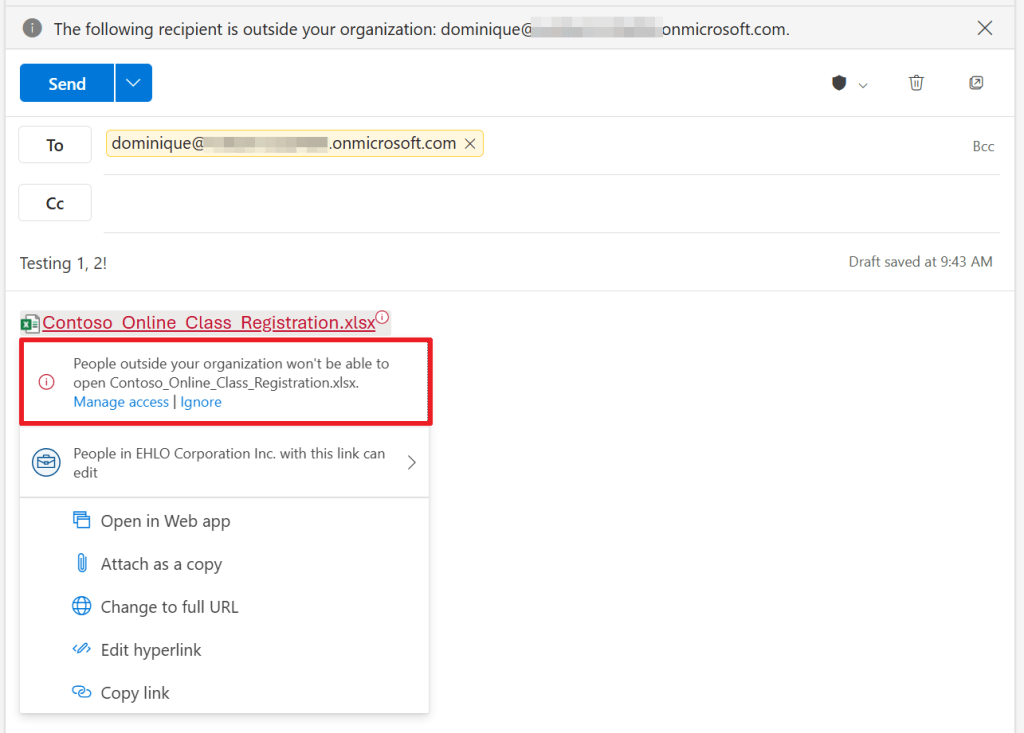
Now let’s try to work around this by using Outlook for Web. When adding a link to the document, here also a message appears that people outside your organization won’t be able to open the file.

When sending the message anyway, another message pops up telling you that the recipients can’t access the links in the document, after which you can send the message anyway (with an inaccessible link in it) or to don’t send the message.

When the recipient receives the message, and tries to access the document:
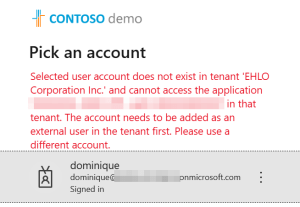
This won’t work because the tenant from which we shared the document did not create a guest account for the guest user. The simple reason for not creating the guest user is that the document could not be shared because of our DLP policy!
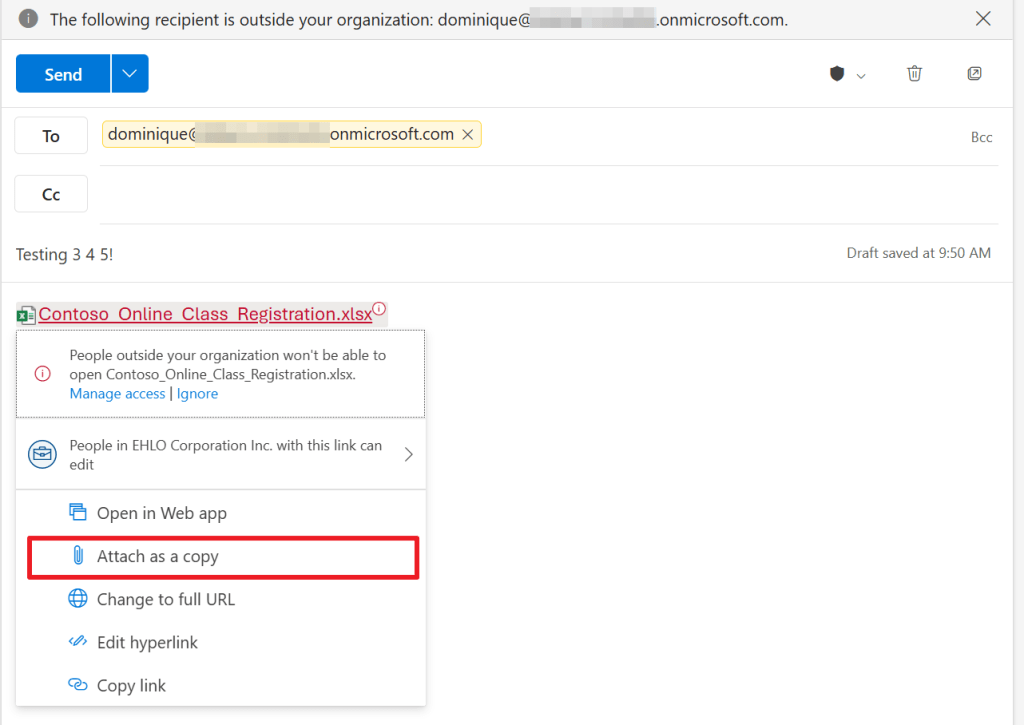
Let’s try something else. Let’s attach the file as a copy. Would this work?

As you can see, we are greeted with a couple of warnings:
- A policy tip is shown that tells us that the email message conflicts with a (DLP) policy in our organization.
- To send the message without removing the information (attachment in this case) we have to first select the ‘override’ button.
- When selecting ‘learn more’, we can see that the document we attached contains Credit Card Numbers, which of course is found using the SIT we configured in our policy. We here have the option to report a false positive.

When trying to send the message without overriding, we see a message stating that we still won’t be able to send the message without removing the attachment that contains sensitive information.

Now let’s select ‘override’. Now a business justification has to be entered or we have to select that we think the message doesn’t contain sensitive information. Let’s go with the first option and enter ‘As requested by CEO’.

Another policy tip appears stating that your decision may be reviewed later as you’ve chosen to send this message even though it appears to contain sensitive information.
When the user receives the message, he/she is able to open the document containing the sensitive information. Let’s understand why:
- The user has overridden warnings from DLP stating that he/she is sending sensitive information to a party that should not have this information.
- A business justification was added, that can be reviewed by a legal department of your organization for example.
- Microsoft DLP does not encrypt files, so when an attachment is added a recipient can open the file as it’s not encrypted. You could use encryption to counter this by using sensitivity labels. These sensitivity labels can be teamed up with DLP for optimal protection!
In conclusion
As we have seen in this article:
- Microsoft Data Loss Prevention (DLP) can be used to prevent users from oversharing information.
- It does this by applying actions to items that are considered to contain sensitive information.
- Sensitive information is found using Sensitive Information Types, also called SIT’s.
- Policies can be ran in simulation mode first before enabling the policy in your environment.
In the upcoming article we take a look at the legal department side of things. What can be monitored from the actions we took above?
Hope you learned something from this and see you next time!

3 thoughts on “Microsoft Purview 101: How to set up Data Loss Prevention (DLP)”