The Microsoft Purview (Unified) Audit Log. Not the first component of Purview you think of when there’s Data Loss Prevention, Data Lifecycle Management and other cool features. However, the most basic feature like the Audit Log can be quite interesting. So in this article, I want to take you through the basics of the Unified Audit Log.
The Audit log is the place where a lot of user and administrator interactions with the various Microsoft 365 services are stored so they are accessible and searchable for security ops, IT admins, insider risk teams, and compliance and legal investigators in your organization. That’s exactly why it’s called the unified audit log. It collects almost everything from the various services in your Microsoft 365 subscription.
Let’s talk basics
The Purview Audit Solution comes in 2 flavors: Audit Standard and Audit Premium. Both are enabled by default in newer M365 tenants. If you have an older tenant, you’ll need to use the following command in Exchange Online PowerShell to verify whether the Audit Solution is enabled in your tenant:
Get-AdminAuditLogConfig | Format-List UnifiedAuditLogIngestionEnabledWhile both flavors come packed with the Audit Search tool in Purview and Compliance portals and Search-UnifiedAuditLog PowerShell cmdlet to search through audit events, exportable audit records to CSV’s and access to audit logs via the Office 365 Management Activity API (albeit that Audit Premium includes higher bandwidth access to the API), differences are noticeable in the following area’s:
Audit Standard has a 180-day audit log retention where Audit Premium can be configured for up to 10-year audit log retention. Also, Audit Premium includes Audit Log retention policies and Intelligent Insights. Intelligent insights provides access to important events to conduct forensic and compliance investigations. Take a look at the following Learn Article to see the activity properties that are supported.
Besides the above, you have to be assigned the ‘Audit Logs’ or ‘View-Only Audit Logs’ roles in the Microsoft Purview (compliance) portal to be able to search the audit log. These roles are part of the ‘Audit Manager’ and ‘Audit Reader’ role groups.
Another thing to note is that Microsoft doesn’t guarantee the time it takes for an audit log to be available (or searchable) after an auditable event has happened. It does note however that for the general services (Exchange, SharePoint, OneDrive and Teams) availability is typically 60-90 minutes after an event occurs.
What information is stored in the Unified Audit Log?
The answer to this question depends on the type of license that is assigned to specific users. The license type defines which user or admin activity generates an audit record and for how long this record is stored (and thus is searchable) in the audit log.
- When a user has a Office 365 E5, Microsoft 365 E5 or Microsoft 365 E5 Compliance or Microsoft 365 E5 eDiscovery and Audit add-on license, audit records for the following services are retained for 1 year by default:
- Microsoft Entra ID
- Exchange
- SharePoint (and thus OneDrive)
- Organizations with the licenses mentioned above can create audit log retention policies to retain audit records for activities in other services for longer retention periods than the default of 180 days for these other services.
- Users that are assigned any other license than the ones mentioned in the first bullet, audit records are retained for 180 days.
Using Audit Log Search
Let’s dive into the portal and take a look at how Audit Log Search works.
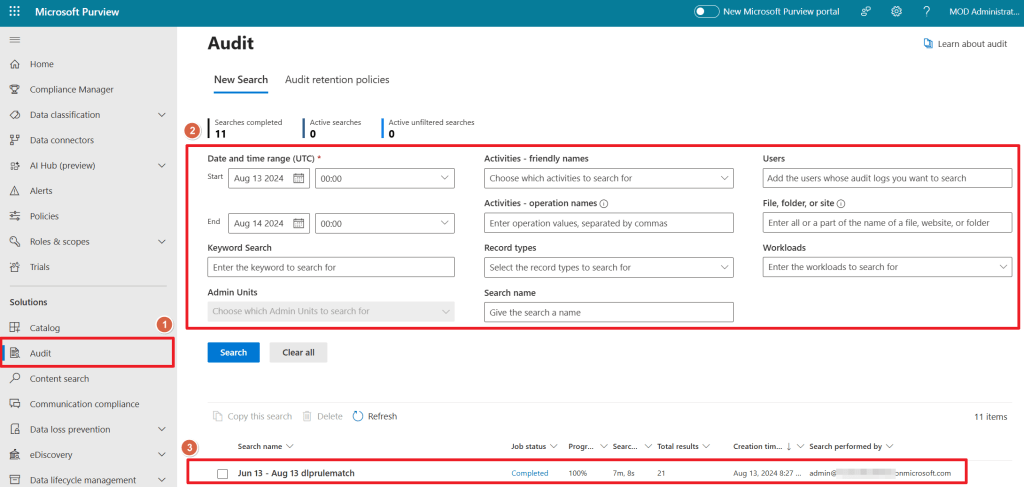
When you navigate to the Microsoft Purview Console and select the Audit Solution on the left hand side (1), you’ll enter the main Audit Console which consists of 2 parts:
- The filter section to narrow down your search of all items in the Audit Log (2). The more filters you configure for your search, the more narrowed down your search result will be.
- The previous search jobs section that shows previous search jobs and their status.
Let’s go and run through an example to get an idea of how this works.
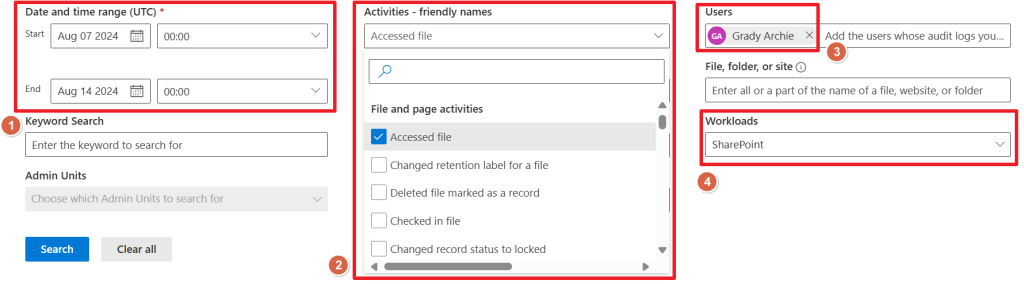
For our audit search, let’s configure the search filter so that we’re searching for all accessed files in SharePoint by Grady Archie in the last week:
- Date and Time range set to last week (1).
- Activity is ‘accessed file’ (notice the nice drop down list on ‘activities – friendly names’) (2).
- User is Grady Archie (3).
- Workload is ‘SharePoint’ (also selectable by a drop down list).

When pressing Search a new line appears in the ‘previous search jobs’ section. Now we wait until the ‘Job Status’ changes to ‘completed’ and click it so we can see the results. Notice that the search name is automatically filled in for us (since we lacked to do so).

The results pane presents us with all audit log entries that match our search filter (1). When selecting one of the entries, the details pane (2) shows us more information. Ranging from CreationTime to UserID to the fact if the device that accessed the file is a managed device or not.
If you want to take a look at all the available properties take a look at this Microsoft Learn Article. If you would like to see some scenarios where the Audit Log could help you troubleshoot common support issues, take a look at this Learn Article.
Hope you learned something today!

3 thoughts on “Microsoft Purview 101: Mastering the (Unified) Audit Log”