In the last blog, we talked about sensitive information types, classifiers and how to implement them in your environment. In this blog I want to take you along the likes of the Content Explorer and Activity Explorer. According to the Purview documentation, we can leverage the Content Explorer to explore email and documents in your environment that contains sensitive information or items that have labels applied. Activity Explorer can be used to take a look at all the actions that took place with sensitive info or items that have labels applied.
Let’s dive right in and start with the possibilities of Content Explorer
Content Explorer

Let’s start taking a look at Data classification, overview. Here you can see a glance at the sensitive information and labels used in your environment. A lot of this data is actually coming from the Content Explorer.
Now, when clicking through to Content Explorer on the left hand side, we see a current snapshot of all items in your environment that have:
- a sensitivity label
- a retention label
- have been classified as a sensitive information type you defined or are available by default.
Let’s talk about permissions next, which are managed on different levels.
First, to get access to the Content Explorer, you’ll have to have the Global administrator, Compliance administrator, Security administrator or Compliance data administrator role.
Second, because the Content Explorer shows files (and it’s content) that contain sensitive information, you’ll have to have more permissions to see the file title or contents:
- Content Explorer List viewer (and specifically it’s data classification list viewer role) gives you permission to see the item and it’s location.
- Content Explorer Content viewer (and specifically it’s data classification content viewer role) gives you permission to view the contents of each item in the list.

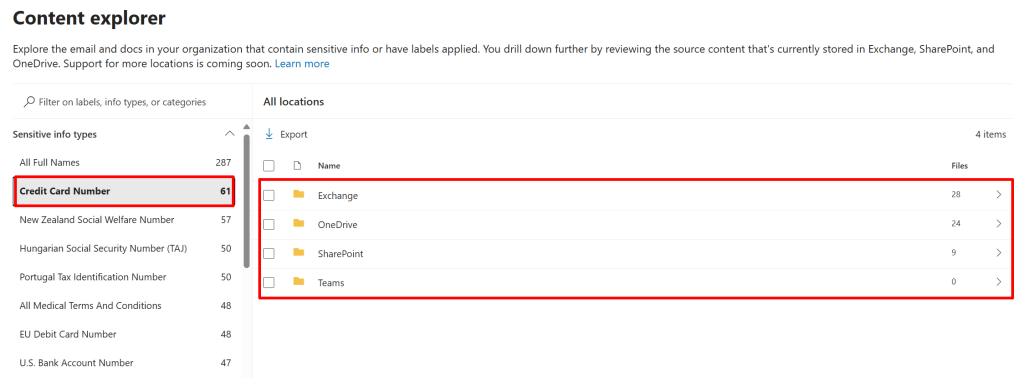
When diving in Content Explorer, let’s check out what’s in store here. I’ve clicked the ‘Credit Card Number’ SIT, where content explorer shows me that there are actually 4 items in my environment that match the SIT. When drilling down further into the SharePoint site in this case, it shows me the actual files and even contents of these files, because I have the appropriate permission. The possibilities in this view are as follows (numbers below match numbers on the screenshot above):
- Filter on label name, SIT or categories. For instance, if you don’t want to scroll all the way through the list, you can just type in ‘credit’ and it shows you only the Credit Card Number info type.
- Export. Provides you with a CSV file with all the content that is currently on screen.
- Search. Search for items in the current view. In the screenshot above, it allows me to search for items with the Credit Card Number SIT in the SharePoint site ‘newemployeeonboarding’.
- Detailed view. Shows the contents of your items (if you have the correct permission).
- Provide Feedback on a matched SIT or trainable classifier. This feedback can be used to further optimize your SIT’s / classifiers.
In conclusion, a nifty explorer to find out all about the sensitive content in your environment, and where it resides.
Activity Explorer
Now let’s turn our attention to the Activity Explorer. In short, the activity explorer gives you an historical view of activities on your labeled content. This information is actually sourced from the Microsoft 365 unified audit logs and made available in the activity explorer UI. This data is available for 30 days and can be filtered using over 30 different pre-configured filters.
Just as with the content explorer, let’s talk permissions first.
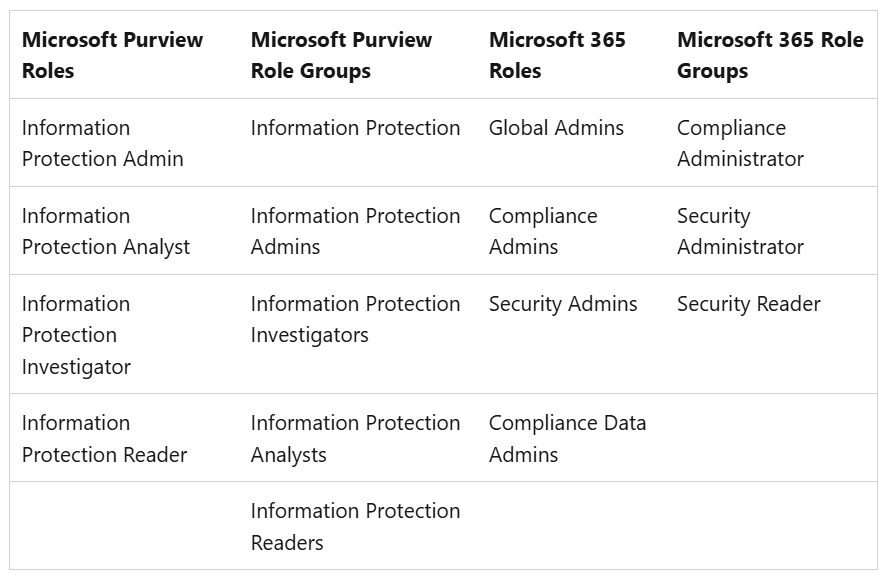
To get access to the activity explorer, you need one of the roles above or be part of one of the role groups described here.

Let’s take a look at what’s going on here. I’ve filtered my view so it provides me with a certain time range. In that time range a Data Loss Prevention rule was matched in my environment. Options we have here are (numbers below match with numbers on the screenshot above):
- Built-in filters that you can choose from are for example Endpoint DLP activities, Egress activities or activities for a certain target domain for example. This actually doesn’t stop there. With the filters button in the same row, you can define your own filters using a vast numbers of properties to choose from.
- When you change your filter, the properties that you can choose from on screen change. This way you can filter on properties that belong to a pre-defined filter.
- A graph is shown of when an activity happened and how many items in your current view took place in that timespan.
- The ability to export the current list of activities to a CSV file.
- The current activities in your view.
In conclusion, the activity explorer provides you with a nice activity overview of activities in your environment which allows you to see if the controls that you have in place in your environment are effective or whether you need to finetune your configuration!

One thought on “Microsoft Purview 101: Utilizing the Content and Activity Explorer”