Communication Compliance in Microsoft Purview can detect messages in your organization that are considered to be inappropriate. Besides detection it can also capture and take action on the messages that it finds. Microsoft Purview is equipped with several out-of-the-box policies and gives you the possibility to create your own. Communication compliance policies can be used to check for inappropriate messages in internal and external communications that take place in email (Exchange), Meeting/IM (Teams chat, channel messages, meeting transcripts with recordings), Viva Engage and interactions with Microsoft 365 Copilot.
You can think of the following messages being inappropriate in your environment:
- Messages that contain sensitive content.
- Messages that contain inappropriate content, text or images.
- Messages that contain conflict of interest.
- Messages that contain information that is against laws or compliance policies.
- And so on!
In this blog I want to show you how to create a communication compliance policy, what it looks like for the user that sends messages being inappropriate, how these messages are captured and how you can take action. Are you ready? Let’s go!
Communication Compliance Policy Configuration
In this example we’re going to set up a Communication Compliance policy that detects credit card numbers and we’ll use Microsoft Teams to demonstrate what this looks like for the users involved. Before we begin though, make sure the audit log is enabled in your environment.
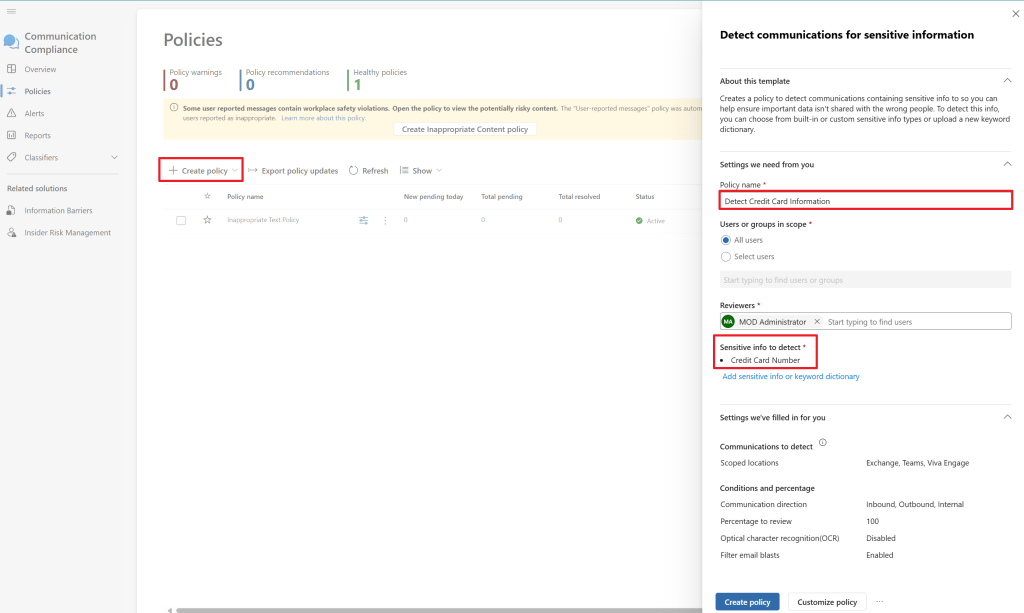
Now, let’s start by navigating to the Microsoft Purview portal, select the Communication Compliance solution and navigate to the policies window. There, select ‘Create policy’ to create a new policy. Here we’ll need to configure a few fields of information:
- Give our policy a name. I’ll go with ‘Detect Credit Card Information’.
- I select all users to be in scope of this policy, which means that this policy will apply to all users in my tenant.
- The reviewer will be ‘MOD Administrator’. As this is just for demo purposes, selecting the administrator is fine, however in a real world scenario I would advise you to delegate the task of reviewing policy matches to a dedicated resource.
- For sensitive info to detect we’ll select ‘Credit Card Number’. Do note that you can select any Sensitive Info Type (SIT) or keyword dictionary to be detected in communications.
- The scope of where this policy will be applied is Exchange, Teams and Viva Engage and this will be applied for inbound, outbound and internal communication.
- We will leave ‘percentage to review’ at 100%, so we’ll have to review all policy matches.
- Optical Character Recognition is turned off at this screen, but is enabled later when selecting ‘customize policy’. This feature can even detect forbidden communications in images that are being sent, really cool!
- The ‘Filter email blasts’ feature is enabled, so messages from bulk email senders will not generate alerts.
When done, we’ll click ‘customize policy’, so we have a chance to:
- Exclude users and groups from the policy.
- Select additional Microsoft 365 locations (like Microsoft 365 Copilot) or non-Microsoft apps.
- Edit the SIT.

When done you will see that the status of your new policy is now ‘Activating’. After a while the policy will have a status of ‘Active’ and policy health of ‘Healthy’. When this is the case, we can start our testing.
Testing, 1, 2, 3
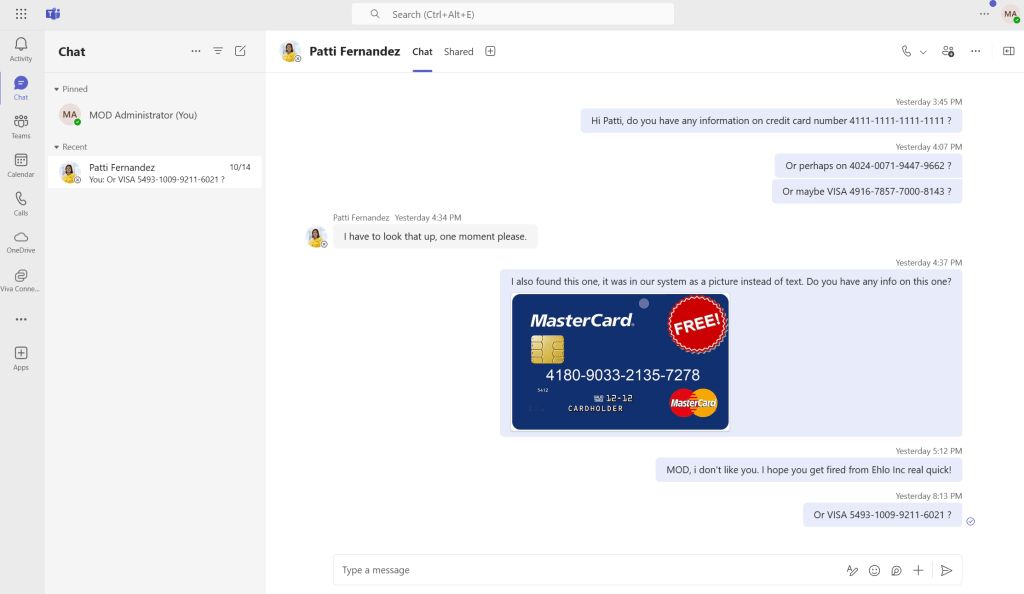
To demonstrate what is going to happen, I set up a chat between MOD Administrator and Patti Fernandez as you can see in the image above. The Administrator has sent various messages that contain (fictional) credit card numbers and even sends 1 (fictional) credit card number as a picture.

Now, the Communication Compliance service starts detecting and processing these messages after which they pop up in the Communication Compliance policy screen. In the screenshot above you can see how long it takes for the service to pick up the various types of content.
Communication Policy Match Overview
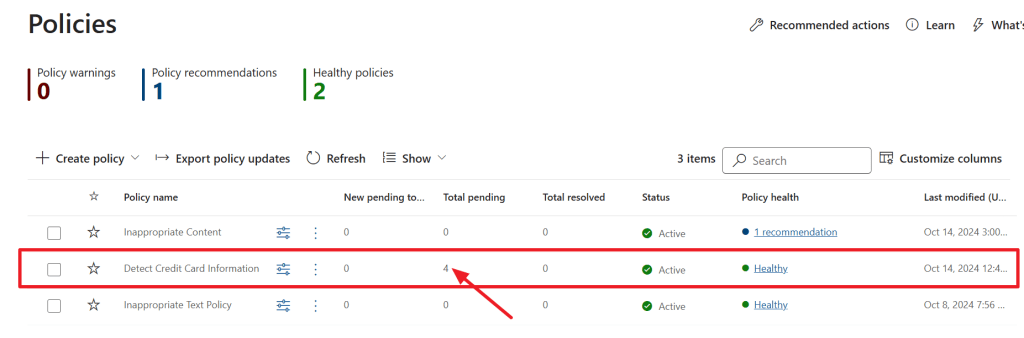
Back at the Purview Communication Compliance policies screen, you can see that our ‘Detect Credit Card Information’ Policy has picked up 4 messages that match our policy.
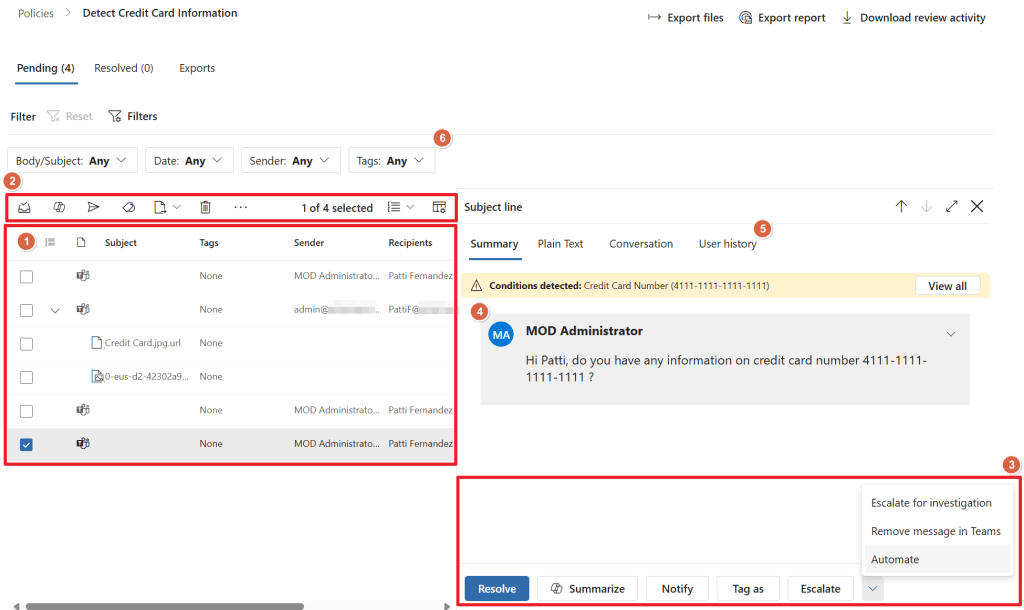
When clicking the policy, we get some insights on what’s exactly going on. We can (numbers below match numbers in the picture above):
- See an overview of all messages that match with our communication policy and included SIT.
- Apply various actions to one or multiple messages:
- Resolve: Move the message from the pending queue to the resolved queue. No further action is taken.
- Summarize: Let Copilot summarize a message (requires separate license)
- Notify: Notify the sender of the message using a notice template.
- Tag as: Tag the message with one of the predefined filters or with a custom one that can both be used to filter messages.
- Escalate: Let other people in your organization review the message.
- Escalate for investigation: Create an eDiscovery (premium) case for further review.
- Remove message in Teams: Removes the message for sender and recipient in Teams and shows a help tip why the message was blocked.
- Automate: Use a Power Automate action on the selected message.
- Same actions as for number 2, however in this case the scope is only the highlighted message.
- Preview of the message selected.
- Show the message summary, in plain text, a snippet of the conversation or the user history.
- Filter the message list.
Notify the user
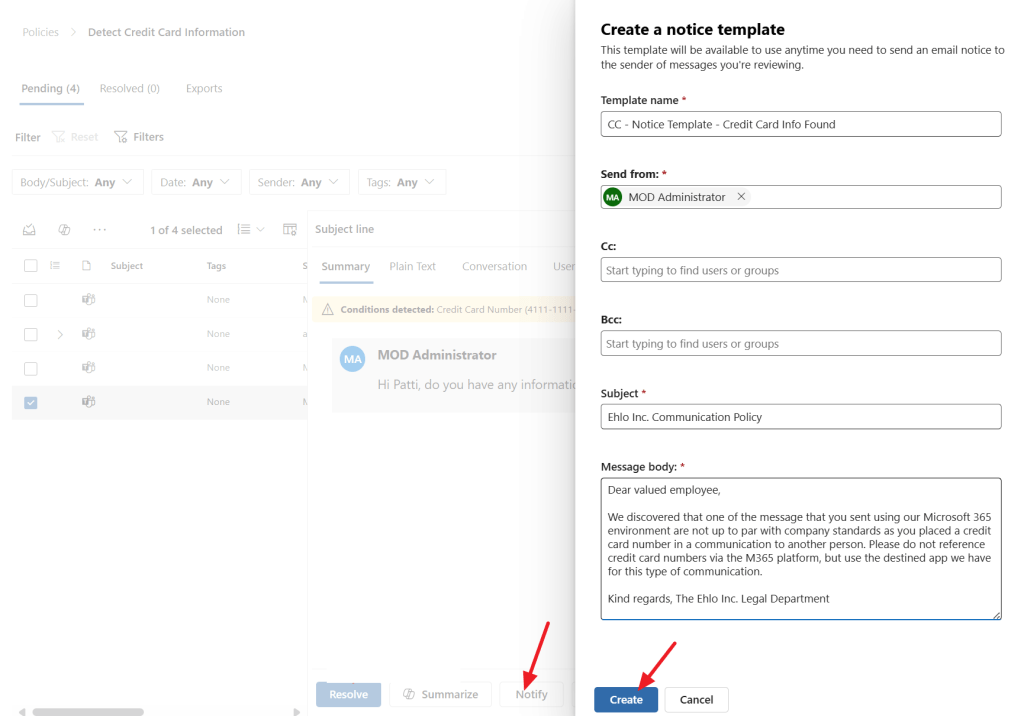
By selecting one or multiple messages and selecting ‘Notify’, we can notify the sender of a message. When no notice templates are configured yet, here you also have the opportunity to create one. I choose to create one that informs our user that a message he or she has sent isn’t up to par to the company’s standards. After selecting your template you have the opportunity to change it to your liking.
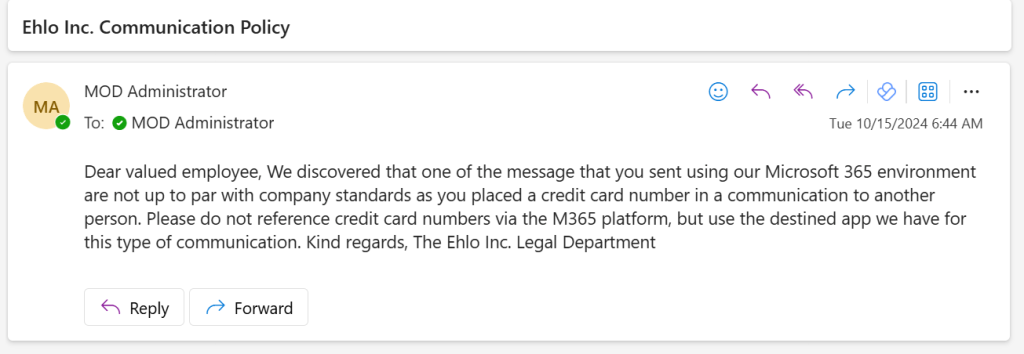
See above what the message looks like in the mailbox of the user. Unfortunately the original message isn’t present so the user can’t easily match the notice with a message he might have sent.
Message Removal

When selecting ‘remove message in Teams’ the message is… removed in Teams! This is a quite powerful feature to dispose of messages that do not comply with company standards.
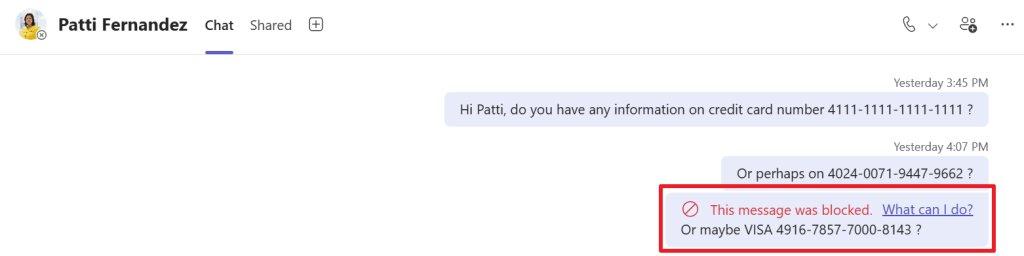
From the sender’s point of view, the message is still displayed, but with an added note that the message is actually blocked. The message contains a help link to inform the user of the process that took place to actually block the message.

On the recipient side, the message is completely removed and is replaced by a message stating that the message was blocked due to organization policy. Ain’t that nice?
Resolve a message
By pressing the resolve button, one or multiple messages are being moved from the pending queue to the resolved queue. This indicates that no further action has to take place on the message.

A comment can be placed that will be stored with the message in the Communication Compliance Center. Notice that by default, the message will be resolved in all other policies that detected it. This can be turned off if it not to your liking.
Optical Character Recognition (OCR)
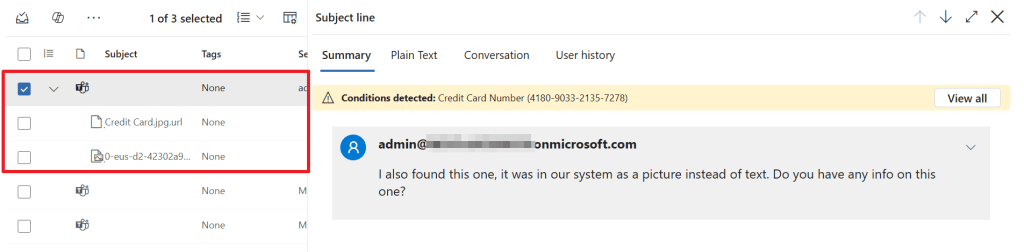
This has to be one of the coolest parts of this feature. In the picture above a message is linked with an image. Take a look at the credit card number that the OCR feature found.
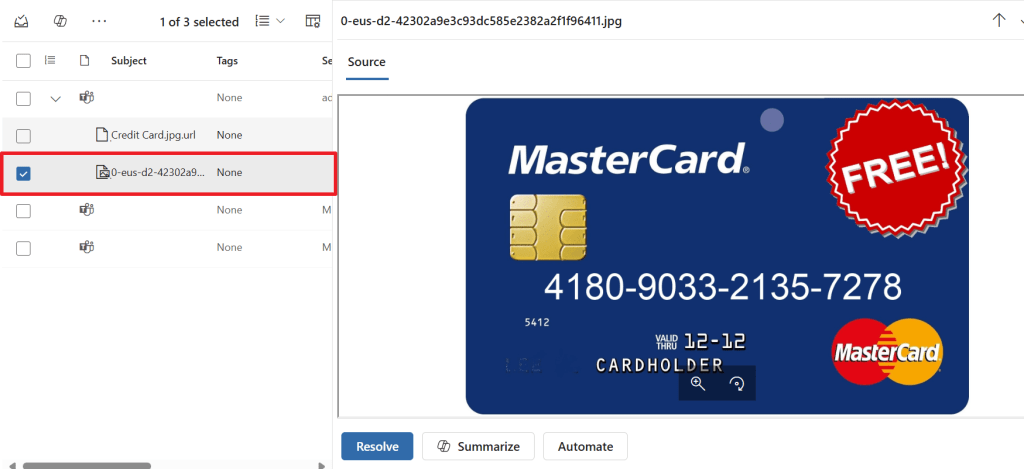
It’s actually found in a picture! So your SIT’s will also be detected when hidden in a picture! Also the picture can be removed from the chat in this case!
Bonus: Quick Setup: User-reported messages & Inappropriate Content
I hope the above explanation was a good example of the inner workings of communication compliance. However, when you don’t want to go through the hassle of setting up policies yourself, Communication Compliance provides you with 2 out of the box options. The first one is ‘user-reported messages’.
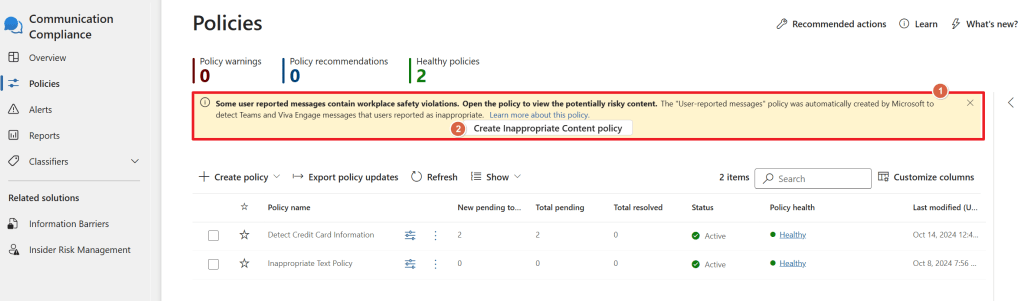
When you first enter the Communication Compliance console, a yellow bar appears stating 2 things:
- The ‘user-reported messages’ policy was automatically created by Microsoft to detect Teams and Viva Engage messages that users reported as inappropriate.
- The option to create an ‘Inappropriate Content Policy’.
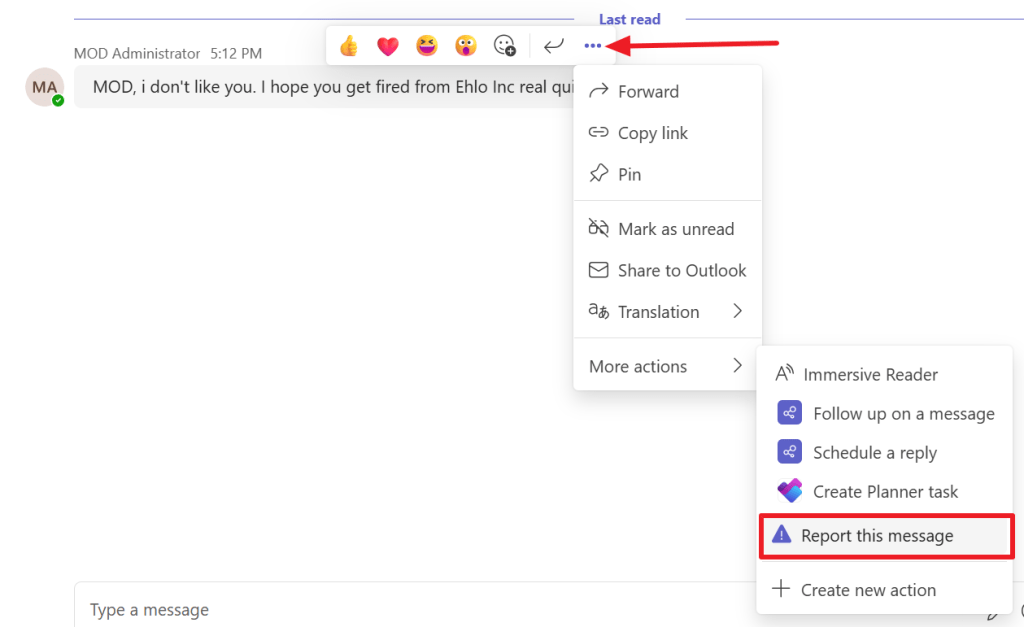
The first option creates a policy that will kick in whenever a user reports a message in Teams or Viva Engage via the ‘Report this message’ button. After the button is clicked, the user can mark the message as a security risk or as inappropriate. The message is then shown in the Communication Compliance console for further investigation.
The second recommended policy (which can be created with the button in the yellow bar) creates an ‘Inappropriate Content Policy’ that monitors communications for content that matches one of the following trainable classifiers:
- Sexual
- Violence
- Hate
- Self-Harm
This is a pretty powerful feature that starts monitoring your messages on the topics above with little configuration and is great to start your Communication Compliance policy with!

One thought on “Microsoft Purview 101: Setting up Communication Compliance”