Since the management of Exchange Message Records Management (MRM) policies has been moved to the Microsoft Purview console and marked prominently as ‘legacy’, I frequently receive questions from clients asking whether they should migrate their MRM policies to Purview Data Lifecycle Management (DLM). And the answer is: it depends. First of all, Microsoft states the following when navigating to said management console:
We do not recommend using this option except for moving items from a primary to an archive mailbox and applying retention or deletion settings to default folders. We recommend that you use ‘Retention policies’ in Microsoft 365 to protect content in SharePoint, OneDrive, Exchange and Microsoft 365 Groups.
Second, you should look at the functionality Purview DLM offers and whether it matches your requirements.
Common pitfalls
So with that, let’s first take a look at some common pitfalls when migrating Exchange MRM to Purview DLM.
- Purview DLM does not give you the opportunity to move message to the Exchange Online Archive. Instead, it moves (or copies in the case of an edit) items to a hidden folder within ‘recoverable items’ which in turn resides in the primary mailbox. They are essentially two different solutions. Exchange MRM provides archiving to an online archive with the purpose of cleaning up old messages from the primary mailbox, which can then be retrieved and, if necessary, deleted by the user. Purview DLM offers a solution aimed at meeting compliance requirements. After archiving, messages can no longer be found or deleted by an end user, but they can be accessed by a member of, for example, your legal, HR, or records management team through the use of eDiscovery.
- Purview DLM makes use of retention policies and retention tags. Policies are enforced on entire mailboxes, and the settings of a policy regarding retention or deletion cannot be modified by a user. Retention tags can be applied by a user to items such as individual email messages or calendar entries, but tagging an entire subfolder within the mailbox is not possible.
- Purview DLM retention policies support:
- Email messages, including attachments (received, drafts and sent)
- Tasks (only those with an end date)
- Notes
- Calendar items (only those with an end date)
- Public Folders
- Purview DLM retention labels support:
- Email messages, including attachments (received, drafts and sent)
- Tasks (only those with an end date)
- Notes
- In addition to application by end users, retention tags can also be automatically applied to:
- Mail items containing sensitive information (classification must be configured for this).
- Mail items that contain certain words, phrases, or properties.
Assessing the current configuration
You should start by assessing the current Exchange MRM configuration. You can do so by navigating to the Purview console, Solutions, Data Lifecycle Management, Exchange (Legacy). Document which MRM retention policies are present, which retention tags they distribute and to how many and which users the policies are distributed to. The latter can be easily found using the ExchangeOnlineMangement PowerShell module. Use the following command (and tailor it to your specific needs):
Get-Mailbox | ft Name,RetentionPolicy
Design the DLM equivalent, if possible
As you can see, there are a lot of differences in functionality between both solutions. If the goal is to clean up the primary mailbox, where the organization also enables the user to make exceptions to the organization-wide policy by applying MRM tags to (sub)folders, then Purview DLM may not be the best option at this time. This is also considering that Purview DLM does not support archiving to the online archive. In this case, I would recommend continuing to use Exchange MRM policies. However, if the goal is retention or automated deletion of data for compliance purposes, then Purview DLM is an excellent alternative. In the example below, you will find a solution for Purview DLM that still provides the user with some flexibility before items are permanently stored in the archive.
That being said, make sure not to forget to involve your end users in the visual and functional changes should you decide to proceed with the migration.
Let’s take a look at some facts and figures that we have to keep in the back of our mind when designing a solution based on DLM in combination with Exchange Online:
- Changes in your current MRM policy take up to 7 days to be applied to mailboxes. This includes removal of the MRM policy assignment from a mailbox. You can however speed up the process by invoking the ‘Start-ManagedFolderAssistant’ ExchangeOnlineManagement cmdlet.
- When using retention policies, it can take up to 7 days before your policy becomes effective. This includes up to 24 hours for the policy to distribute to the location and the time needed for the policy to be applied to your content.
- When using auto-applying retention labels based on retention label policies, it can take up to 7 days before your labels become effective. This includes up to 24 hours for the policy to distribute to the location and the time needed for the label to be applied to your content.
- You can daisy-chain several retention labels together to give the user some time to delete content before it’s archived.
- Make yourself familiar with how DLM retention and deletion works, and most importantly, which action takes precedence over another. There is a great flowchart for that over on Microsoft Learn.
The test scenario
In our test scenario, a fictitious customer wants to migrate the following functionality from Exchange MRM to Purview DLM:
- Supported mailbox items should be retained forever for various VIP mailboxes.
- The mailbox owner must have a period of two weeks after the creation of the item (for example, after receiving or sending an email message) to delete the item so that it will not be archived.
- If the user deletes an item after the two week period, it should be retained for legal purposes.
Purview DLM policies are better suited for this scenario than Exchange MRM policies because MRM allows users to delete items from their online archive, making it less appropriate for legal or compliance requirements.
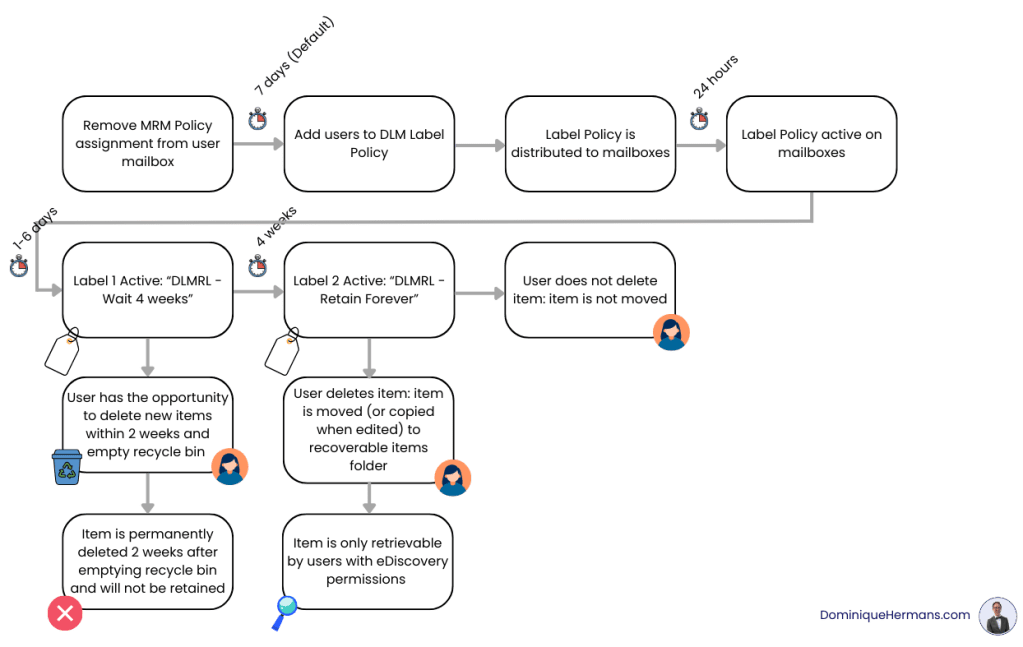
Let’s take a look at the steps we’ll have to take to make this work with Purview DLM. This setup relies on two important techniques:
- Daisy-chaining labels to give users the possibility to delete items before they are retained (archived).
- Auto-apply labels to apply the first label automatically to all supported items in a mailbox. Normally I would advise to use an retention policy over a retention label policy for this. However, retention policies don’t support daisy-chaining.
Take a look at the following flowchart how daisy-chaining and auto-applying labels could help us meet the requirements:
Configure
As this is just an example setup, I will show you how to apply the design above to one mailbox. In a production environment, I would advise you to first test and pilot this setup before rolling it out into production.
Removing the MRM Policy assignment
Log into Exchange Online PowerShell and use the cmdlets below to remove the MRM policy assignment from the user mailbox and run the Managed Folder Assistant to expedite the process.
# Connect to Exchange Online
Connect-ExchangeOnline -UserPrincipalName admin@SomeTenant.onmicrosoft.com
# Remove the MRM Policy assignment from the mailbox
Set-mailbox Christiec@SomeTenant.onmicrosoft.com | Set-Mailbox -RetentionPolicy $null
# Start the Managed Folder Assistant to expedite the process
Start-ManagedFolderAssistant -identity ChristieC
Do note that it still can take a few days for the changes to take effect. After the changes are in effect, mailbox policy tags will not be auto-applied nor be available for users to apply to items or folders in their mailbox.
Create the DLM retention labels
As can be seen in the flowchart above, we now need 2 DLM retention labels:
- Label 1: “DLMRL Wait 4 weeks” which will be auto-applied to all supported items in the mailbox by using an auto-apply label policy.
- Label 2: “DLMRL Retain Forever” which will be ‘glued’ to label 1 using the daisy-chain technique so it automatically becomes active 4 weeks after label 1 was applied.
Note that DLM retention labels will apply to items in your primary mailbox AND your archive mailbox. No additional configuration is needed for this.
Let’s start by creating Label 2. No, that isn’t a typo. We should create label 2 first:
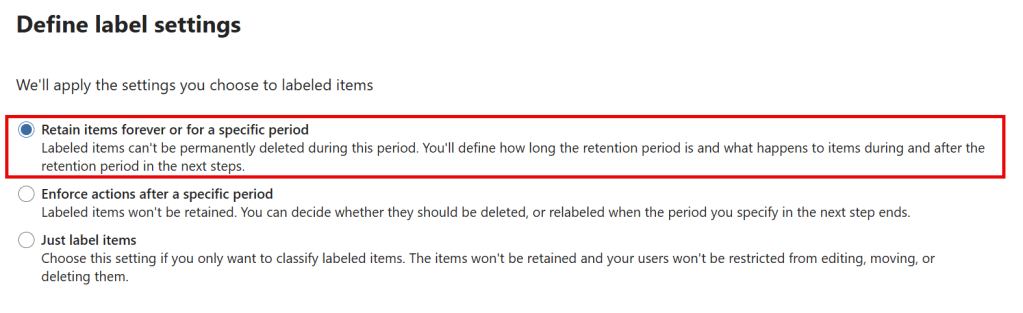
The requirement of our case was that items should be retained forever (after a 4 week waiting period), so that’s what we configure here by choosing ‘retain items forever or for a specific period’.
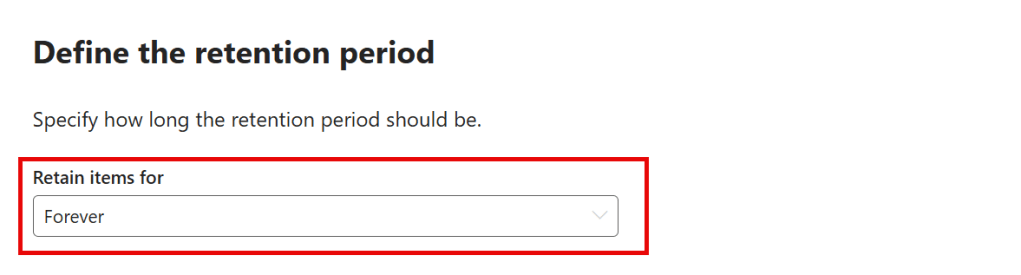
Next, select ‘forever’.
Now onto label 1. Label 1 will have a very easy task. Just label items and do nothing but sit out a four-week waiting-game. This will give users the chance to delete items before they are retained forever. Note that the instructions to your users should be that they have 2 weeks to delete items and empty the recycle bin.
You could also use a MRM policy tied to the default folder ‘deleted items’ for it to be emptied after each couple of days. The downside of this approach is that it uses an MRM policy and that’s exactly the kind of policy we want to move away from!
The four-week waiting period for the first label is necessary because items remain in the Recoverable Items folder for two weeks by default before they are permanently deleted. This two-week period is the default value and may differ in your environment. If that is the case, the value of Label 1 must be adjusted accordingly.
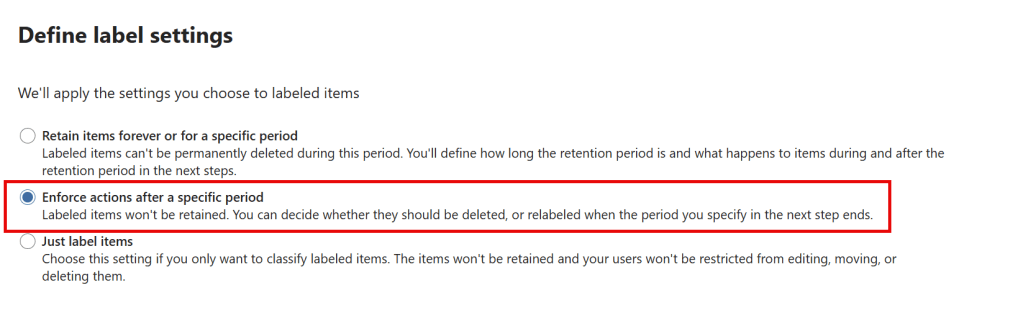
The label setting of choice for label 1 will be ‘enforce actions after a specific period’.
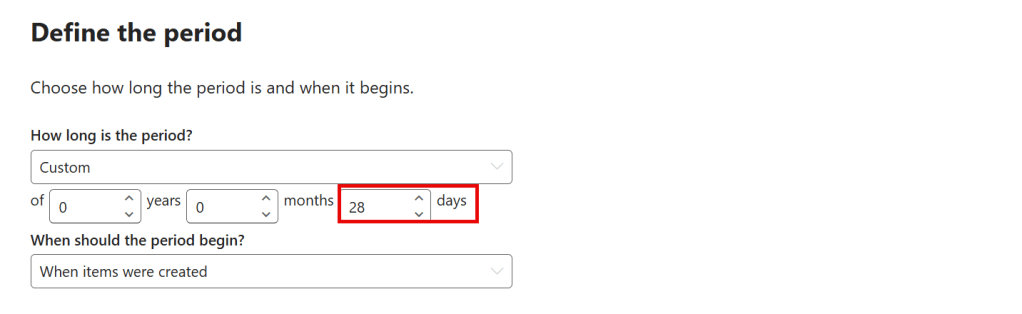
As discussed, when your recoverable items folder is configured with default values, the period should be configured as ’28 days’.
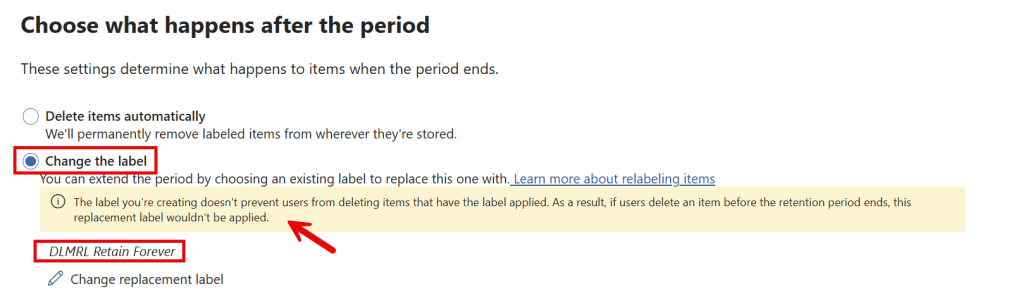
Last but not least, let’s apply some daisy-chain magic. Use ‘change the label’ and select label 2 (now you know why we had to configure label 2 first!). Note the yellow bar stating that our second label will never be applied if users delete an item before the retention period of the current label (label 1) ends; which is exactly what we’re aiming for!
Create the DLM retention label auto-apply policy
Last but not least, we have to teach the system how to apply our first label. We’re going to configure this with a DLM retention label auto-apply policy.
To accomplish this, navigate to DLM, policies, label policies and click ‘auto-apply a label’.
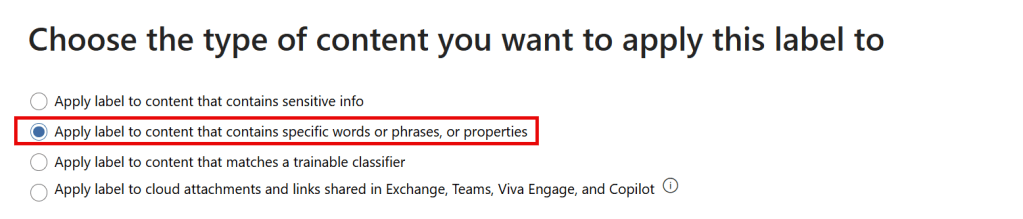
First, select ‘apply label to content that contains specific words or phrases, or properties’
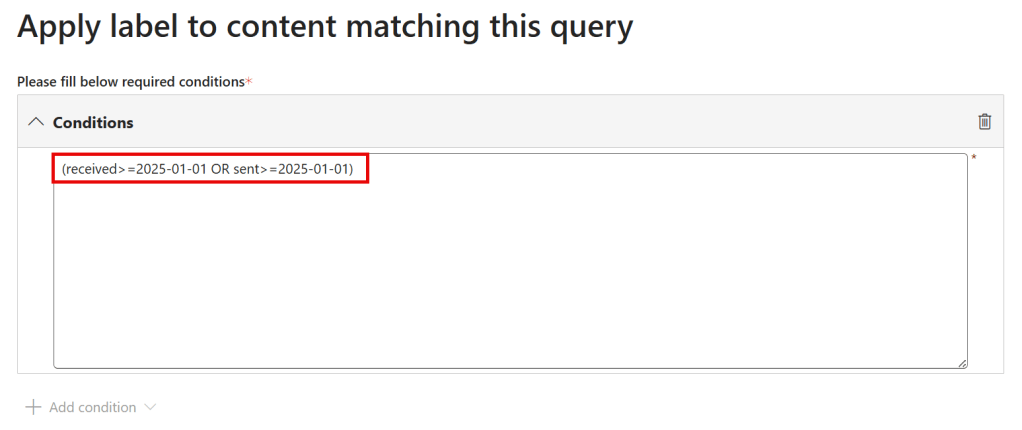
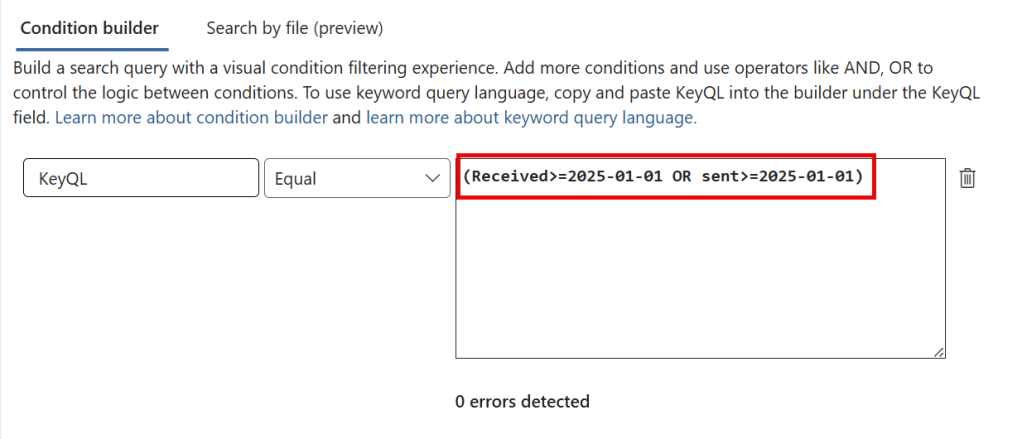
Next up, we’ll have to specify conditions that teach the system to what type of content the label should be auto-applied to. In our case we want all items that are received or sent after 2025/01/01. Take a look at the following Microsoft Learn article to see more properties you can use as conditions.
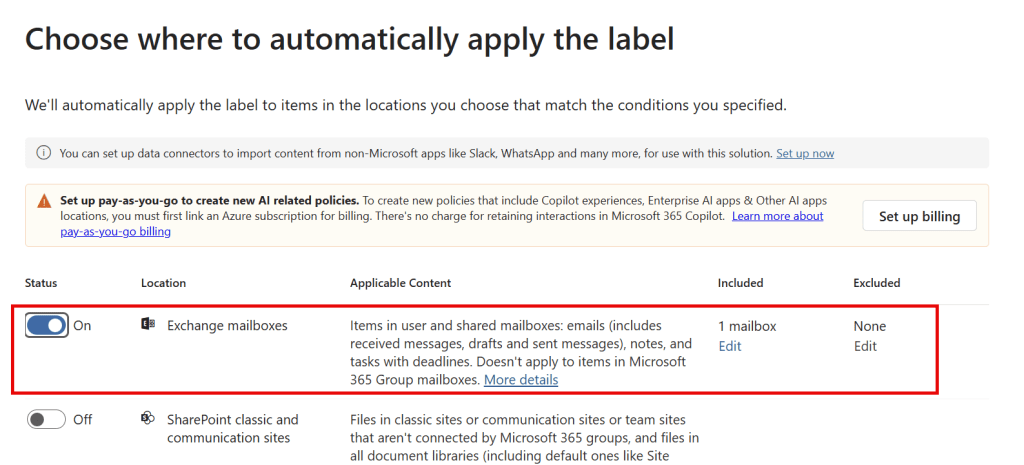
Select the mailboxes that you would like to have your label applied to. Disable all other locations.
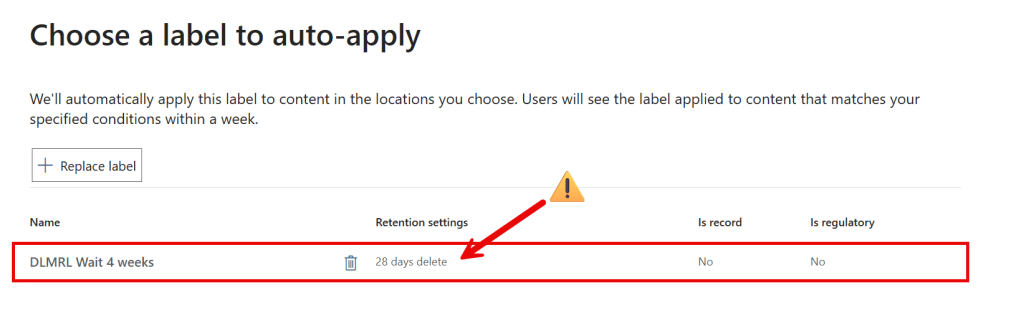
Last but not least, choose a label to auto-apply, which is of course our first label. The weird thing in this GUI is, that it shows ’28 days delete’ which isn’t really the case as it was configured to relabel after the configured period.
Verify your implementation
Now the big waiting game can start. You can use a couple of tools to check whether your implementation works as designed.
Use ‘policy lookup’ to verify the label policy has been successfully distributed

Navigate to Data Lifecycle Management, Policies, Policy Lookup and select a user of choice. Within a second you know whether your label policy has been distributed successfully to the user mailbox.
Use Content Search to test your auto-apply conditions
Use eDiscovery, Content Search to test your auto-apply conditions. You can scope your test to specific mailboxes. It will tell you when your syntax is incorrect. Run the query to see if you’re seeing item matches you expected.
Of course, also check whether items that have been labeled with your second label end up in the recoverable items folder!
Informational messages

As you can see in the image above, users also receive informational messages (tooltips) when an item is nearing the end of its expiration date. This is why it is important to use label names and descriptions that are meaningful for your users!
Alternative Configuration – Using Record Labels
Say you want to have a little different approach where you want the primary mailbox of a user always to reflect what is actually being retained. In other words, you don’t want to make use of the recoverable items folder but keep items right where they are (or where moved by the user).
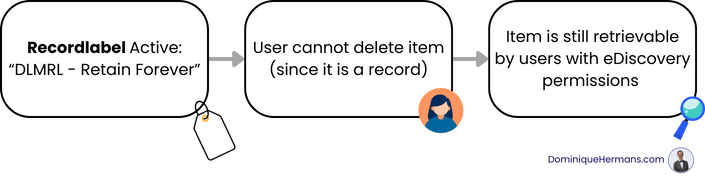
This is a really good case to substitute the second label with a record label which does exactly that, keep the item in place and don’t allow a user to remove it! If you would like to know more about record labels and their properties, take a look at my post on the subject!
Parting Thoughts
In the scenario described above, Exchange MRM policies can be replaced by Purview DLM policies. However, this is still far from possible in all cases due to differences in functionality. Time will tell whether the features we currently only have in Exchange MRM, such as moving items to an online archive, will eventually also become available through Purview DLM.
If you have successfully completed the pilot, then migrate the rest of your organization to Purview DLM and do not forget to consider your strategy regarding (re)migrating items from your online archives, should you decide to discontinue them!
