Before you can make use of all features in Microsoft Purview, such as information protection and data loss prevention, it is essential to understand which information is sensitive for your organization and where this information is located within your organization. Identifying this sensitive information can be done in two ways: through (auto-)labeling or continuous classification based on document content characteristics.
When is classification information collected and where is it stored?
Image source: Enrique Saggese (Microsoft)
Let’s take a look at the image above by Enrique Saggese. Classification information is created or updated when 1 of the following actions happen to content:
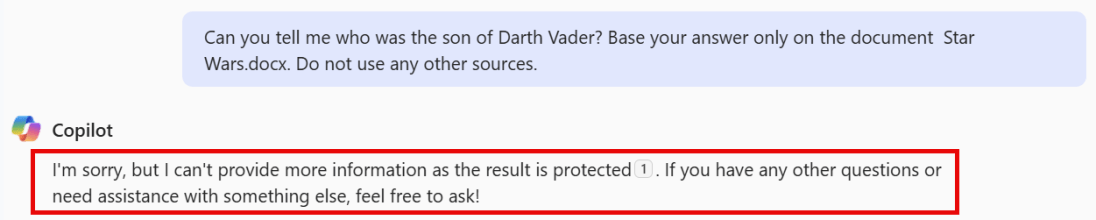
In a previous post I talked extensively about using the newly introduced Data Loss Prevention (DLP) policy that can be scoped specifically at M365 Copilot interactions to prevent M365 Copilot from using sensitive labeled content. The post concluded with a table that clearly showed that the DLP policy alone did not suffice in keeping your sensitive information from being processed by M365 Copilot, as it only supports M365 Copilot chat based experiences. This is also clearly being communicated by Microsoft as the DLP policy is still in preview.
In the same posts conclusion, my advice was to combine the M365 Copilot DLP feature with other security measures like the removal of the EXTRACT permission. And that’s exactly what I put into practice over the last week. In this post, I want to show you the results of this test.
Configuration
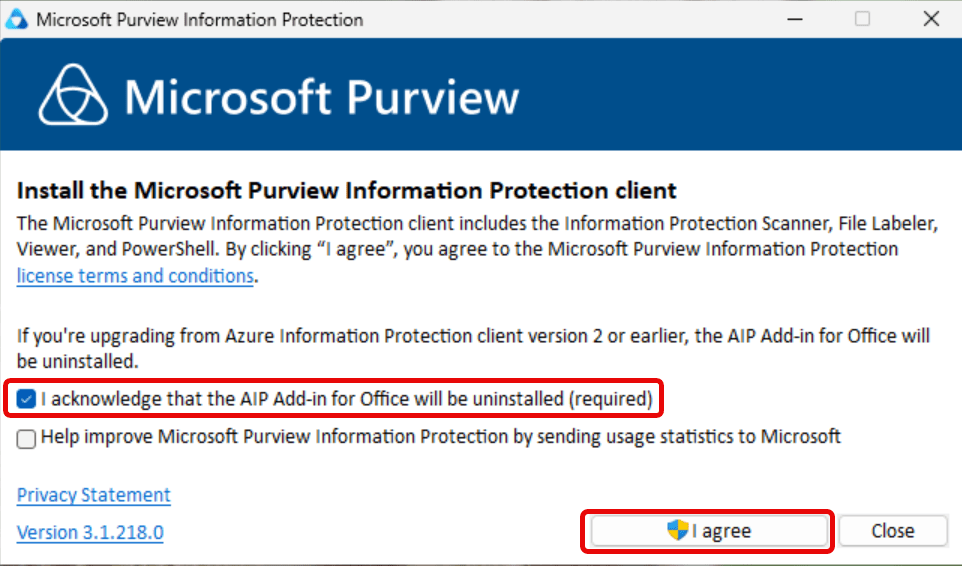
What I did to configure this setup is fairly simple. First, create a sensitivity label. You can use my article on this as a starting point. However, make sure the configured sensitivity label applies access control (also known as encryption), as per the configuration in the above image. Click ‘Assign Permissions’ on the bottom of the screen.
For all your labeling needs on Windows clients, Microsoft provides us with the Microsoft Purview Information Protection (MPIP) client. This client extends the use of sensitivity labels in your organization for use on Windows clients. Your files can be anywhere on the client, it doesn’t have to be in a SharePoint, Teams or OneDrive location, it can just as easily be on the local harddrive.
The Microsoft Purview Information Protection client is in fact a collection of 4 tools:
The information protection file labeler. This tool is featured in this blog article. I will show you how to label files with it.
The information protection viewer which can be used to view encrypted files. This tool is also featured in this blog article.
The information protection scanner. Used to scan network shares and apply labels as per your liking. Will be featured in the next blog article.
The Microsoft Purview Information Protection PowerShell Module. Used to install and configure the information protection scanner and adjust sensitivity labels on files. Also featured in the next blog article.
The MPIP Client replaces the old Azure Information Protection (AIP) unified labeling client. Be sure that you don’t rely on AIP before installing the MPIP client as it will uninstall the AIP client! This client also won’t install add-ins for sensitivity labeling in Office applications, as this is built-in the applications nowadays.
Before starting, make sure to take a look at the client requirements. If you run clients on Windows 11 ARM, make sure to check the note that this processor architecture is not supported. While it worked as designed in my lab environment, your mileage may vary. Also, the tool supports all languages that are supported by Office 365.
File type support
The MPIP client supports even more file types (extensions) than the ones found in the Microsoft 365 services. Support for all Office filetypes, PDF, Images, Photoshop and others are present. You can check the entire list at Microsoft Learn. Make sure to note that the supported file types differ between sensitivity labels with encryption and sensitivity labels without encryption.
For a little while now, Microsoft offers a Data Loss Prevention (DLP) policy that can be specifically scoped at Microsoft 365 Copilot (Hereafter called ‘Copilot’). This feature lets you prevent Copilot from processing content that has been labeled with sensitivity labels of your choosing.
However, while this is a nice way to prevent content from being used by Copilot to generate its answer, it’s not something that is going to work for all Copilot use cases.
Let me explain what I mean by this. When we configure such a DLP policy an informational message appears saying “Currently, this action is supported only for labeled files in SharePoint and OneDrive that are processed for chat experiences in Microsoft 365 Copilot. It’s not supported when processing labeled files in non-chat Copilot experiences”. But what exactly are these ‘chat-experiences’ in Microsoft 365 Copilot? And as the opposite, what are non-chat experiences?
Let’s dive into a demo environment where we set up the new DLP policy that prevents Copilot from processing labeled content and maybe more important, take a look at what the user experience is like for the various integrations of M365 Copilot in chat and apps.
Where is content being blocked, and where does Copilot just work it’s magic despite of having this DLP policy deployed? Let’s find out!
Allowing or blocking guest access to your teams is a common thing you need to think about when creating a team. Will you let the team’s owner be responsible for this fact or is this something you embed in your organization’s policy?
If we look at the options within Teams, we can generally only enable or disable guest access for the entire environment. But when we throw sensitivity labels into the equation we can:
Prevent team owners from adding guests.
Prevent items in a team from being shared with guests.
Note: This article applies sensitivity labels to containers (also referred to as container-level labeling), where the container in this case refers to the team and its underlying SharePoint site. Applying a sensitivity label at the container level does NOT assign a sensitivity label to items (files) within the container. This means that individuals can still download a file and distribute it by other means. If you want to prevent this, you can use item-level sensitivity labels.
Let’s take a look at how to configure container-level labeling to prevent guests from being added to a team and prevent items in the team from being shared with people outside your organization.
Prepare your environment for container-level labeling, the Microsoft Graph part.
Microsoft Teams teams are built on Microsoft 365 groups. Your Microsoft 365 Entra ID environment contains various so-called ‘settings objects’ that define how a Microsoft 365 group is configured. By default, these settings objects are not visible, as your environment is configured with default values.
Let’s talk about the following scenario. You have an employee that is leaving your company. Because the leaving employee thinks that he has the rights to all of the companies documents he starts downloading them for later use and sends the documents to his private email account using Dropbox. Wouldn’t you want to be notified of such a scenario?
Enter Microsoft Purview Insider Risk Management (IRM). A solution that collects information from all kinds of different sources like Microsoft 365 and perhaps other services like your HR-system. In IRM, you can create various policies that let you monitor all sorts of policy violations. A few examples are:
Data theft by departing users
Various kinds of data leaks
Various kinds of policy violations
Health record misuse
Risky browser usage
IRM provides you with workflows to help your organization detect the above potential risks, manage them by cases and take various actions on the risks that are found in your environment. Ready to find out more by using an example? Let’s go!
Prerequisites
When you first navigate to the IRM console, you are greeted with a few recommendations to get you started.
Turn on analytics
The first one is shown in the picture above and let’s you turn on analytics to scan for potential risks. When you enable this, user activities are scanned on a daily basis to identify potential risks occurring in you environment. The first scan can take 48 hours to complete as it scans your audit log and Microsoft Entra ID. When it’s done, it provides you with an email when there are insights and IRM policy recommendations to check up on. Note that if you don’t have audit logging enabled for your tenant (which is enabled by default nowadays) now is a good time to do so.
Communication Compliance in Microsoft Purview can detect messages in your organization that are considered to be inappropriate. Besides detection it can also capture and take action on the messages that it finds. Microsoft Purview is equipped with several out-of-the-box policies and gives you the possibility to create your own. Communication compliance policies can be used to check for inappropriate messages in internal and external communications that take place in email (Exchange), Meeting/IM (Teams chat, channel messages, meeting transcripts with recordings), Viva Engage and interactions with Microsoft 365 Copilot.
You can think of the following messages being inappropriate in your environment:
Messages that contain sensitive content.
Messages that contain inappropriate content, text or images.
Messages that contain conflict of interest.
Messages that contain information that is against laws or compliance policies.
And so on!
In this blog I want to show you how to create a communication compliance policy, what it looks like for the user that sends messages being inappropriate, how these messages are captured and how you can take action. Are you ready? Let’s go!
Imagine you’re the guy in the picture above. You’re responsible for processing requests for information for a government. These requests occur worldwide and are often enshrined in legislation. Examples include:
The Netherlands: Wet Open Overheid (WOO)
United States of America: Freedom of Information Act (FOIA)
Canada: Access to Information Act
United Kingdom: Freedom of Information Act
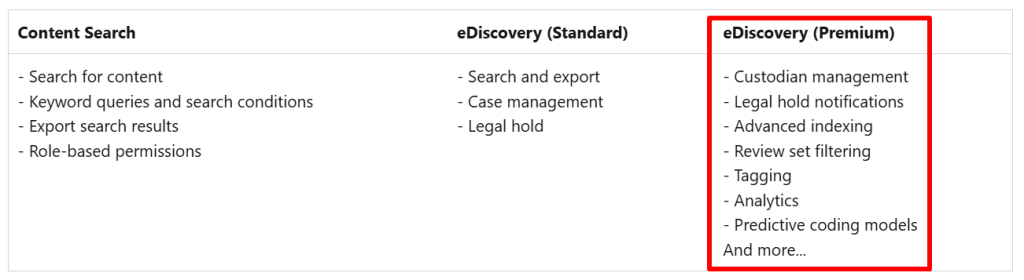
These requests often need to be handled within a specified timeframe. Not exactly doable if you have to comb through al these boxes like the guy in the picture. Good thing in reality you are not really that guy in the picture! You use modern methods and services like Microsoft 365 to store your information. And that’s where the magic comes in that I will explain in this blog. With Microsoft 365 you can use the eDiscovery feature to fulfill the requests for information. A really handy and quick tool that takes a lot of the manual work out of your hands. Let’s see how this works by putting a request for information through it’s paces in eDiscovery Premium.
eDiscovery within Purview comes in 2 flavours: Standard and Premium. You can see the differences in the table above. There’s also Content Search which can be used for the same purposes but has less features in terms of case management. In this blog I will use eDiscovery Premium to demonstrate what features it has in store.
In the last blog, we talked about sensitive information types, classifiers and how to implement them in your environment. In this blog I want to take you along the likes of the Content Explorer and Activity Explorer. According to the Purview documentation, we can leverage the Content Explorer to explore email and documents in your environment that contains sensitive information or items that have labels applied. Activity Explorer can be used to take a look at all the actions that took place with sensitive info or items that have labels applied.
Let’s dive right in and start with the possibilities of Content Explorer
Content Explorer
Let’s start taking a look at Data classification, overview. Here you can see a glance at the sensitive information and labels used in your environment. A lot of this data is actually coming from the Content Explorer.
When talking about Microsoft Purview, it goes often hand in hand with data classification. But how can we classify our data? Microsoft Purview provides us with a few different options to do this:
Manually by an administrator or your users.
By using automated pattern-matching.
By using classifiers
After your data has been classified, you can take a closer look at where your sensitive data resides (for example with Data Explorer or eDiscovery) to get an overview of your information, or use the various tools in Purview to protect your sensitive data. This article covers classifying your data, if you want to take a closer look at the tools that protect your data, take a look at my articles on Data Loss Prevention, Data Lifecycle Management and others.
Introduction to Data Classifiers in Purview
When talking about manually categorizing your content you can use pre-existing labels or sensitive information types or you can create custom ones yourself and use these to protect your data and manage it’s lifecycle.