Allowing or blocking guest access to your teams is a common thing you need to think about when creating a team. Will you let the team’s owner be responsible for this fact or is this something you embed in your organization’s policy?
If we look at the options within Teams, we can generally only enable or disable guest access for the entire environment. But when we throw sensitivity labels into the equation we can:
- Prevent team owners from adding guests.
- Prevent items in a team from being shared with guests.
Note: This article applies sensitivity labels to containers (also referred to as container-level labeling), where the container in this case refers to the team and its underlying SharePoint site. Applying a sensitivity label at the container level does NOT assign a sensitivity label to items (files) within the container. This means that individuals can still download a file and distribute it by other means. If you want to prevent this, you can use item-level sensitivity labels.
Let’s take a look at how to configure container-level labeling to prevent guests from being added to a team and prevent items in the team from being shared with people outside your organization.
Prepare your environment for container-level labeling, the Microsoft Graph part.
Microsoft Teams teams are built on Microsoft 365 groups. Your Microsoft 365 Entra ID environment contains various so-called ‘settings objects’ that define how a Microsoft 365 group is configured. By default, these settings objects are not visible, as your environment is configured with default values.
To modify the default behavior and properties of a Microsoft 365 group, we need to create a new settings object. For this, we use a ‘SettingsTemplate’ object as a foundation. These templates are provided by Microsoft and define the properties a settings object can have. To customize Microsoft 365 group settings for your environment, we use the template named “Group.Unified”.
Install-Module Microsoft.Graph -Scope CurrentUser
Install-Module Microsoft.Graph.Beta -Scope CurrentUser
Start by installing the Microsoft.Graph and Microsoft.Graph.Beta PowerShell modules using the above cmdlets in PowerShell 7.
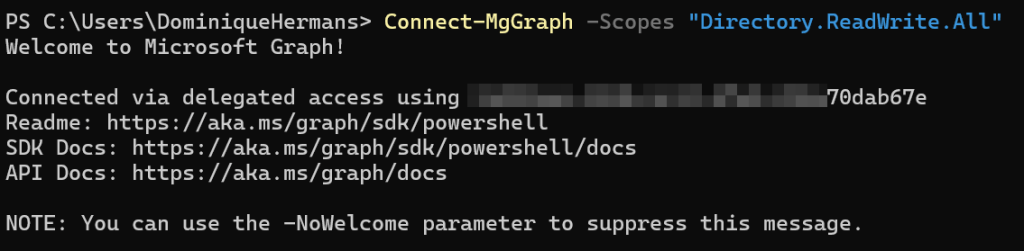
Next, connect to Microsoft Graph PowerShell using ‘Connect-MgGraph’ with the ‘Directory.ReadWrite.All’ scope as shown in the image above. This allows us to edit the Microsoft Entra ID directory configuration.
$grpUnifiedSetting = Get-MgBetaDirectorySetting | Where-Object { $_.Values.Name -eq "EnableMIPLabels" }
$grpUnifiedSetting.Values
Use the above cmdlets to check if a new settings object was already created that defines the ‘EnableMIPLabels’ property. If yes, you’re done here and you can skip to the next chapter. If you see an empty screen you should follow along to prepare your environment.

Let’s take a look at which SettingsTemplates we have in our directory and the ID’s that have been assigned to them using the cmdlet ‘Get-MgBetaDirectorySettingTemplate
ft Id,DisplayName,Description’. The ‘Group.Unified’ template in my environment ends with ‘e0e304b’. Let’s keep that in the back of our mind.
# Get the SettingsTemplate ID for 'Unified.Group'
$TemplateId = (Get-MgBetaDirectorySettingTemplate | where { $_.DisplayName -eq "Group.Unified" }).Id
# Get the 'Unified.Group' Template and pass it to the 'Template' variable.
$Template = Get-MgBetaDirectorySettingTemplate | where -Property Id -Value $TemplateId -EQ
# Show the configuration of the template on screen
$Template | fl
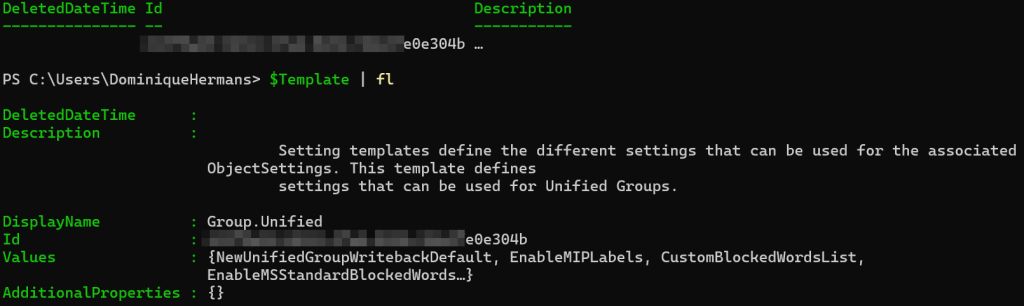
To add the configuration that we need to be able to set sensitivity labels on our Microsoft 365 group, we need to get the SettingsTemplate object above and put it in a variable. This can be done using the cmdlet above. The last line shows the configuration of the settingstemplate that is passed to the ‘Template’ variable. Note that we can use the ‘EnableMIPLabels’ value on a new settings object.
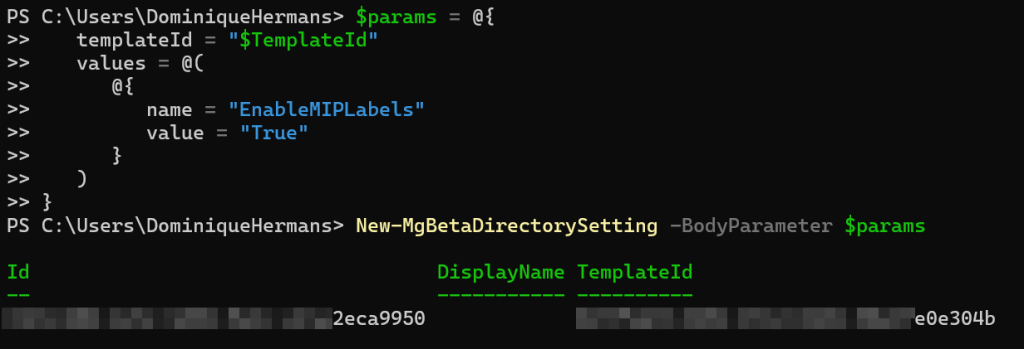
This is done by creating an object that contains the values that we want to use. For our usecase, we want to use the value ‘EnableMIPLabels’ with a value of ‘True’. When done, create the new directory setting object by feeding the object you just created to the “new-MgBetaDirectorySetting’ cmdlet using ‘New-MgBetaDirectorySetting -BodyParameter $params’.
$Setting = Get-MgBetaDirectorySetting | where { $_.DisplayName -eq "Group.Unified"}
$Setting.Values
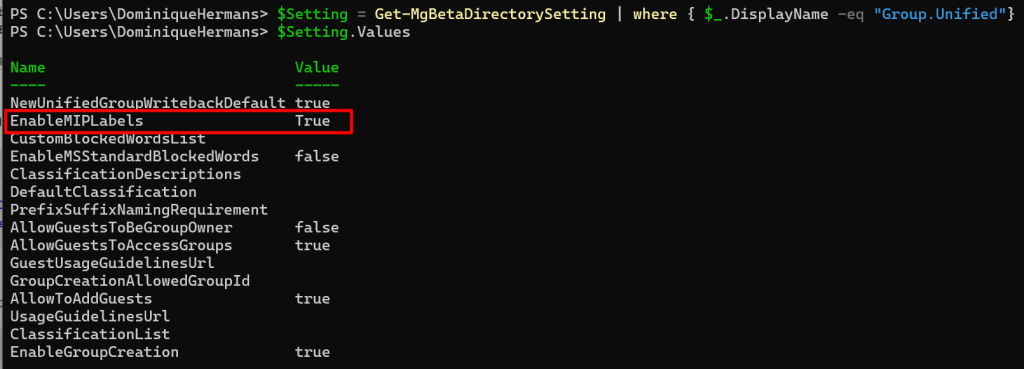
As you can see, MIP (Microsoft Information Protection) labels are now created for Unified Group (also called Microsoft 365 Group) objects!
Disconnect-MgGraph
Disconnect from the Microsoft Graph PowerShell API.
Prepare your environment for container-level labeling, the Security and Compliance part.
Now that we made Microsoft 365 groups support sensitivity (MIP) labels, we have to take care of another prerequisite, that is start the synchronization of labels from Microsoft Purview into Microsoft Entra ID. As teams are built on Microsoft 365 groups, which are in turn sourced from Microsoft Entra ID, we need our sensitivity labels to be available there before we can apply them.
Install-Module -Name ExchangeOnlineManagement -Scope CurrentUser
First install the ExchangeOnlineManagement module to be able to connect to Security and Compliance PowerShell by using the cmdlet above (use PowerShell 7).
Import-Module ExchangeOnlineManagement
Connect-IPPSSession -UserPrincipalName admin@yourtenant.onmicrosoft.com
Next import the module and connect with Security and Compliance PowerShell using the cmdlets above.
Execute-AzureADLabelSync
Finally, start the synchronization of labels. This only has to be executed once.
Create the sensitivity label
Now we can head over to the Purview portal and navigate to solutions, information protection where we select sensitivity labels. Click ‘create a label’.
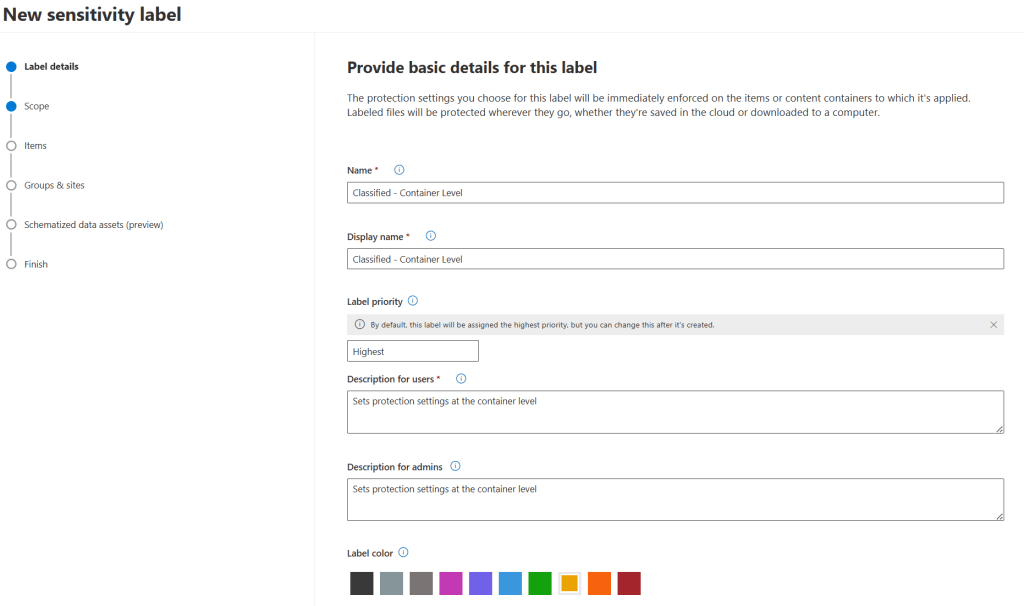
Let’s start with providing some basic details like the label’s name, priority and description for admins and users.
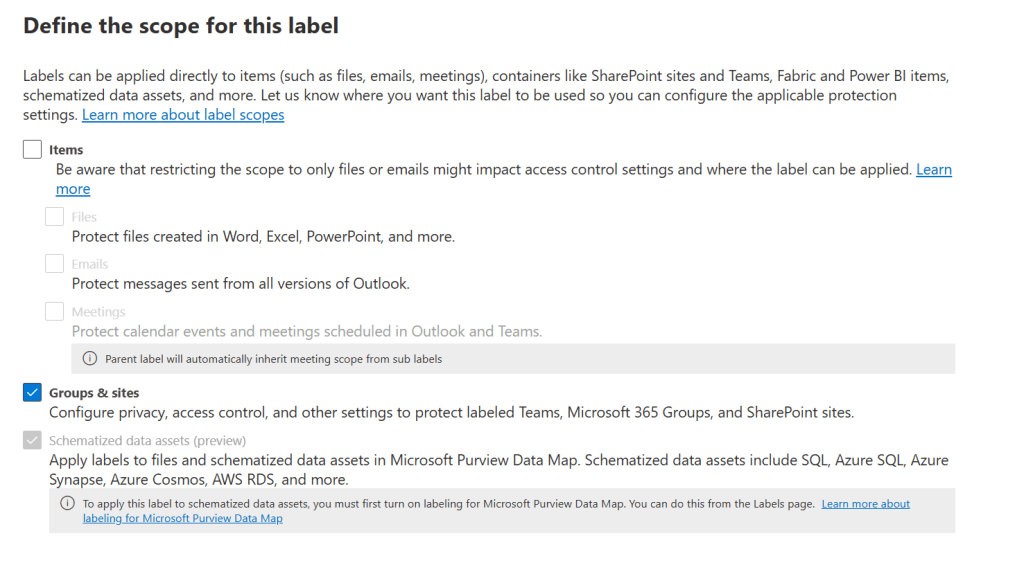
Next, we’ll have to define the scope of the label, which will be ‘Groups & sites’. This configures the label so it can be added to protect Teams, Microsoft 365 Groups and SharePoint sites. The next screen can be skipped, as it wants us to choose protection settings for items. Since that’s not what we’re configuring here and all options are greyed out, let’s move on to the next screen.
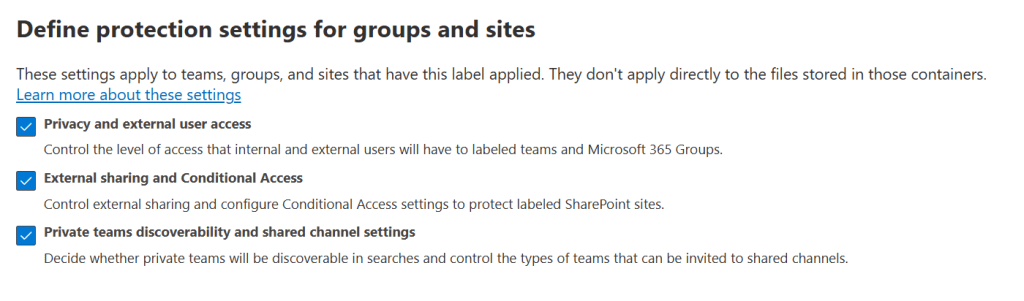
This is where we will define protection settings for groups and sites. Note the message telling us that ‘these settings apply to teams, groups, and sites that have this label applied. They don’t apply directly to the files stored in those containers.
Here let’s select all 3 items to control the level of access that internal and external users have, control external sharing, to decide whether private teams will be discoverable in searches and control the types of teams that can be invited to shared channels.
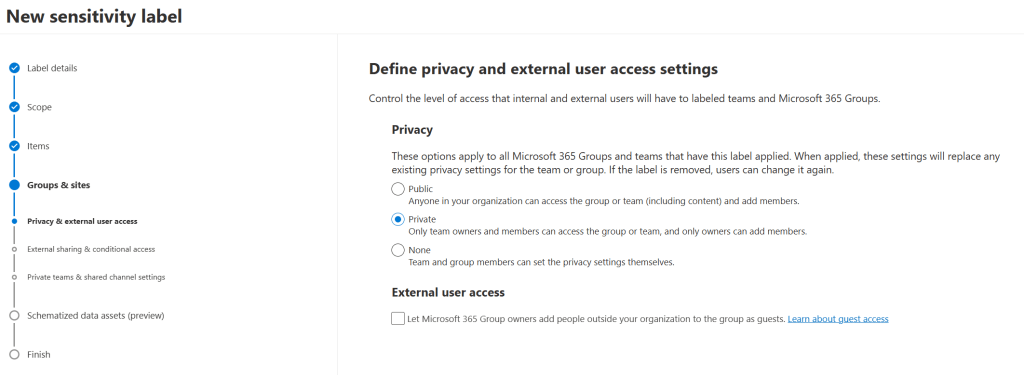
For privacy let’s choose ‘Private’ as we only want team owners and members to access the group or team and only owners can add members.
The more important option in this screen however, is the one on the bottom. As you disable the option beneath ‘external user access’ nobody outside your organization can be added as a guest to your team. That’s exactly what we are aiming for!
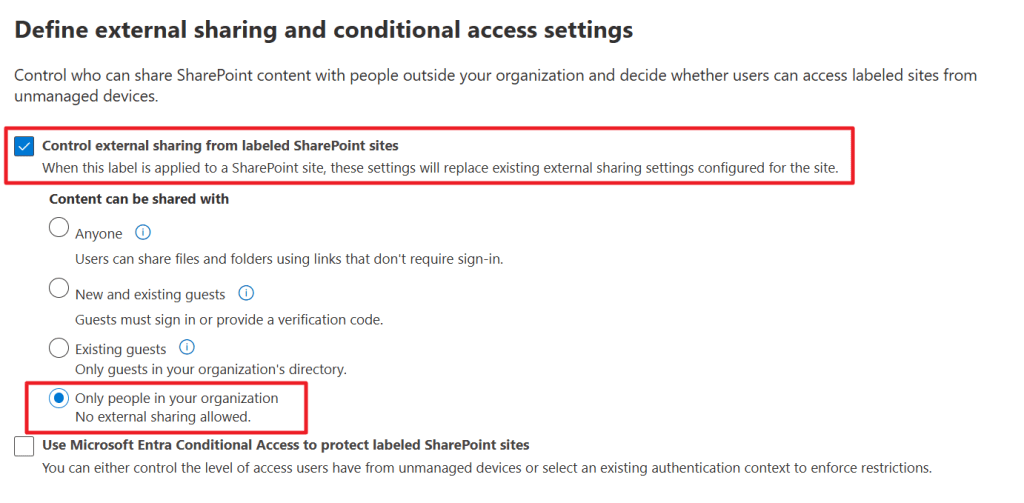
As guests can no longer be added to our team, there’s still one thing members of your organization can do. And that is sharing files that reside in your team from the ‘files’ tab. As this creates links for sharing those specific items, turning guest access off alone won’t help disabling sharing of these files. For this we have to enable ‘control external sharing from labeled SharePoint sites’ and select ‘Only people in your organization’. This configures the underlying SharePoint site that’s connected to the team to not allow sharing of individual files.
You can also configure Microsoft Entra conditional access here to control the level of access from unmanaged devices for example but that’s out of scope for this article.
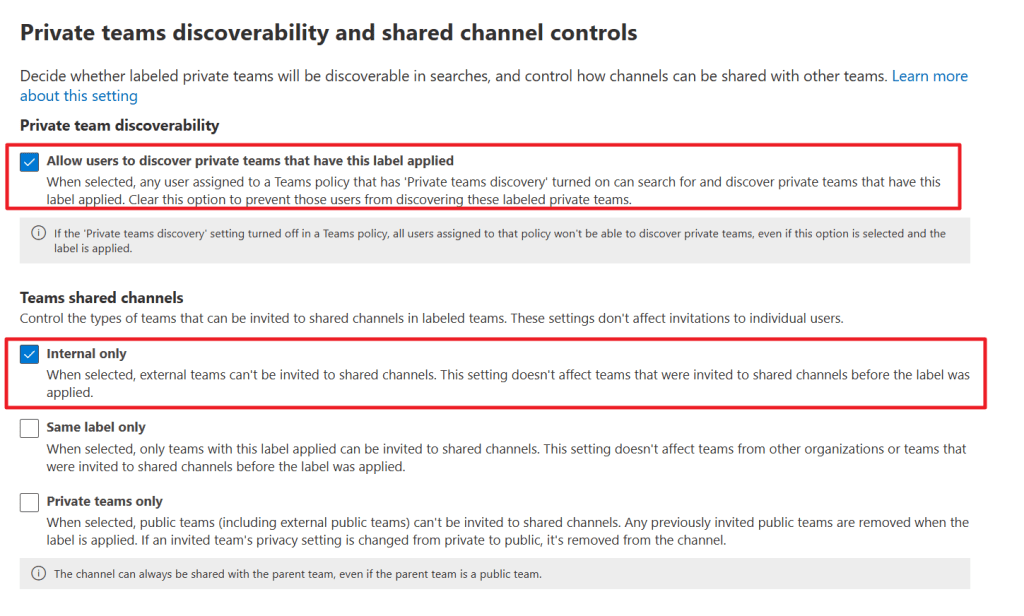
In the next screen, we can select whether private teams with this label applied can be discovered by internal users. Note that if private team discovery is turned off for a teams policy, users are still not able to discover private teams with this label applied.
In the second part of this screen, we can control which types of teams can be invited to a shared channel in the team where we will be applying this specific label. This can be internal teams only, teams that have the same label applied, or private teams only. Do note that this setting only works for inviting entire teams (which makes the shared channel that is part of a labeled team part of the invited team) and not for individual user accounts.
Skip the screen for auto-labeling for schematized data assets as it has nothing to do with labeling teams. Finally review your settings and finish the wizard.
Publish the label to users
Back in the Purview portal, select policies, publishing policies and click ‘Publish Label’. Here we can define which users will have the ability to apply the label to a team.
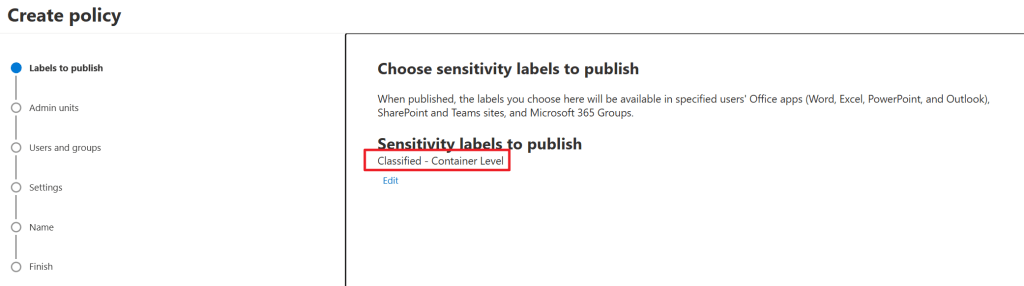
Start by selecting the sensitivity label that needs to be published. In my case, it’s called ‘Classified – Container Label’. Skip the admin units screen as this is out of scope for this article.
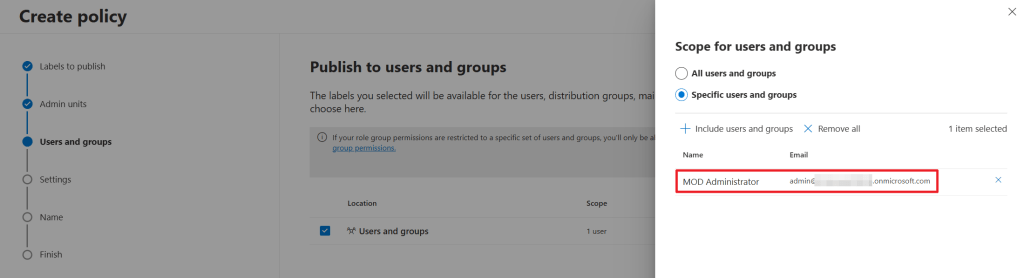
Next, select the users or groups that are tasked with applying the label to teams, or are tasked with creating new teams that have to have this label applied. My advice is to start with a single test user or group and when everything is nice and tidy, expand the scope to everybody who has to apply the label to a team.
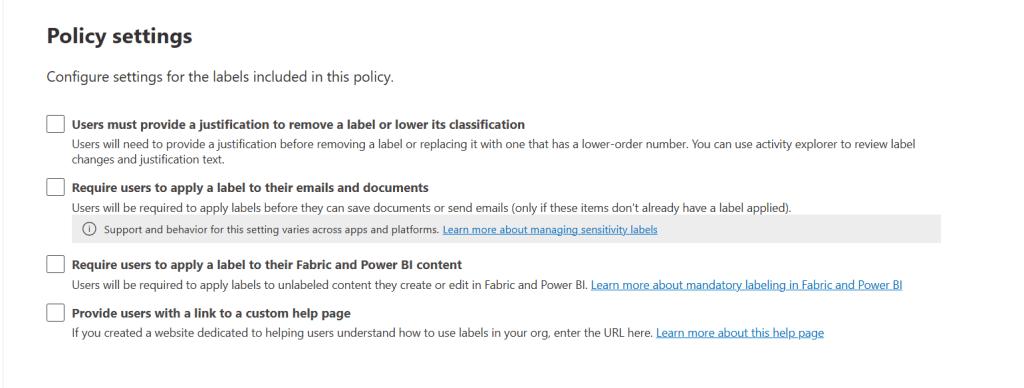
Up next, we can configure whether users must provide a justification to remove a label or lower it’s classification. Since we don’t give users this oppertunity we don’t enable this option. Furthermore, we can require users to apply a label to their emails and documents or Fabric and Power BI content, which is also not what we want to achieve. The last option can be used to provide a link to a help page to educate users on labeling items.
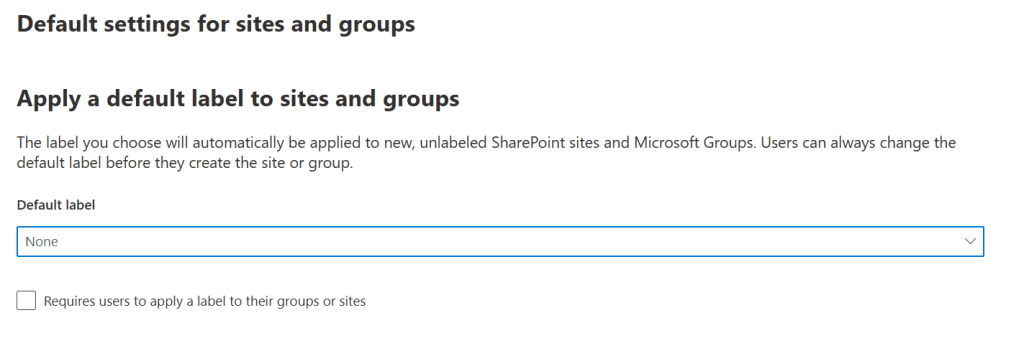
If you want new and unlabeled SharePoint sites and Microsoft Groups to be automatically labeled with a specific label, you can configure this here. Finally, give your policy a name and description, check the review and finish the wizard.
Now this is the part where the coffee comes in, as it can take up to 24 hours before your label is available for applying to your team.
Applying the label to your team
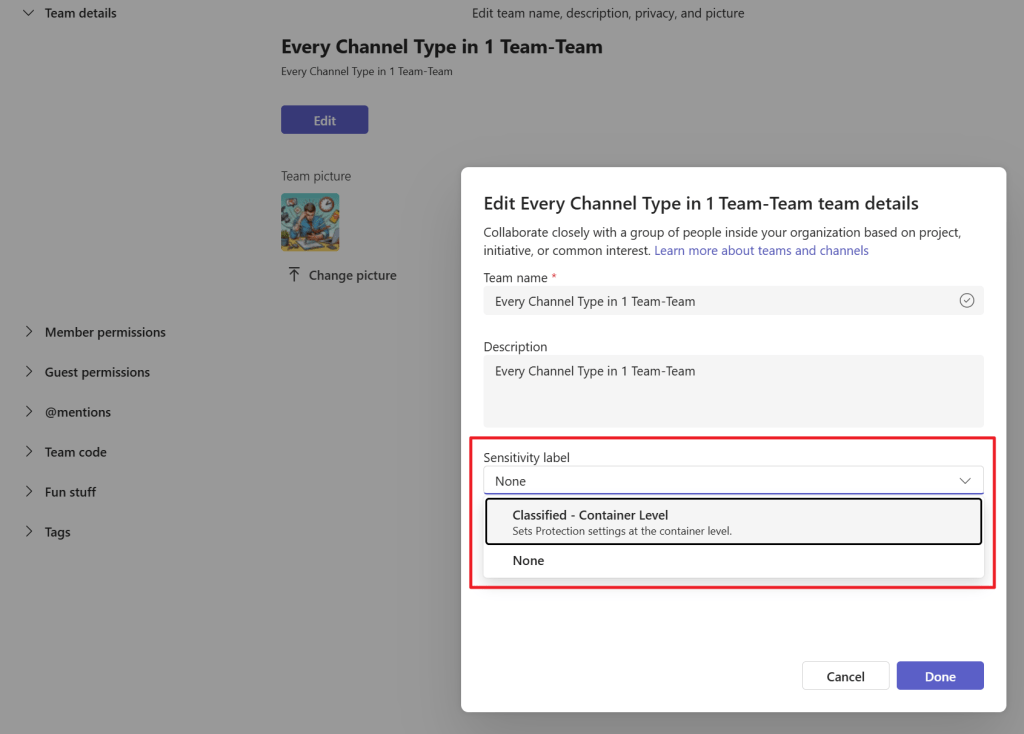
Your new sensitivity label can now be configured on your team by going to Teams, selecting the 3 dots next to your team, select ‘Manage team’, settings tab and clicking ‘Edit. Now your sensitivity label can be selected and applied. Click done and the mission is complete! This of course can also be configured at the time of creating a new team or from within the Entra ID admin panel if you want to have a more centrally managed solution.
User impact
Say we have a user that decided to take the plunge and tries to add an external user as guest to his team or tries to share specific information with someone outside your organization. What happens?
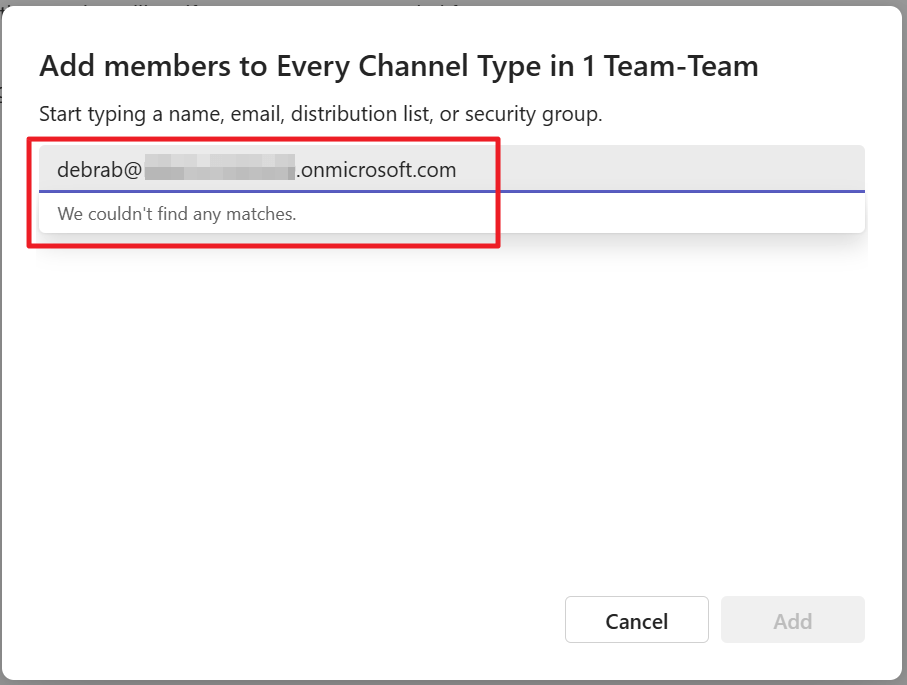
The answer is fairly simple. When an external user is added as a guest, it can not be found and thus can not be added!
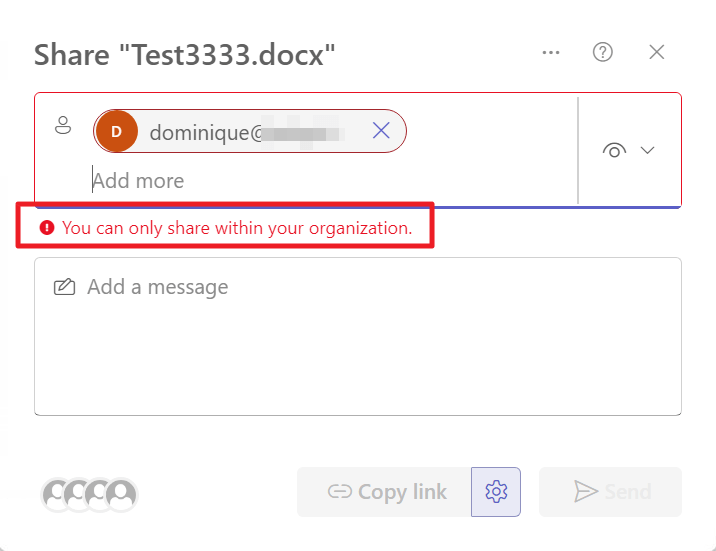
Now when I want to share a specific file from the ‘files’ tab or the connected SharePoint page you’ll receive a nice error stating that you can only share within your organization.
Mission accomplished and the functionality of the configuration has been successfully verified!

What happened to “Get-MgBetaDirectorySetting” ? the MS page 404s and powershell no longer recognizes the Beta, I can’t find a Get-MgDirectorySetting in the new one.
LikeLike