
Message Encryption is a powerful component of Microsoft Purview that enables your users to send encrypted email. In this article, I explain how to configure message encryption, which licenses are required, and what the differences are between the standard and advanced variants.
Version History and blockers
Purview Message Encryption (PME) is a successor to the product Outlook Message Encryption (OME) and exists alongside the product IRM in AD RMS (Information Rights Management in Active Directory Rights Management Services), which is an on-premise service and only works for internal recipients.
Do note however, that if you’re using hybrid identities (identities that are synced from your on-premise environment to Entra ID) and you also utilize AD RMS, Purview Message Encryption cannot be used.
Also, if you want to utilize Bring Your Own Key (BYOK) to setup a customer-managed key to protect your mail messages there are a few prerequisite steps you should take care of before configuring Purview Message Encryption. This article however, makes use of a Microsoft Managed Key for the setup.
Licensing
To be able to use Microsoft Purview (Advanced) Message Encryption, you have to have one of the following licenses:
| Purview Message Encryption | Purview Advanced Message Encryption |
|---|---|
| Microsoft 365 E5 | Microsoft 365 E5 |
| Microsoft 365 Purview Suite (formerly M365 E5 Compliance) | Microsoft 365 Purview Suite (formerly M365 E5 Compliance) |
| Microsoft 365 E5 Information Protection and Governance | Microsoft 365 E5 Information Protection and Governance |
| Microsoft 365 E3 | |
| Microsoft 365 F3 | |
| Microsoft 365 Business Premium | |
| Enterprise Mobility + Security E5 | |
| Enterprise Mobility + Security E3 | |
| Azure Information Protection (AIP) Plan 1 |
How does Microsoft Purview Message Encryption work?
Let’s take a look at how Microsoft Purview Message Encryption works its magic. PME uses 3 components from which two are mandatory and one is optional:
| Component | Explanation | Mandatory/Optional |
|---|---|---|
| Rights Protection (RMS) template | Sets the usage rights for the recipient of the message. Examples are encrypt (message and attachments stay encrypted) or do not forward (message and attachments can not be forwarded). Azure RMS stands for Azure Rights Management Service. Azure RMS is part of Microsoft Purview Information Protection (MPIP), which in turn is built on Microsoft Azure Information Protection. | Mandatory |
| Branding Template | Applies your companies look and feel to your PME portal and accompanying wrapper mail. Also controls how recipients can login to the portal. Most importantly, controls how recipients can read those messages. Examples are inline (using Microsoft Outlook) or using the PME Portal. | Optional |
| Trigger | A trigger makes sure that message are routed through Purview Message Encryption so the Rights Protection (RMS) template and optionally the branding template are applied. | Mandatory |
Now that we got the components figured out, let’s start by creating a simple trigger (in this case, pressing the ‘encrypt’ button in Outlook) that applies only the default rights protection template ‘Encrypt’ to mail messages sent to specific people.
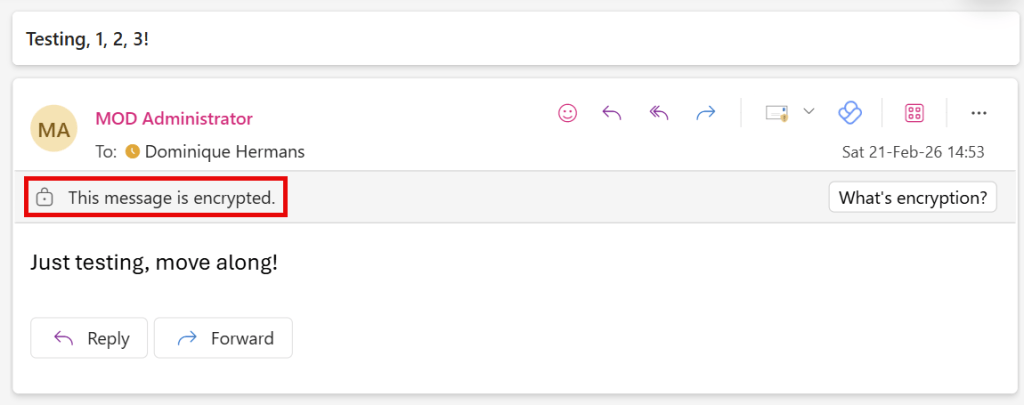
In this scenario, the message is sent from my Microsoft 365 tenant to an external recipient who also uses Microsoft 365. Because all Microsoft 365 users, as well as Outlook.com (formerly Hotmail) users, can communicate directly with Microsoft Azure RMS, the recipient can use Azure RMS to verify that the message was sent to the correct user by authenticating the user, in this case Dominique Hermans. As a result, the message is displayed inline in Outlook, appearing just like a regular, non encrypted email message.
The rights protection template ‘Encrypt’ is responsible for showing the banner stating ‘This message is encrypted’. This means that the message stays encrypted and doesn’t leave Microsoft 365.
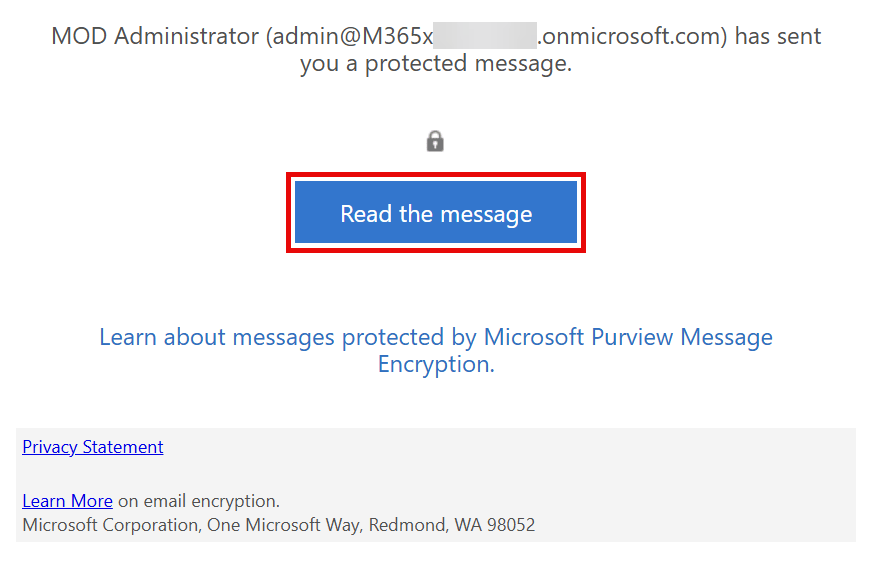
Now, when I sent a message to a non-Microsoft 365 recipient (for example somebody using Gmail or Yahoo mail) the behavior is somewhat different. Since this recipient cannot communicate directly with Microsoft Azure RMS to verify whether he or she is the intended recipient by authenticating the recipient, he/she receives a wrapper mail asking the user to read the message in a secure portal which is called the Purview Message Encryption portal.
Adding Branding templates to the equation
In the previous example, the wrapper mail that asks the recipient to read the message in the Purview Message Encryption Portal is added by a branding template. In this specific case, since we didn’t specify a branding template in the trigger, the default branding template called ‘OME Configuration’ was responsible for this behavior. But remember, the branding template was only triggered because the recipient wasn’t able to communicate directly with Azure RMS.
We can gain greater control over messages sent using Microsoft Purview Message Encryption by requiring all recipients to always access messages through the Purview Message Encryption portal. This can be achieved by applying a branding template to our trigger. However, Purview (Regular) Message Encryption supports only a single branding template, the default template. This limitation significantly reduces flexibility, as all wrapper emails and PME portals used must share the same configuration, including corporate branding and the authentication method used to access the portal.
And this is where Purview Advanced Message Encryption comes in.
What are the differences between Purview Message Encryption and Purview Advanced Message Encryption?
Microsoft Purview Advanced Message Encryption gives you more control over mail messages that are being sent to recipients. It enables you to:
- Create multiple branding templates to control the end user (recipient) experience on a more granular level.
- Adds the following controls for encrypted mail messages made available through the Purview Message Encryption portal:
- The ability for users and administrators to revoke messages
- The ability to let messages expire after a certain amount of time
It is important to note that you can only revoke messages and apply expiration dates to messages that users receive through the PME portal. In other words, email messages that have a branding template applied.
When we put that in a few graphics, the differences between both the regular and advanced editions of Purview Message Encryption are more clear.
Purview Message Encryption (Standard)
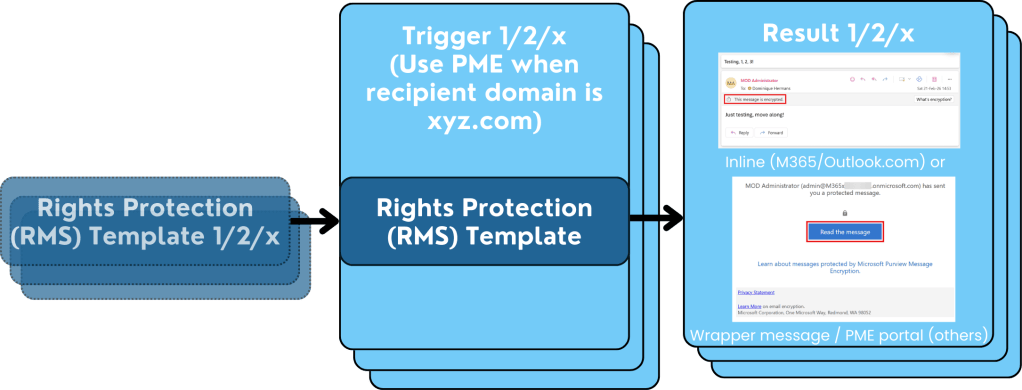
So, the first option we have when using the standard variant of Purview Message Encryption is to use one of the available Rights Protection (RMS) templates (for example encrypt, do not forward, or custom made) without a branding template.
We can add different Rights Protection Service (RMS) templates to different triggers. This way, it’s possible to send mail messages with different Rights Protection (RMS) templates, to different recipients, based on the conditions you set in the trigger.
Since we don’t specify a branding template, the recipient receives an inline experience when using Microsoft 365 or Outlook.com, or a wrapper message linking to the PME portal when using a different mail service.
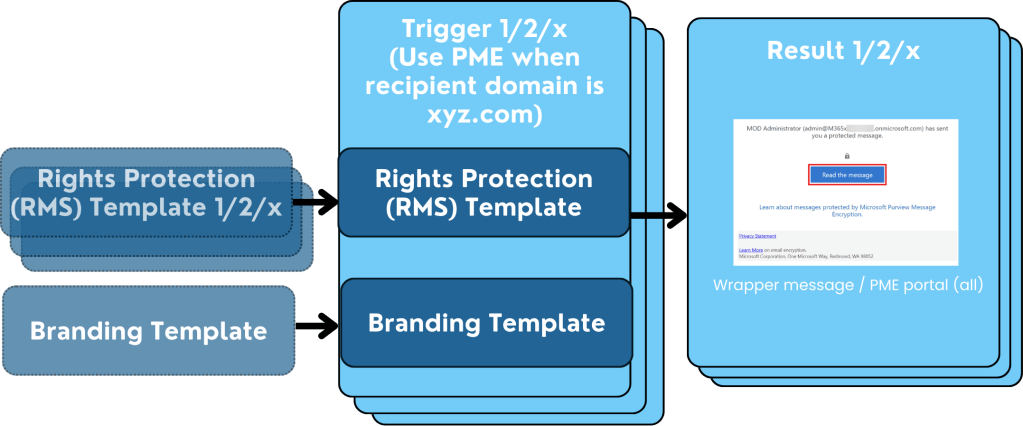
With Purview Message Encryption (Standard) we receive the ability to add (and customize) 1 branding template. This adds to the solution without a branding template above, the possibility to always let a recipient access your secure message using the PME portal. There is however, no possibility to use a different branding template for different recipients.
Purview Advanced Message Encryption
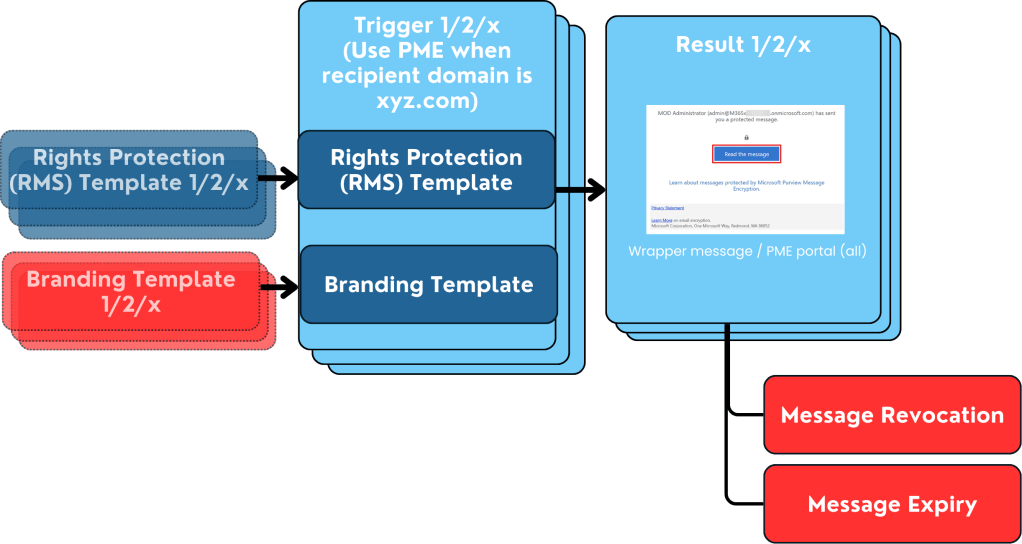
Enter Purview Advanced Message encryption. In the image above, I have indicated in red what the advanced variant adds on top of the standard variant of Purview Message Encryption. As you can see, we now have the ability to create multiple branding templates for different recipients. This gives us the opportunity and flexibility to use different branding styles and options for different recipients.
Also, the advanced variant makes it possible to revoke and expire messages that are sent with a branding template, and thus accessed via the PME portal. This gives an organization much more control over the messages send securely.
Do note that when a user uses the ‘encrypt’ or ‘do not forward’ buttons in Microsoft Outlook or Outlook for the Web (OWA), it uses the Rights Protection (RMS) Template with the same name and the default branding template ‘OME Configuration’. This is the case in both standard and advanced variants of the service!
With that said, let’s dive into the configuration part, so I can explain the rest of the details of this solution on the way!
Prerequisites
Most of Purview Message Encryption components are configured using the ExchangeOnlineManagement and AIPService PowerShell Modules. Install them both using the following cmdlets. I recommend using at least PowerShell 7.5 to ensure everything is running smoothly:
Install-Module ExchangeOnlineManagement, AIPService
The only prerequisite Purview Message Encryption has (besides having the correct license) is that you have the Azure Rights Management service enabled in your tenant. This will be automatically enabled in most cases. You can check whether it’s enabled with the following PowerShell cmdlet:
Import-Module AIPService
Connect-AipService
Get-AipService
If the output says ‘enabled’, you’re good to go. A status of disabled means the Azure Rights Management service is not yet enabled. You can try running ‘Enable-AIPService’ to start the service.
Next, let’s verify the current Microsoft Purview Message Encryption configuration using Exchange Online PowerShell. Be sure to use email addresses that are both available in your tenant:
Connect-ExchangeOnline
Test-IRMConfiguration -Sender userA@yourdomain.com -Recipient userB@yourdomain.com
Your results should look like this:
Results : Acquiring RMS Templates ...
           - PASS: RMS Templates acquired.  Templates available: Encrypt, Do Not Forward.
       Verifying encryption ...
           - PASS: Encryption verified successfully.
       Verifying decryption ...
           - PASS: Decryption verified successfully.
       Verifying IRM is enabled ...
           - PASS: IRM verified successfully.

       OVERALL RESULT: PASS
If the cmdlet fails with error message ‘failed to acquire RMS templates’, be sure to consult the following section on Microsoft Learn.
Component 1 in detail: The Rights Protection (RMS) Template
When it comes to Rights Protection (RMS) templates, you get 2 out of the box. The ‘encrypt’ and ‘do not forward’ templates. You also have the possibility to configure your own templates. This is however out of scope for this article.
Encrypt Only applies encryption to the email and attachments so the content is protected in transit and at rest, but it does not restrict what recipients can do with the message.
Recipients can read, reply, forward, copy, and print the email after it is decrypted, making this option suitable when confidentiality is needed without usage restrictions. It makes sure however, that the recipient is indeed the intended recipient of the message by authenticating the recipient using the inline or PME portal experience. If you want to learn more about the encrypt only option, see the following Microsoft Learn Page.
The do not forward option also makes sure the recipient is authenticated, but in addition applies a set of usage rights that make that the message can’t be forwarded. For more information on the do not forward option, check out the following Microsoft Learn Page.
Component 2 in detail: The branding template

Let’s login to Exchange Online using the ‘Connect-ExchangeOnline’ cmdlet. Now, when we run ‘Get-OMEConfiguration’, we see that only the default branding template called ‘OME Configuration’ is present.
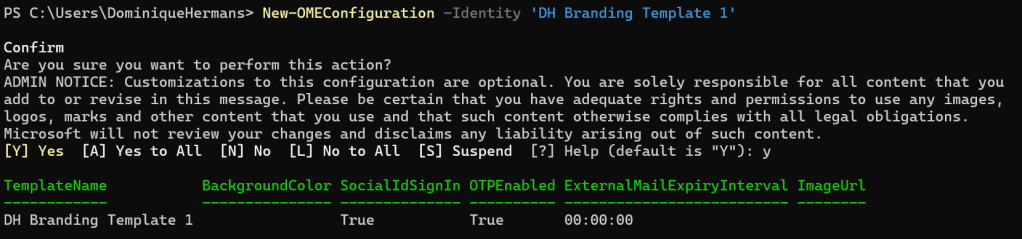
Let’s create a new branding template using ‘New-OMEConfiguration -Identity NameOfYourNewBrandingTemplate’. You can see that you are being notified that you are responsible for all content that you add to your template. Let’s dive into the various properties we can set for our branding template.
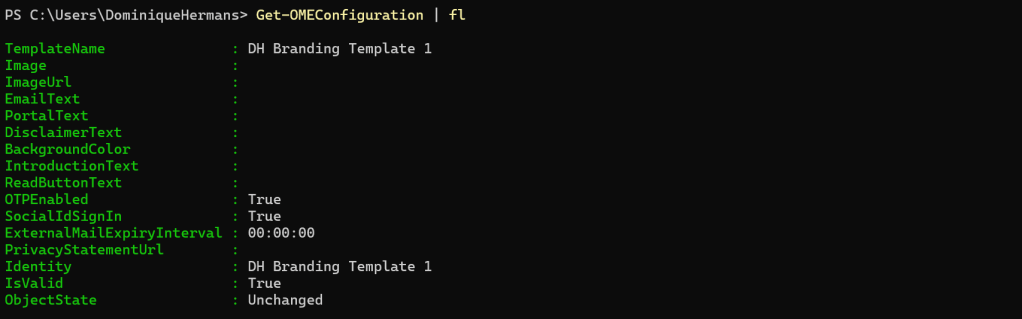
As you can see, we can set different properties for the branding template, ranging from branding properties (what’s in a name, right 😊) to properties that configure how recipients of your secured mail message can login to view the message. Note that branding applies to both the PME portal itself as the wrapper mail message a recipient receives. Let’s take a look at the options.
PME Portal and wrapper mail message branding
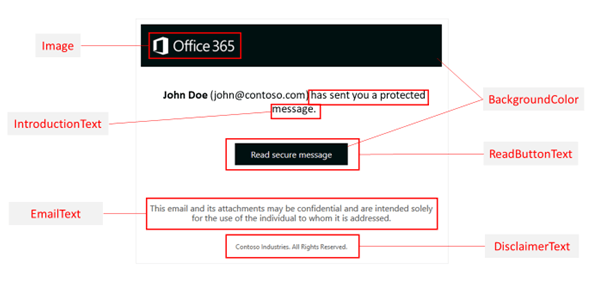
As one would expect of a branding template, a lot of options have to do with -you guessed it- branding. The component names in the example wrapper mail message above correspond with the available properties of the branding template configuration. Note that there are specific requirements for images, which you can find at Microsoft Learn. The one that’s not mentioned in the graphic above is ‘PortalText’, which is the text that is on the top of the PME portal.
OTP (One-Time Password) Sign-in
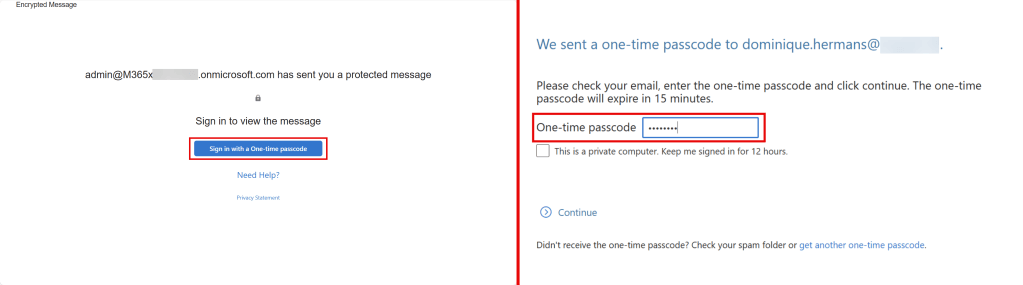
When OTP (One-Time Password) sign-in for your branding template is enabled, you allow the recipient to sign in with a one-time password that is sent to the recipients mailbox. Currently, there are no other options available. This provides us with something to think about. How secure is a secure email service when the OTP is sent to the exact same mailbox as where the wrapper mail was sent to?
This is a major difference with other secure e-mail service providers, which often offer support for OTP using a text message or via other available channels. This is also often combined with multifactor authentication support, where the accounts password has to be used in conjunction with a code that is shared with the recipient over text message or other (more secure) means. Unfortunately, Purview Advanced Message Encryption lacks this functionality at the moment. There is however, a Microsoft-native solution that does add this functionality that can be added to PME, which I’ll talk about later in this deep dive.
This is how it looks when a recipient receives an PME email that is set up for OTP:
Social ID Sign-in
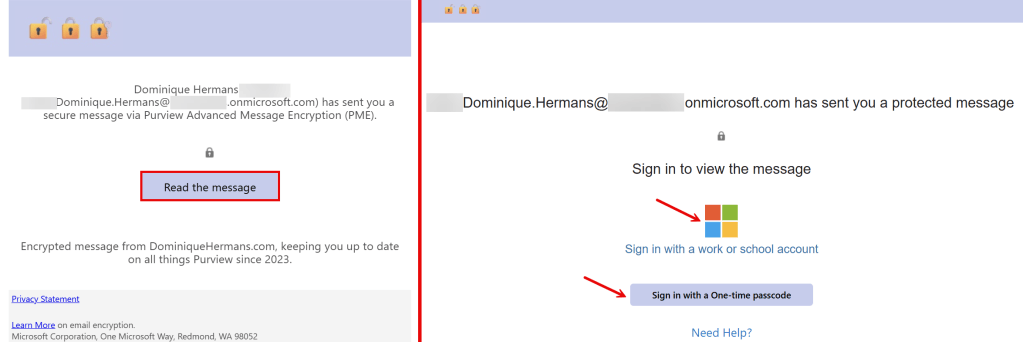
Besides OTP sign-in, it is also possible to provide the recipient with social ID sign-in options. Social ID sign-in options that are currently available are Microsoft, Yahoo and Google. The service automatically selects one of the above sign-in options based on the email service used by the recipient.
In the following example you can see how it looks when a recipient receives an PME email that is set up for both OTP and Social ID sign-in options. Besides the sign-in options being available, the PME wrapper email and portal are modified using branding:
External Mail Expiry Interval
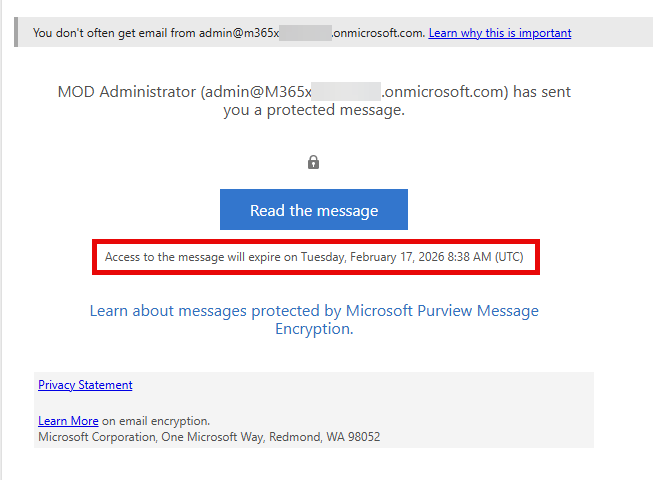
Another feature of the branding template is the ability to set a mail expiry interval for external recipients. This is done using the following cmdlet:
New-OMEConfiguration -Identity "DH Branding Template" -ExternalMailExpiryInDays 7
The recipient is informed that the message will expire at a certain date and time:
Component 3 in detail: The ‘Trigger’
Messages that are sent by users in your organization can be routed through Microsoft Purview Message Encryption in 1 of 3 ways:
- By using Exchange Transport rules
- By using Purview Data Loss Prevention (DLP) rules
- Manually, by users enabling it using the ‘Encrypt’ button in Microsoft Outlook or Outlook for the Web.
Let’s dive into each of these options:
Routing messages through PME using Exchange Transport Rules
Exchange Transport Rules can be created using the PowerShell ExchangeOnlineManagement module. Let’s take a look at the following example:
New-TransportRule -name "Mail Sent to Partner Organization" -FromScope "InOrganization" -ApplyRightsProtectionTemplate "Encrypt" -ApplyRightsProtectionCustomizationTemplate "DH Branding Template 1" -RecipientAddressContainsWords 'dominique.hermans'
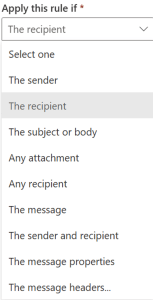
As you can see, the above PowerShell command creates a new transport rule that applies the rights protection template “Encrypt” and branding template “DH Branding Template 1” (here referred to as RightsProtectionCustomizationTemplate). Using a transport rule, we are able to specify when both the rights protection and branding template are applied to a message. In the above example the transport rule is set up to trigger when a message is sent from inside the organization to a recipient that contains the words ‘dominique.hermans’.
Ofcourse, there are other options available here, which are shown in the graphic on the left. If you would like to see the full list of options available, you can take a look at the following Microsoft Learn page.
Routing messages through PME using Purview Data Loss Prevention (DLP) rules
The second option is to use Purview Data Loss Prevention rules. Here, the options are (almost) endless:
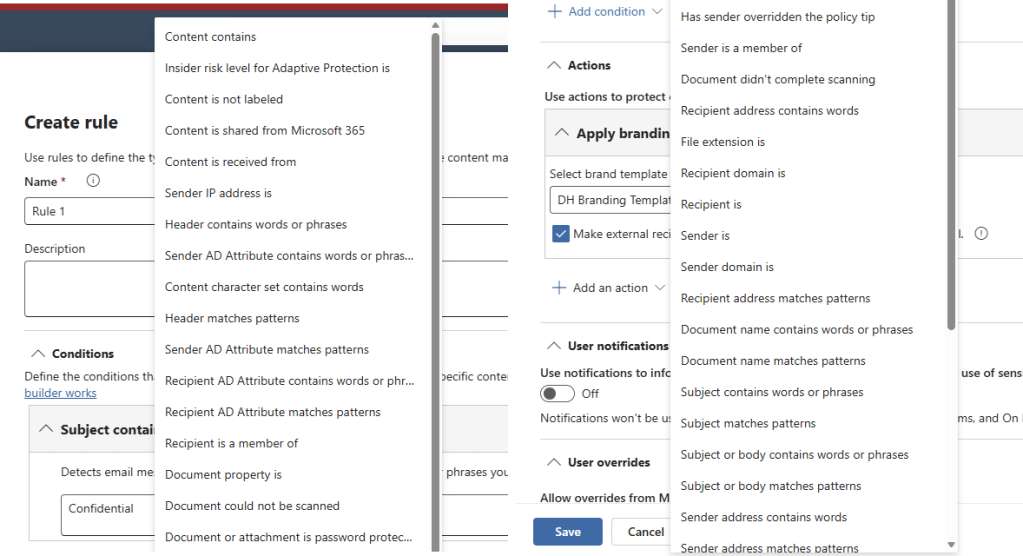
Navigate to Purview, Data Loss Prevention, Policies and create a new rule and select the “Exchange” workload. Select all users you want to include in the policy. When reaching the policy rules screen, create a new rule.
Under conditions, you can select any of the above options. For example, choose ‘subject contains’ and type ‘confidential’ for example. You can add more conditions if you’d like.
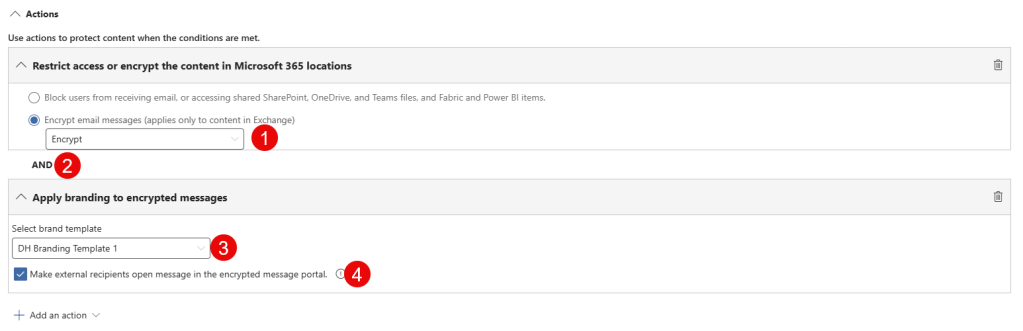
Next, under actions, select ‘restrict access or encrypt the content in Microsoft 365 locations’ and choose ‘Encrypt email messages’ and select the ‘Encrypt’ template (1). Add the ‘apply branding to encrypted messages’ action and select the desired branding template (3).
Now, using DLP policies, you can force external recipients to use the encrypted message portal (4) which allows you to do message revocation and message expiry, as explained above.
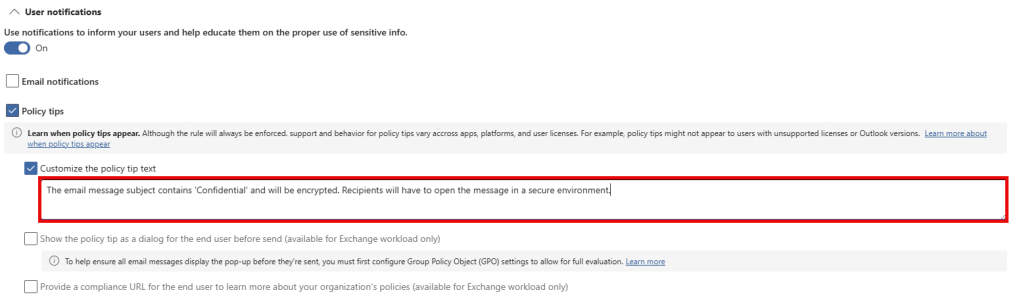
Because the Outlook client (either web or desktop) can show policy tips, you can inform the user of what’s happening before the message is even send. Turn on ‘user notifications’ and enable ‘policy tips’. Customize the policy tip text into something like “The email message subject contains ‘Confidential’ and will be encrypted. Recipients will have to open the message in a secure environment”. Of course, adjust to your liking.
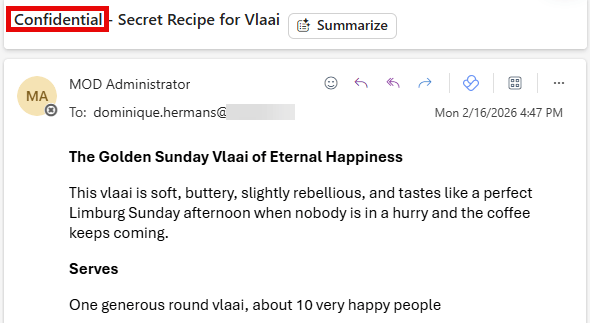
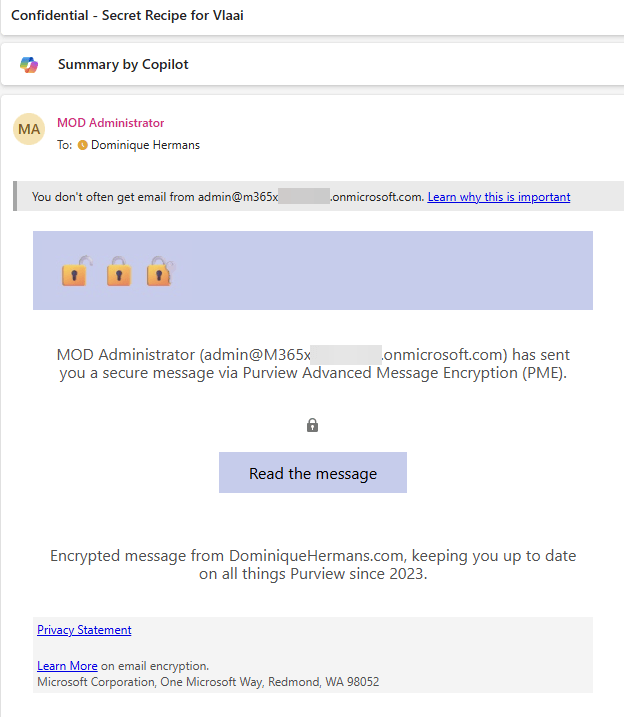
Let’s take a look what happens when this DLP policy is in effect. When someone sends the message above, the recipient gets a wrapper message as shown below that will take the recipient to the PME portal:
Manually routing messages through PME
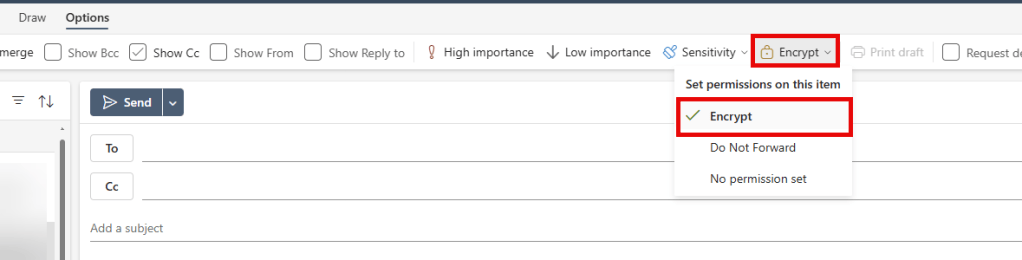
Users can also click the ‘Encrypt’ button in Outlook and select one of the published encryption templates. However, this approach has a limitation: these buttons always apply the default branding template and therefore never invoke the PME portal, which significantly restricts our control over email message settings.
Removing the Outlook ‘Encrypt’ and ‘Do not forward’ buttons
Because the Outlook buttons cannot force external recipients to use the encrypted message portal, we have the option to remove them. You can do so using the following command:
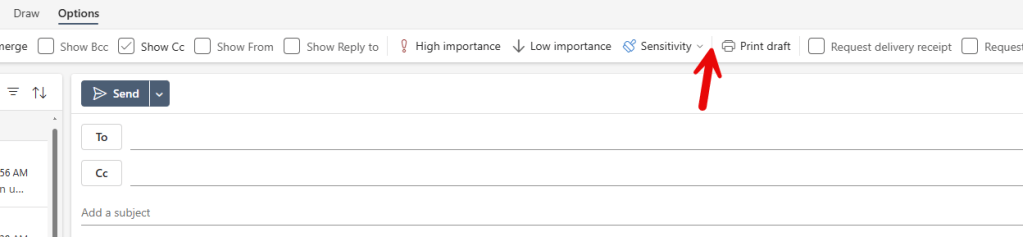
Set-IRMConfiguration -SimplifiedClientAccessEnabled $false
Now, let’s see the result.
Before disabling simplified client access:
After disabling simplified client access:
Revoking messages
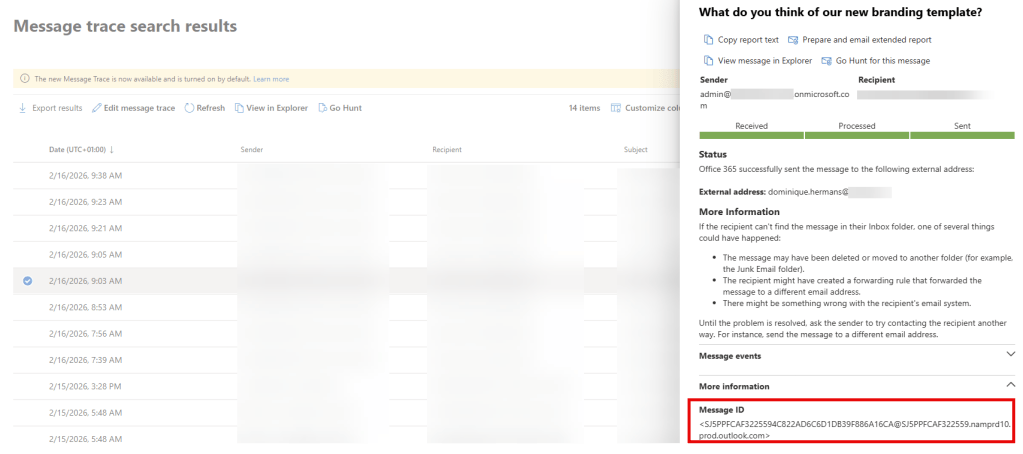
To revoke a message using PowerShell, we have to get it’s message ID first. This can be done in many ways, however the most simple way is to start a message trace and look for the message you’re interested in. Select it, and copy it’s message ID.

Now, use the following command to see whether the message is revocable (in other words, can only be opened by the recipient in the PME portal):
Get-OMEMessageStatus -MessageID "Enter-Message-ID-Here" | ft Subject, IsRevocable -Autosize

To actually revoke a message using PowerShell use:
Set-OMEMessageRevocation -Revoke $true -MessageID "Enter-Message-ID-Here"

To check whether the message is actually revoked, use:
Get-OMEMessageStatus -MessageID "Enter-Message-ID-Here" | ft -a Subject, Revoked
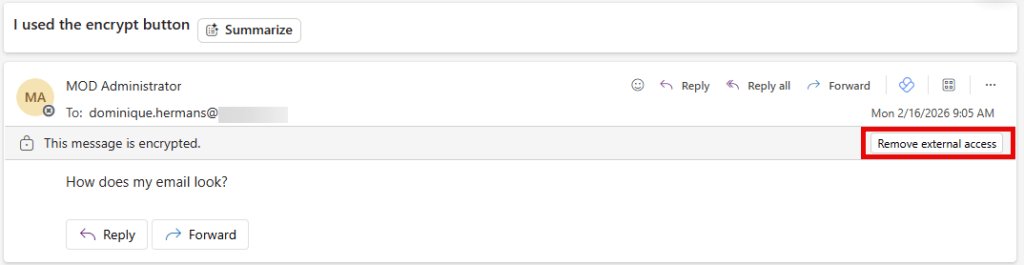
Users can also remove external access from revocable mail messages by navigating to their sent items, selecting the message and then click ‘Remove external access’.
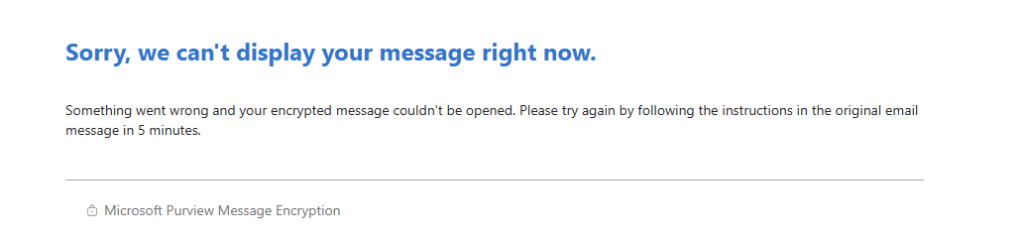
After revocation, the recipient sees a polite message saying the message can’t be displayed.
Auditing
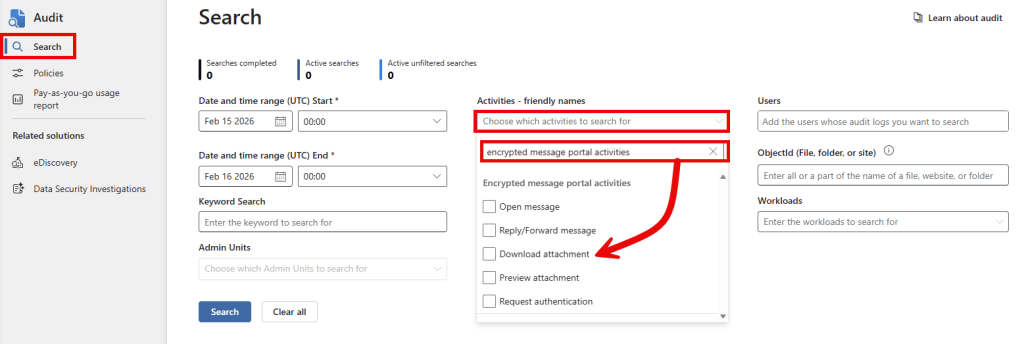
As with a lot of activities in Microsoft 365, also encrypted message portal activities are audited. They can be easily viewed by navigating to Microsoft Purview, Auditing. Under ‘Activities – friendly names’, select all activities under ‘encrypted message portal activities’.

As you can see in the image above, all user behavior is logged in the audit log.
What about forcing MFA?
Where do I configure MFA as mandatory? There are two ways to do this:
Simple: A DLP policy or Exchange Transport rule targeting specific domain(s) that enforces the use of social sign-in. In this case, the MFA requirement lies with the recipient.
Advanced: Through an Entra ID Business-to-Business (B2B) connection. This also lets you enforce MFA on your own organization’s side.
Unfortunately, at the time of writing this blog there is no native solution in the Purview Advanced Message Encryption product that can force usage of MFA.
Parting thoughts
That’s it, you can now call yourself an expert on setting up Purview Message Encryption! Hope you enjoyed this blog. See you next time!


